Note: If you're a Classic user, please log in to your account to access the dedicated Classic Help Center.
Do you use FreshMail but want to continue your email marketing in MailerLite? That’s an excellent idea! MailerLite gives you even more possibilities! From AI-based tools to multivariete testing options and advanced automation paths.
In this guide, we will take you through each stage of migrating your data to your MailerLite account:
Account registration in MailerLite.
Free trial period on the Advanced plan with plenty of advanced features to try.
Migrating data from FreshMail.
Choosing the best plan to suit your needs.
Closing the FreshMail account.
Using your MailerLite account.
What you need to know before migrating
What data will be migrated from my FreshMail account to MailerLite?
Subscribers: email addresses of all your subscribers found on the subscriber lists.
Subscriber lists: in MailerLite, these are known as Groups.
Custom fields: names of fields and the so-called declarative data contained in these fields, i.e. information that subscribers declare, most often when completing a subscription form. These include, for example, your name, date of birth, interests, or your sector.
Graphics: we will send the 50 most popular graphics in your account to MailerLite.
1 message and 1 subscription form template: we will reproduce one design each of the message and form of your choice. The designs will not be migrated automatically, but we will recreate them in your MailerLite account free of charge once we receive a request that you can send here.
What data will not be migrated?
Behavioral data: in MailerLite, we cannot reproduce the same behavioral data that was stored in FreshMail. Behavioral data is all the information collected about subscriber email activity, such as information on opened messages in campaigns or clicks on links. However, this data will be automatically collected in MailerLite based on the subscribers’ actions in campaigns sent via MailerLite.
Segments based on custom fields: if you have segments based on data from custom fields in FreshMail, these will not be automatically recreated in MailerLite. However, you can create them manually based on the automatically migrated additional fields. For this purpose, use the segment function, which gives you even more possibilities in MailerLite! Give them a try and learn how to create and use segments.
Reports: Your historical data from campaigns performed in FreshMail will not be transferred into your MailerLite account, but it will soon be possible to download it and keep it outside the system. We are working on a feature that will be available soon. With one click, it will allow you to export not only reports from campaigns sent from the start of 2022 but also to download subscribers from all lists if you want to access them outside MailerLite.
To find out more about migration, read the Frequently Asked Questions.
I want to set up an account with MailerLite. How should I do this?
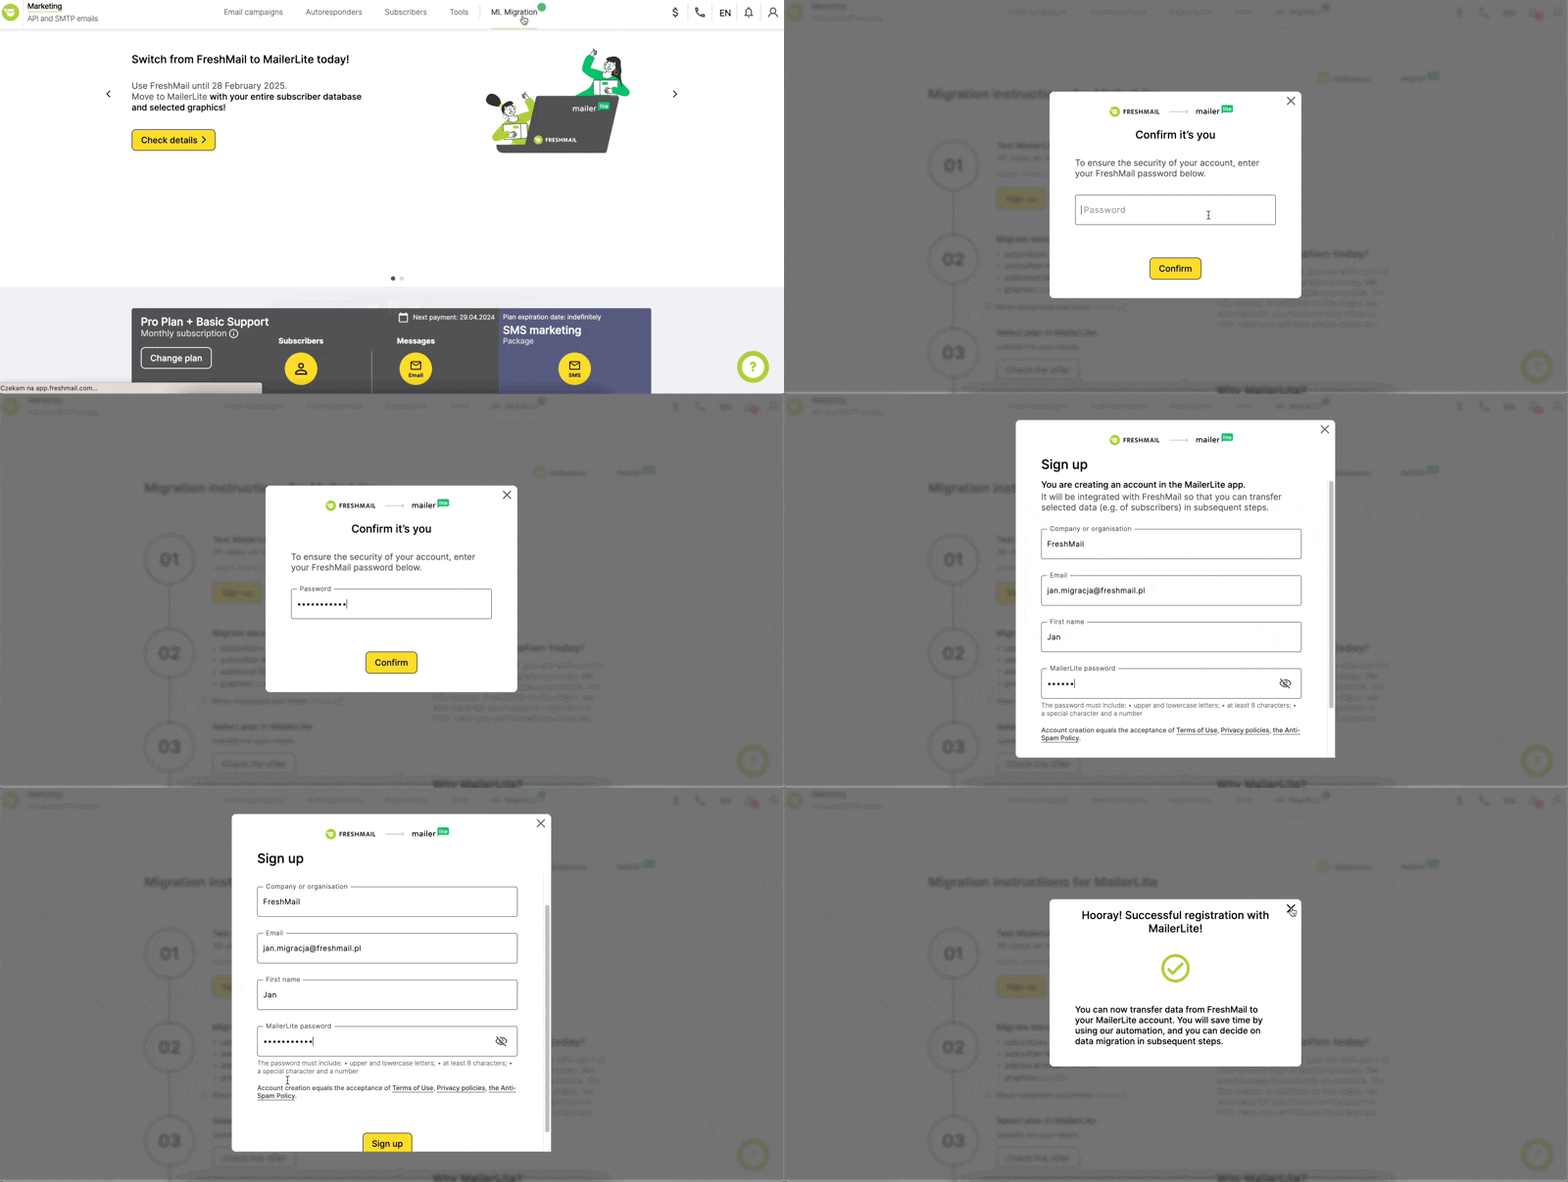
You can set up an account with MailerLite from your FreshMail account:
Log in to your FreshMail account.
In the top menu on the Dashboard, you will find a link to migration. Click on the Migration tab.
Select Register and then Create account.
For security reasons, confirm that you are the account owner by entering your FreshMail login password and click Confirm.
Register with MailerLite by completing the details in the form. You can create an account with MailerLite with the same login as in FreshMail, or you can choose a different email address that belongs to you.
Confirm your registration by clicking on the Register button.
I already have an account in MailerLite
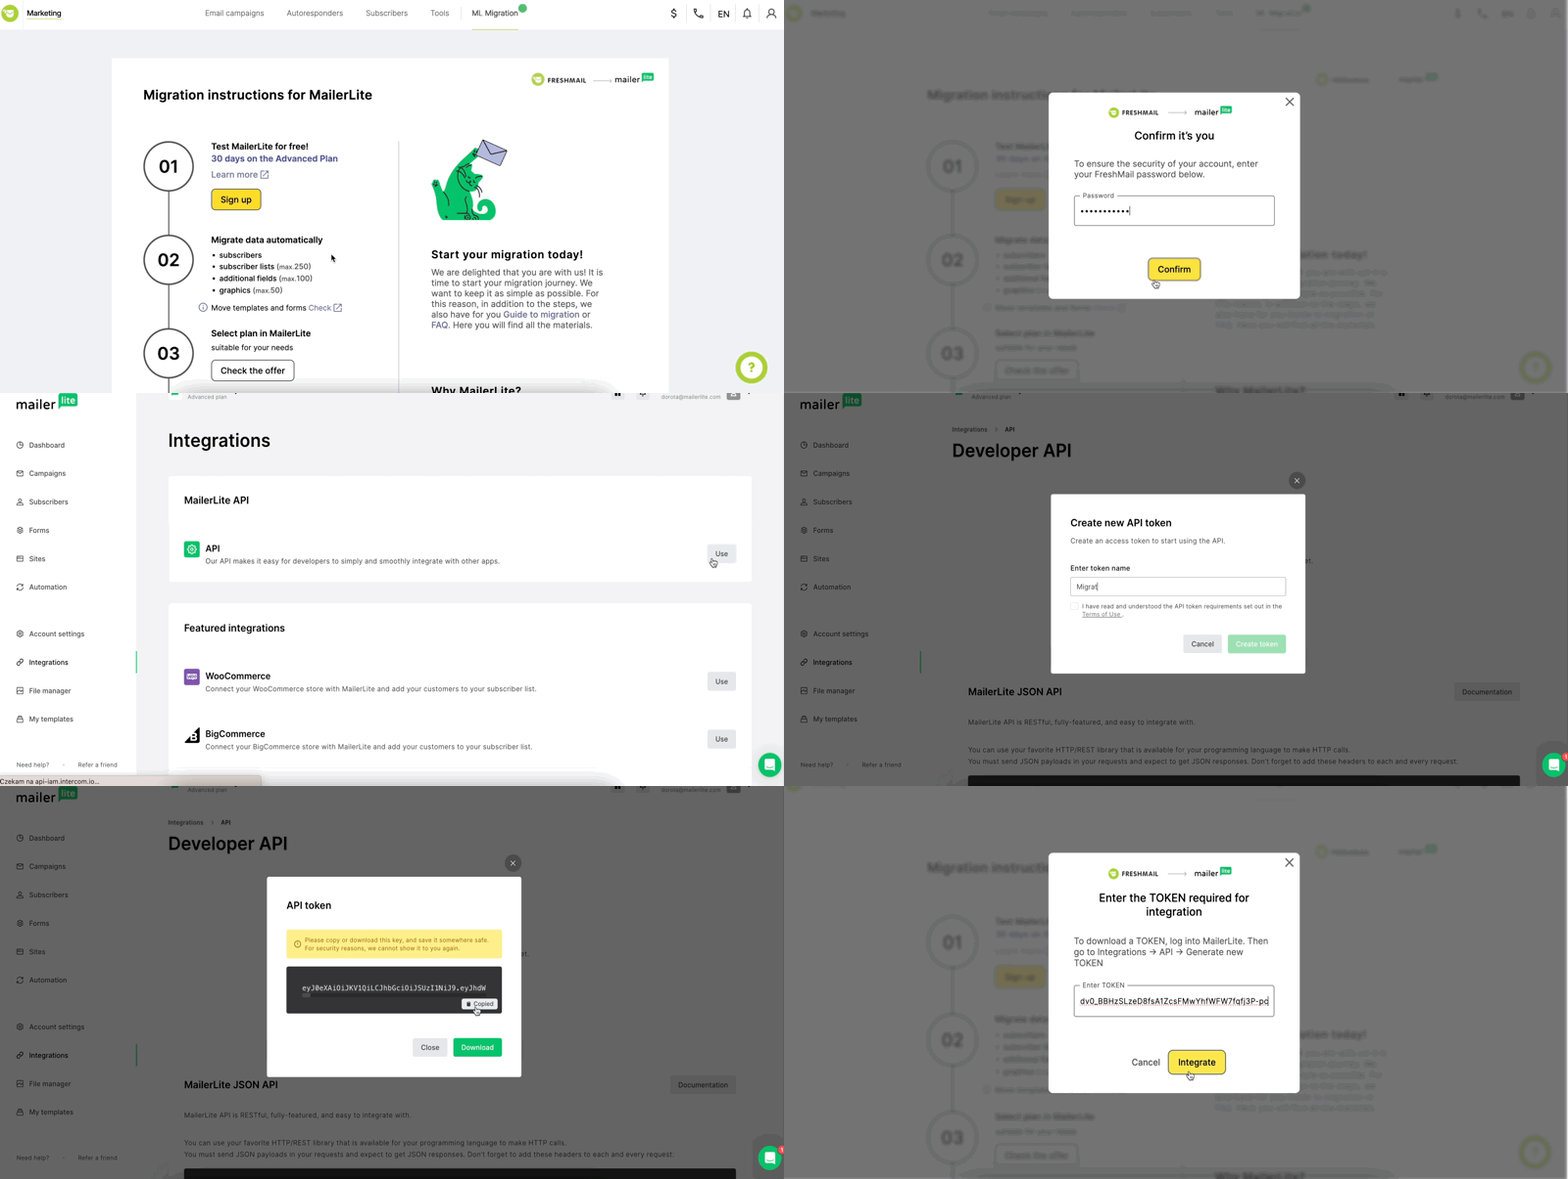
If you already have an account with MailerLite, follow the steps below to integrate it with your FreshMail account:
Log in to your FreshMail account.
In the top menu on the Dashboard, you will find a link to migration. Click on the Migration tab.
Select Register and then I already have an account.
For security reasons, confirm that you are the account owner by entering your FreshMail login password and click Confirm.
Enter the token required for integration. Download it from your MailerLite account under Integrations -> Verify -> API -> Generate new token.
After entering the token in the window in FreshMail, click Integrate.
Note: If you already have a MailerLite account set up directly from the site (instead of the Migration tab in FreshMail), be sure to go through the MailerLite account approval process in addition to integrating it with your FreshMail account. Only then will you get full access to advanced features, the ability to send campaigns or publish sites. See how to verify your account in MailerLite.
I want to test the possibilities of my MailerLite account
When you create a MailerLite account, you automatically get access to the advanced features of the Advanced plan for 14 days for free. Make sure to get the most out of this trial period!
An account with a 14-day Advance plan gives you the opportunity to test a number of useful features, including:
intuitive subscriber segmentation and grouping,
more than 100 ready-made email templates,
drag & drop email creator with AI Writing Assistant, a function to include surveys, quizzes, e-commerce blocks, blog posts, and much more,
AI subject line generator,
A/B testing of campaigns and multiple testing options,
the Smart Sending function, which will send campaigns to each subscriber separately at the time when they are most likely to interact,
form wizards: embedded, pop-ups and promotional forms,
page builders and landing pages,
advanced automation paths with ready-made scenarios and the option to create from scratch – just the way you want it!
The center of your subscriber preferences,
24/7 contact with the support team via email and chat,
telephone support (for accounts with 8,000 subscribers and above).
Find out more about the advantages of MailerLite.
Go to your MailerLite account and use the available features now.
Visit the MailerLite Knowledge Base and blog. This is where you will find instructions for using the system, tips, news, and industry-related posts. Instructions and guides that will be useful to you when you first start using the system can be found here.
Also take a look at what features you will have access to after the end of the free trial period on the Advanced plan.
I want to migrate my data from FreshMail to MailerLite
You can start migrating your data already during your 14-day MailerLite trial period.
Migration of subscriber data (email addresses, lists, custom fields)
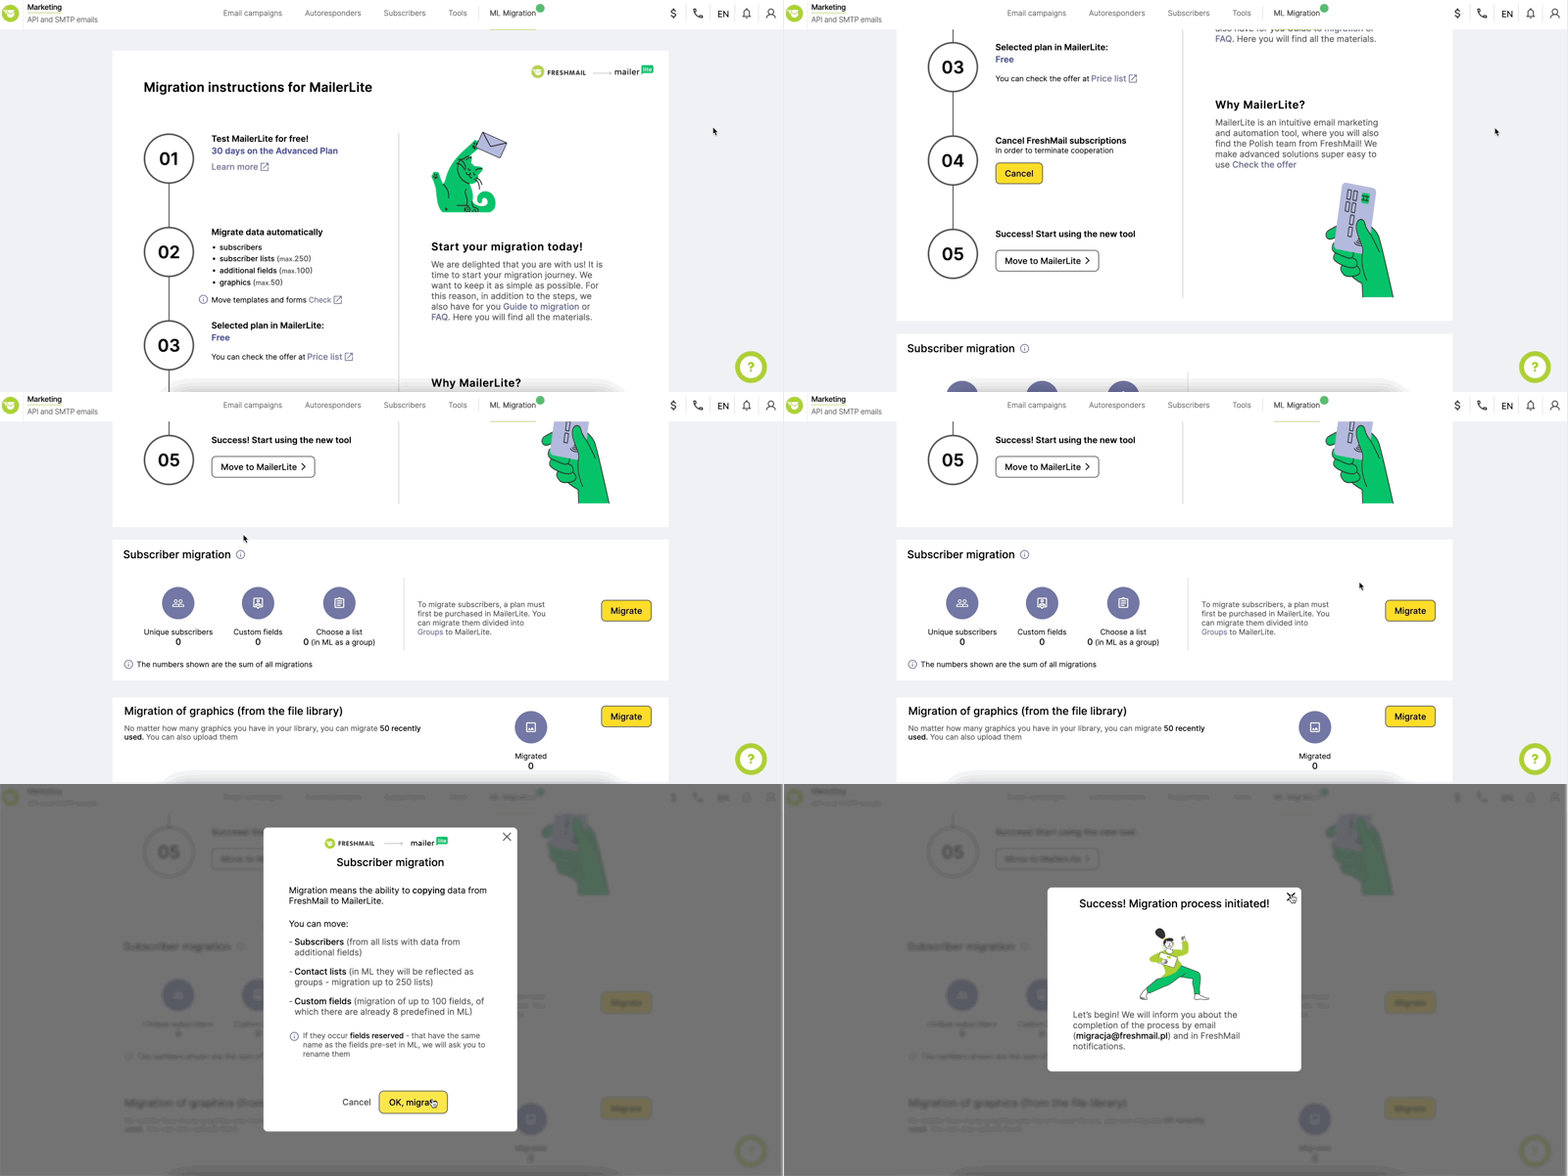
To migrate subscriber data:
Log in to your FreshMail account.
Go to the Subscriber Migration category. Click Migrate.
Read the information on the pop-up and click OK, migrate.
That’s it! You can close the confirmation pop-up, and the system will do the rest for you.
We will inform you by email once the subscriber migration is complete. This information will also be available in your FreshMail account.
You will find your existing subscriber lists from FreshMail in MailerLite under Subscribers -> Groups. Find out how to use groups.
What if there are new subscribers in my FreshMail account?
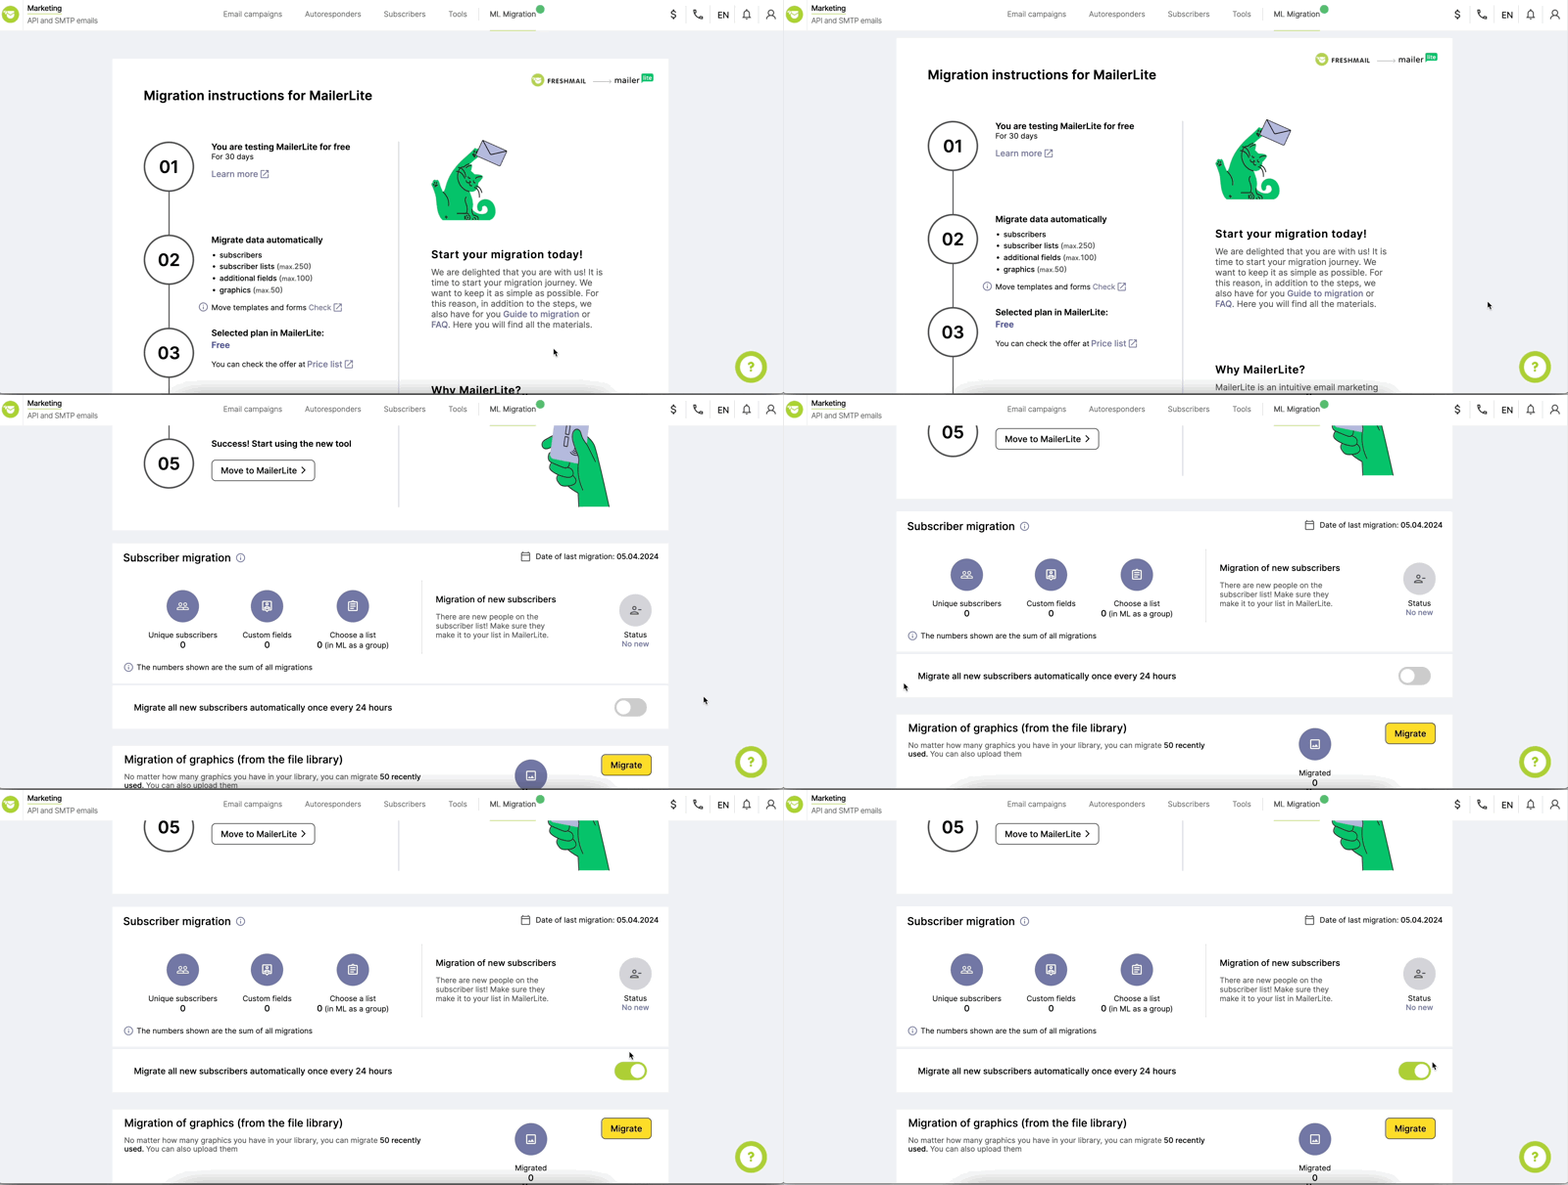
If your FreshMail account is linked to a subscription form active on the website or an external integration, and you expect that new subscribers may appear in your account, we have a solution for you. Take advantage of the Automatic Remigration option.
In your FreshMail account, go to the Migration tab.
Under the subscribers’ migration summary, activate the option Automatically remigrate.
Once every 24 hours, the system will automatically remigrate your data, and the new subscribers will be uploaded to your MailerLite account.
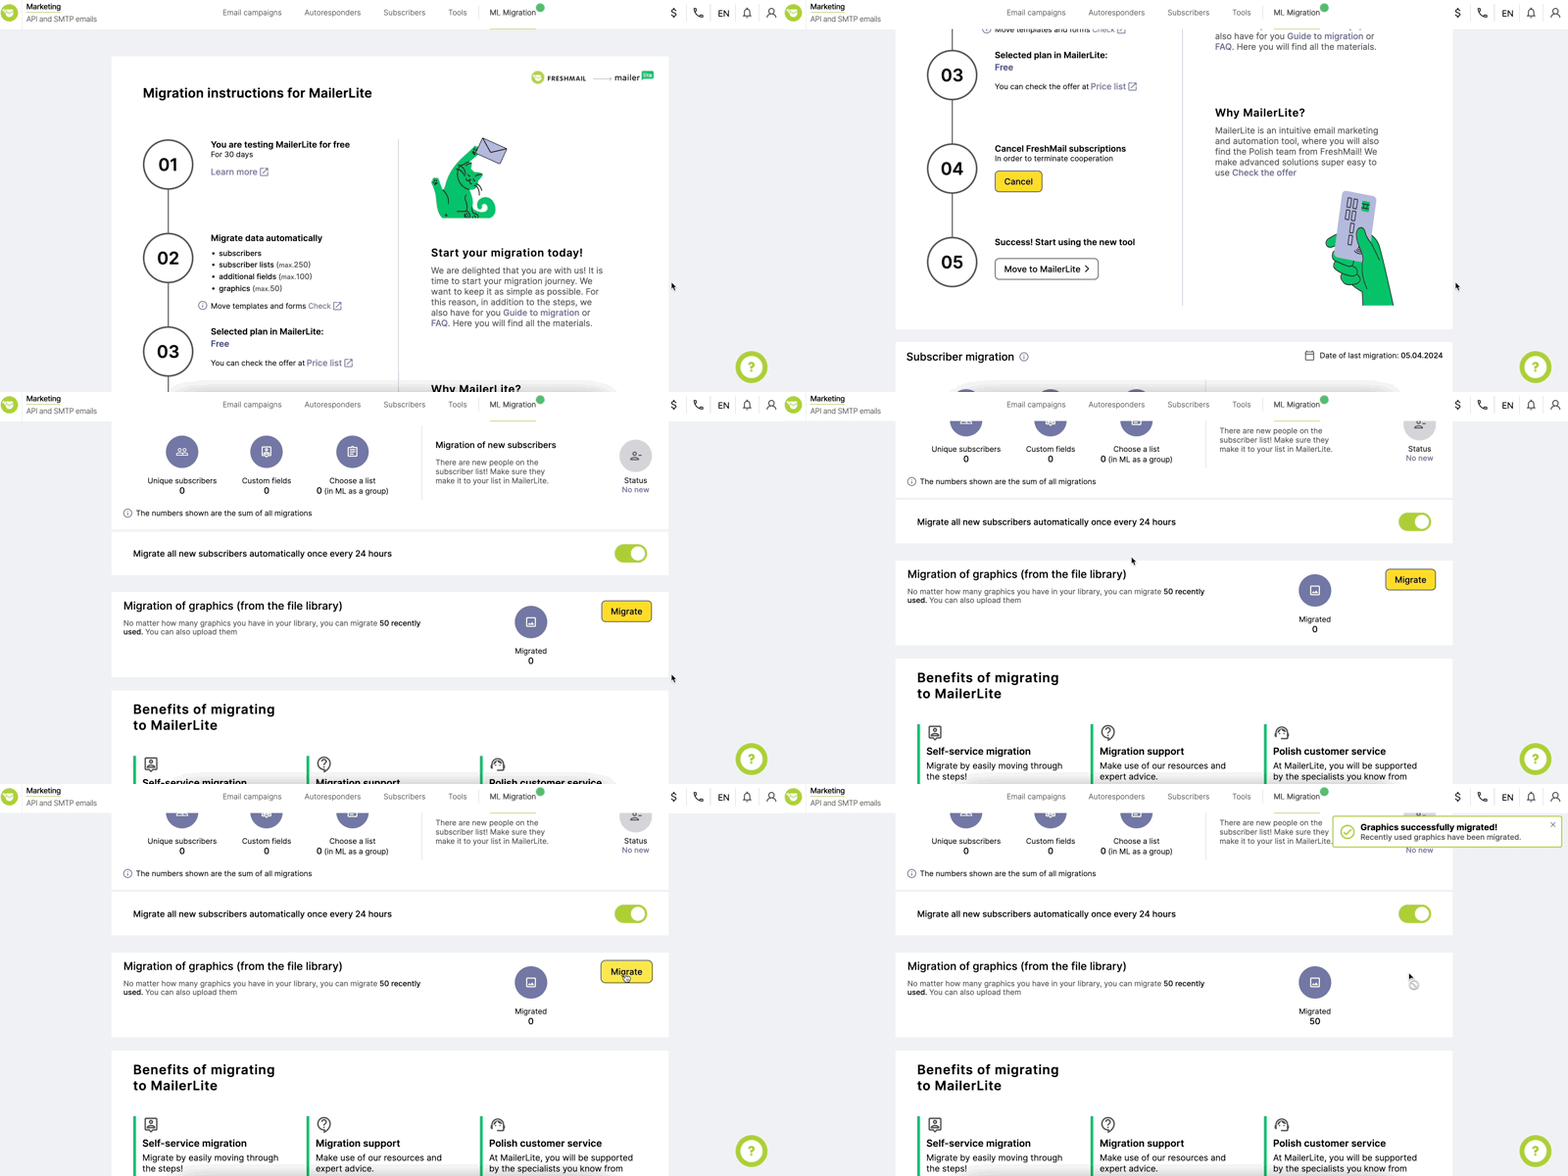
Migration of graphics from the FreshMail file library to MailerLite
If you have graphics in the File Library in FreshMail that you want to transfer to MailerLite, follow these steps:
In your FreshMail account, go to the Migration tab. There, you will find the category Graphics migration (from the file library).
Click Migrate.
That’s it! You will see a message on the screen confirming the migration of the graphics.
We will migrate the 50 most popular graphics on your account.
Migration of email template and subscription form; additional migration support
We are not able to automatically migrate all the data to your new account. However, to make your transition to MailerLite as simple as possible, we have set up a dedicated page where you can make a request.
To have us recreate your chosen email template and subscription form for free, commission additional projects, or find an expert to help you with other MailerLite activities, visit the website and fill out the form.
Our catalog and your MailerLite account are full of inspiration and ready-to-use templates. More than 100 designs for emails, landing pages, websites, and pop-ups are waiting for you.
My 14-day trial period will soon expire. I want to extend the validity of my MailerLite account
Once you’ve tested the possibilities of a MailerLite account, you can choose a plan that suits you. Choose the Advanced plan if you still want to have access to all the features available in your account during the trial period. You can also choose the Growing Business or the Free plan. Please refer to MailerLite pricing for details.
To purchase a plan:
Log in to your MailerLite account.
Head to the Settings tab and then Plan and billing.
Select a plan and complete the required Billing Information and Payment Method.
Once you have completed your details, confirm your purchase by clicking the Upgrade plan in account button.
Head to our knowledge database for information about plans and billing.
I want to close my FreshMail account
Once you have purchased a plan with MailerLite and all your data has been migrated, terminate your partnership with FreshMail. This will prevent you from incurring duplicate payments and keep you fully focused on developing your MailerLite activities.
Depending on whether you have a contract, subscription plan, or message package in FreshMail, the opt-out process may look different.
I have a contract with FreshMail
In your FreshMail account, go to the Migration tab. There, you will find the option “End collaboration with FreshMail.”
Click on the Contact button.
This will put you in contact with a FreshMail specialist who can terminate your existing contract and walk you through the process.
I have a subscription plan
In your FreshMail account, go to the Migration tab. There you will find the option “Cancel FreshMail subscription.”
Click the Cancel button.
The system will redirect you to the Manage Subscription tab. There, click on the Cancel subscription button.
In the cancellation form, state the reason for cancellation and click Next.
For security reasons, confirm that you are the account holder by entering your FreshMail login password, click Next and then Unsubscribe.

If you have a subscription that renews monthly, cancel it before the start of the new billing period so that the next payment is not charged.
If you have an annual subscription, you can cancel early. All you need to do is contact us at migracja@freshmail.pl. Our specialist will provide you with all the help you need. The unused amount from your subscription will be converted into monetary funds (so-called MailerLite credits) and added to your MailerLite account. You can then use these funds when making your next payment to buy a MailerLite plan cheaper.
I have the Pay as you go plan
Head to your FreshMail account.
On the dashboard, you will find the number of remaining messages and their expiry date.
You can use up the messages you already have before their expiry date or convert them into credits in MailerLite.
If you would like to switch to MailerLite without using up the messages you have bought in FreshMail, contact us at migracja@freshmail.pl. Our specialists will help you transfer the unused part of your plan to MailerLite. The unused amount from your subscription will be converted into monetary funds (so-called MailerLite credits) and added to your MailerLite account. You can then use these funds when making your next payment to buy a MailerLite plan cheaper.
You’re all set! I want to start using MailerLite
Now, all you have to do is log in to your MailerLite account to take full advantage of your plan’s features.
We also encourage you to take a look at the self-service customer center. There, you will find a wealth of material to guide you through the system, answer your questions, and point you to solutions.
Have fun using MailerLite!