12 secret MailerLite hacks to save time and enrich your emails
 Tautvydas and Migle, product team
We all have life hacks that we incorporate into our daily routines to make life easier (and better), like packing lunch boxes in the evening or removing scratches on wood with a walnut.
Yes, that walnut thing works!
Much like your favorite life hacks, there are some time-saving tricks you can employ in MailerLite that will help you work faster and smarter. We call them “Lite hacks”.
In this article, we’ll show you 13 Lite hacks you can use to simplify your email marketing routine so you can spend more time doing the things you love.
1. Create a button that adds subscribers to a group (without automation)
Use case: When you want a subscriber to join another email list by clicking a button, but you don’t want to redirect to an external web page.
Lite hack: Create a button that automatically adds subscribers to a group using the event block.
If you’ve used the traditional button block, you know that the button only appears if you add a destination URL. And to move people into a specific group, you have to create an automation that’s triggered when a subscriber clicks that URL.
You can skip the external link and the automation by creating an event button that automatically adds subscribers to a selected group, without the need for a destination URL and automation.
The event block contains a button—except this button is used for collecting RSVPs, and therefore, doesn’t require a destination URL.
By simply removing the content you don’t need, such as the heading and subtitle, you can hack the event block to make it look like a regular old button block—except you won’t need to add a URL.
Then add your design, some additional text or headings, and voila!
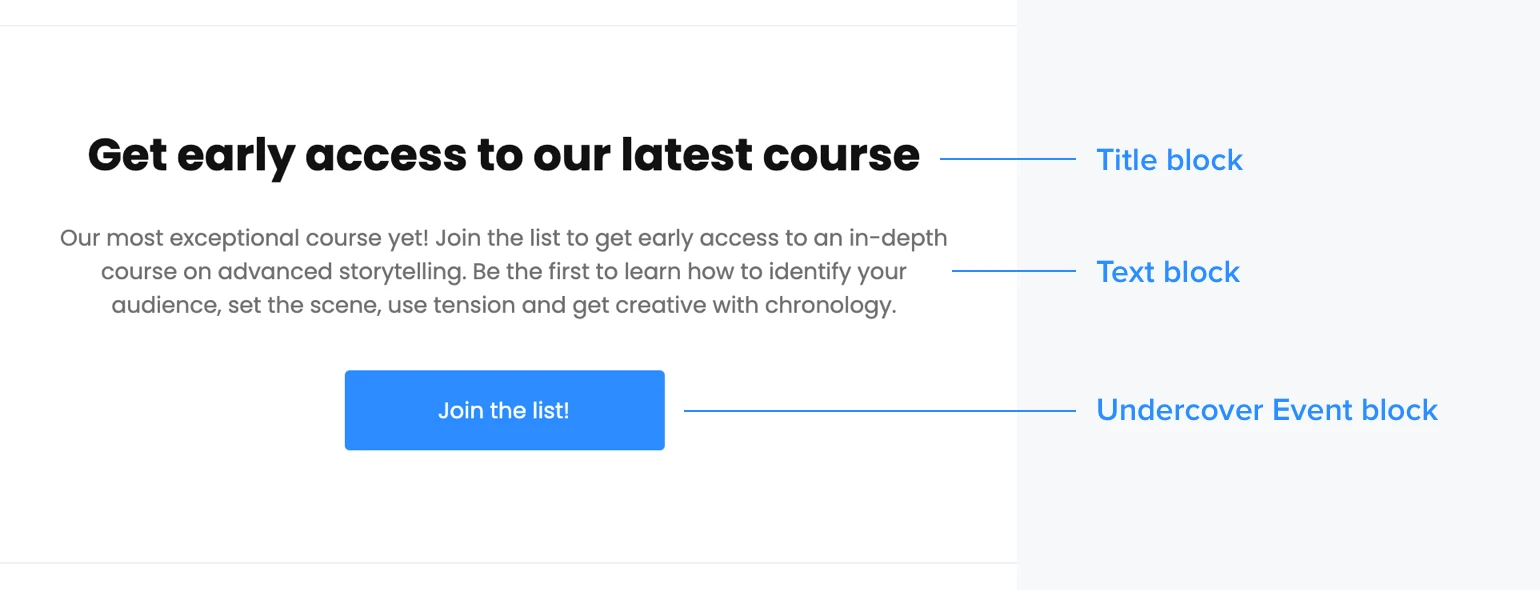
You’ll be left with an incognito CTA that, when clicked, will show subscribers a short success message and automatically add them to your selected group.
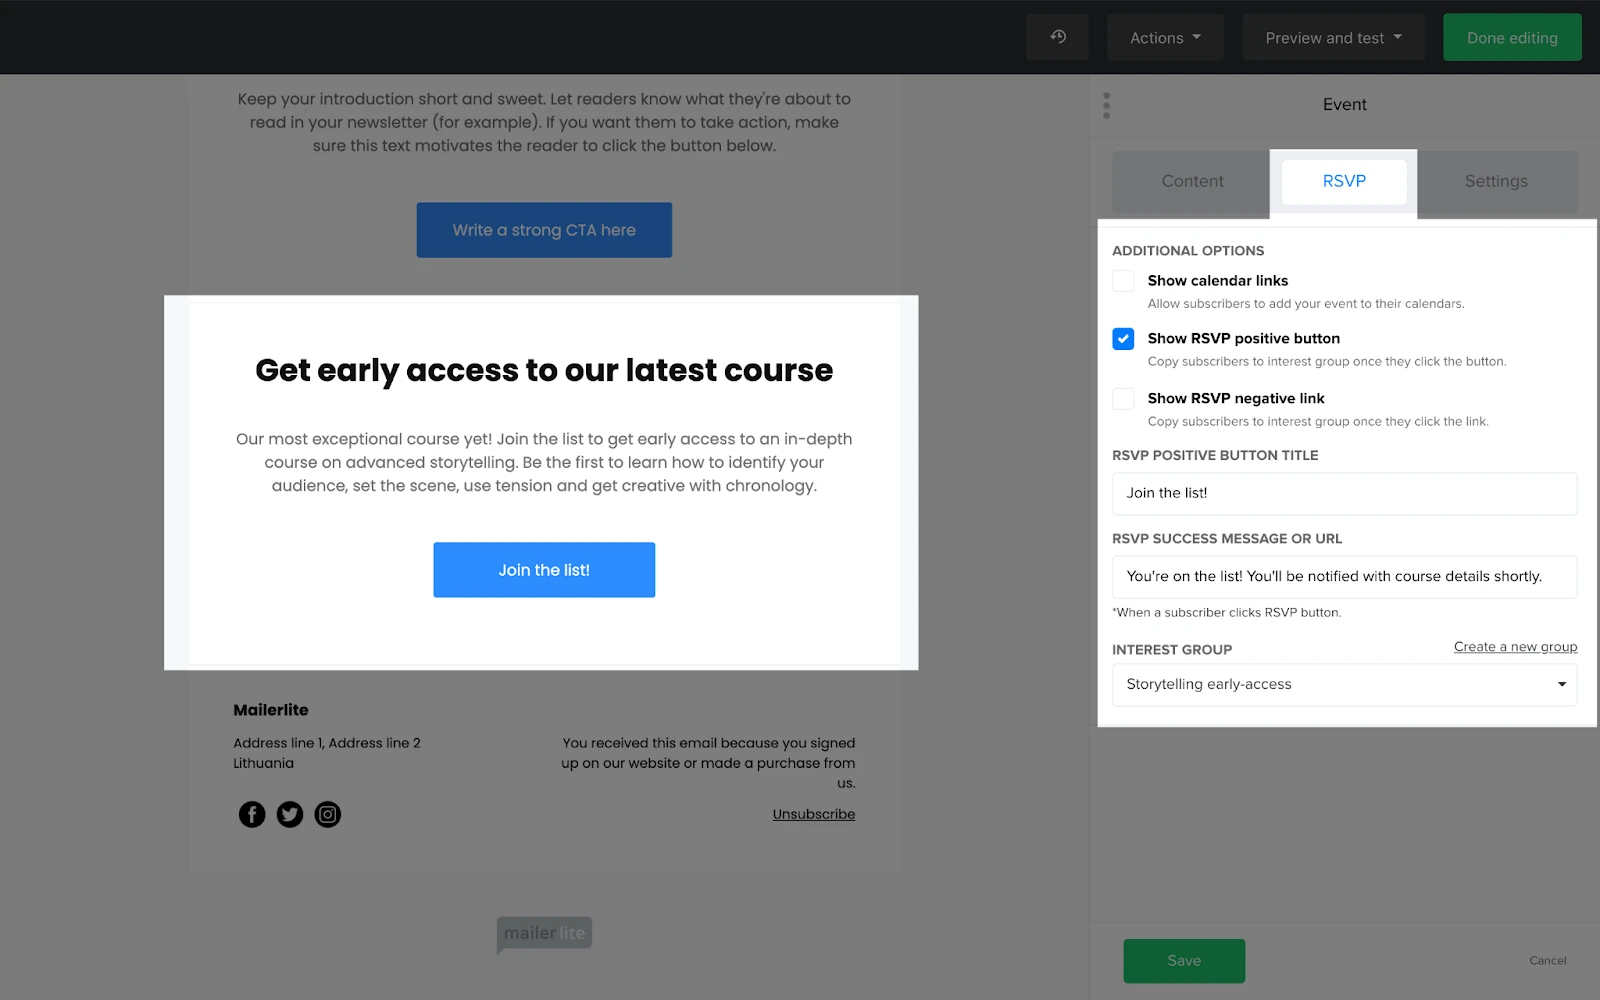
1. Drag and drop the Event block into your newsletter content.
2. In the right-hand sidebar, remove the default value from the Heading 1 and Subtitle fields.
3. In the RSVP success message or URL field, enter a success message you’d like subscribers to see after they click the button.
4. Click the RSVP tab and use the Interest group dropdown to select a group to which clickers will be added.
There’s no need to add a date, location or URL for this button to work. It’s really that easy. Just be aware that the RSVP block doesn’t work in test emails.
2. Turn your AI tool into an email marketing assistant
Use case: When you want to automate campaign tasks, get real-time optimization insights, or repurpose content instantly using AI.
Lite hack: Connect your MailerLite account to your favorite LLM (like ChatGPT or Claude) using the Model Context Protocol (MCP) server.
The Model Context Protocol (MCP) is a secure, no-code bridge that gives your chosen AI assistant (LLM) direct access to your real-time MailerLite data and campaign functions. This connection turns your LLM into a powerful AI email marketing workhorse that can execute tasks and analyze campaigns.
Here are some situations where MCP can help you speed things up:
Turn long-form content (like blog posts) into a draft email campaign in seconds
Share all your email content easily. Instantly collect all your newsletter’s web version URLs for sharing outside of MailerLite with a single prompt. Create a link for online sharing or create a QR code for offline distribution
Get actionable insights and optimization ideas based on real-time data, like "What can I do to increase my open rate?"
Improve your list health by identifying inactive subscribers and instantly draft a re-engagement campaign for them. Remove the subscribers who don’t engage to keep your list clean and up to date.
Copy the MailerLite MCP server URL.
Paste the MCP URL into the relevant section of your AI tool.
Authorize the connection with MailerLite.
Once connected, your AI is ready to receive commands and execute tasks within your MailerLite account.
See complete instructions for major LLMs like ChatGPT and Clause in this article on connecting the MailerLite MCP server.
3. Duplicate a sent campaign
Use case: When you want to resend a campaign or use a sent campaign as the starting point for a new campaign.
Lite hack: Use the Copy to drafts feature to create an identical version of a past campaign.
MailerLite lets you resend campaigns to new subscribers who joined your list since the initial send. But what if you want to send an existing campaign to other people? That’s where the Copy to drafts feature is useful.
There are 3 main situations when you might want to duplicate a campaign:
To send the campaign to a subscriber group or segment who weren’t included in the initial send.
To resend the campaign to people who didn’t open the initial email, when the campaign wasn’t created with our automatic resend feature.
To use the campaign’s design as the starting block for your next email.
When you use the feature, Mailerlite will copy the entire campaign to your drafts, including content, subject lines, and recipients, so it’s ready for sending. You can then edit any part of the campaign to suit your needs.
1. Head to the Campaigns section of your dashboard.
2. Go to the Sent tab.
3. Click on the More button.
4. Click Copy to drafts.
5. You’ll be able to find the duplicated campaign in the Drafts tab.
4. Turn a campaign into an automation
Use case: When you want to turn a sent email campaign into an evergreen automation.
Lite hack: Create a new automation and then choose from your recently sent campaigns as the template.
There are times when you send an email as a one-off campaign but realize that it will also work well as an automated message.
For example, if you sent a campaign with speaker information to event signups, you may also benefit from sending the same information to future event signups via an automation.
Rather than creating an automation and then recreating the email by copying and pasting all the information, simply use the recently sent campaign as the basis for your automation email.
You'll save a ton of time, and it's still easy to adjust the content to make it more evergreen, for example, by removing dates.
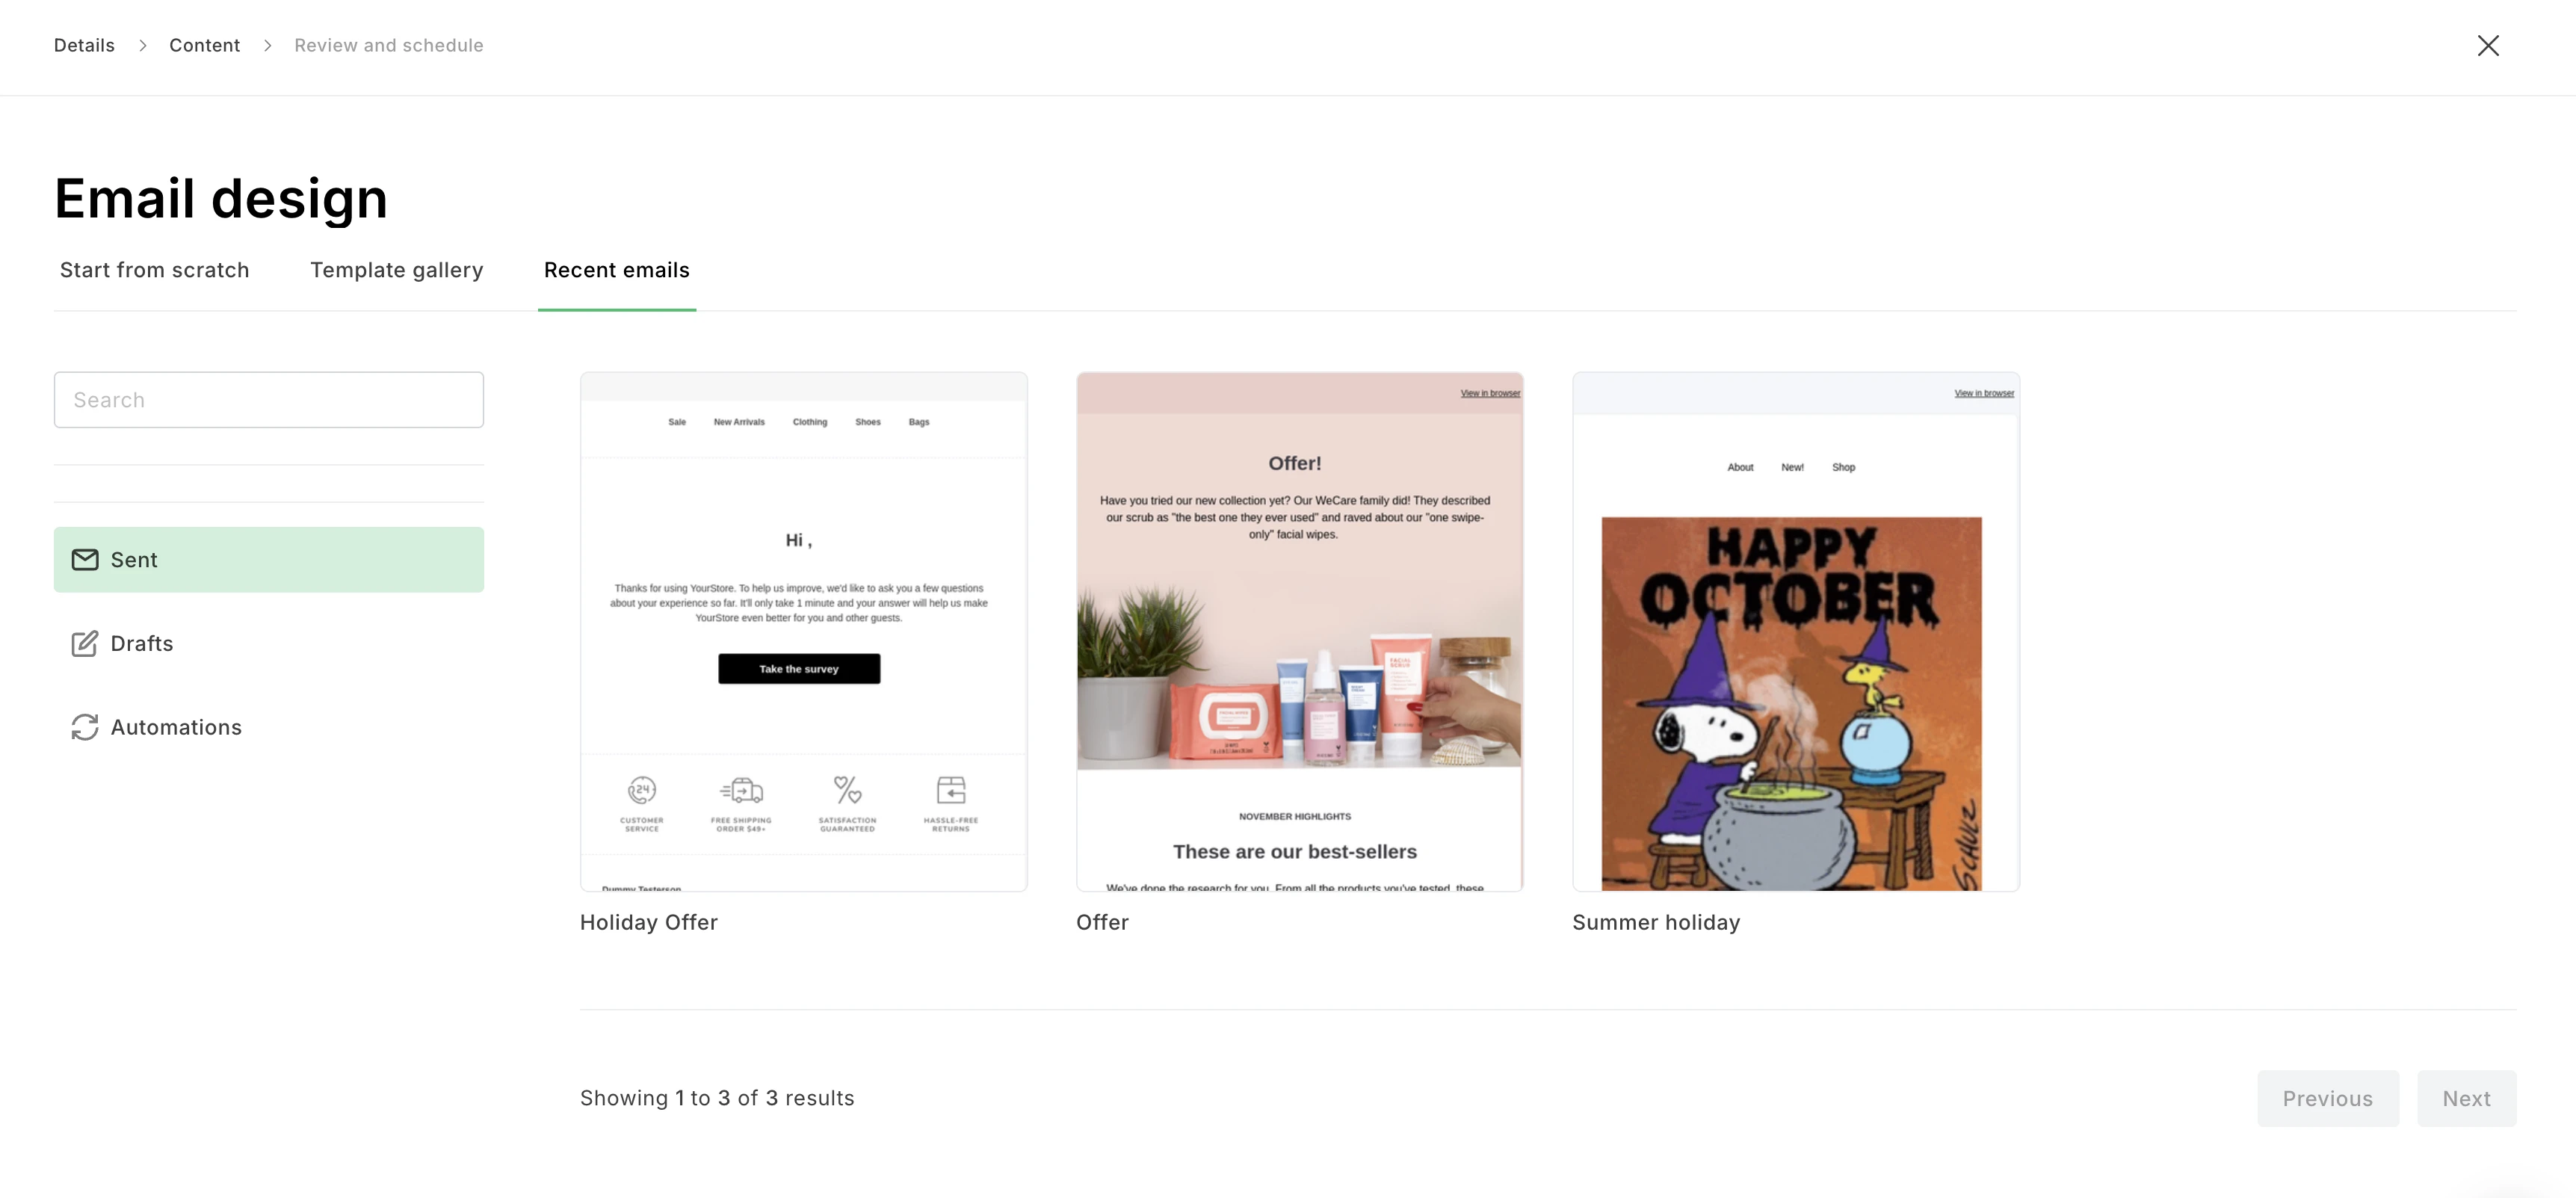
1. Open the Automations tab in your dashboard.
2. Click New automation.
3. Click Start from scratch and name your automation.
4. Set up your automation trigger and delay.
5. Add an email block and then click Design email.
6. Head to the Recent emails tab and choose your campaign.
7. Make any required content edits and save the email.
8. Finish building the automation and set it live!
5. Add icons in a couple of clicks
Use case: When you want to highlight ideas or quickly communicate a message.
Lite hack: Add icons from our integrated icon library.
Using icons in design communicates ideas visually, helping people understand your content faster. They also bring attention to the content blocks with the icons and give your email design a professional touch.
Previously, you’d have to find and download icon packs and then upload them into your MailerLite file manager. But now you can access them straight from MailerLite via our Iconfinder integration.
1. Choose a content block with an image.
2. Click Replace image to open your File manager.
3. Click the arrow next to Upload image and choose Iconfinder.
4. Search for the icon you want to add.
5. Choose from the options and click Import.
6. Click Insert to add the icon to your email.
7. Resize the icon with the arrow at the bottom right of the image block.
6. Save blocks to speed up email creation
Use case: When you want to reuse content across multiple emails without reusing an entire template.
Lite hack: Save the block as a template.
Templates allow you to reuse entire email designs but they can also be useful to reuse individual sections, such as offer or blog post promotion blocks. Saving an email block as a template allows you to do this.
All you have to do is design the block you want to use and save it. You’ll then be able to add the block to any of your future emails and customize the content.
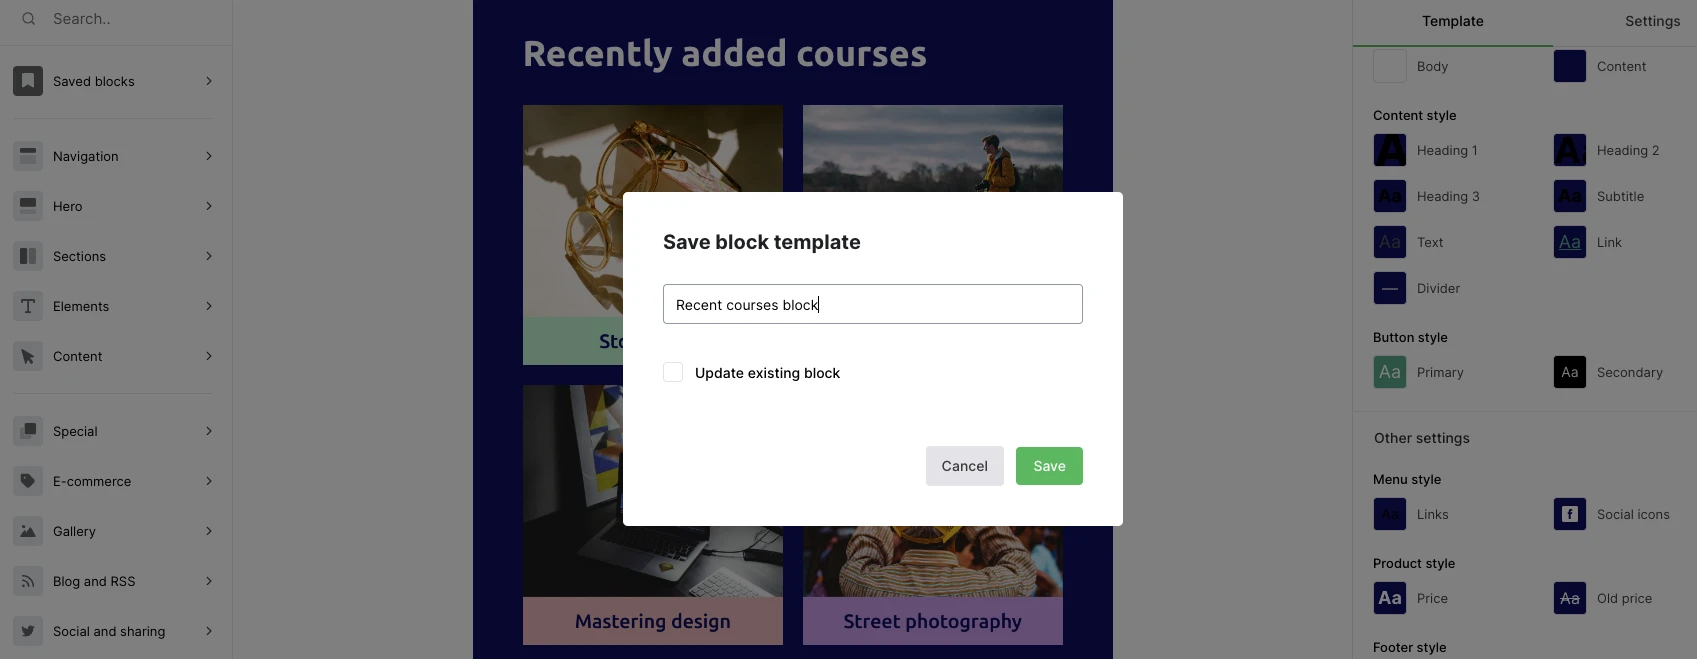
This will help you create consistently on-brand emails in significantly less time. And the best thing is that you can create and save multiple blocks for all your needs.
1. Design a block within our email editor as you usually would.
2. Scroll over the block you want to save to open the block menu.
3. Click the bookmark icon.
4. Enter a name for the block template.
5. Hit Save.
6. The saved block will now be available in the Saved blocks tab in the left sidebar.
7. You can add the block to any email and edit the content.
7. Stop contact details being converted into links
Use case: Stop email addresses and sequences of numbers being automatically turned into links.
Lite hack: Paste a short code snippet into the text block’s HTML.
When you add email addresses or numbers to an email, they are automatically turned into links. When people click on the email or number it will automatically open their default email client or phone app.
While linking contact details can be useful, you might not want it to happen in your emails as links can distract readers from your content.
Solve the problem by adding a short code snippet around the email or number to stop them from being turned into a link.
1. Drag a text box into place in your email editor.
2. Add the text you need, including the email address or number.
3. Highlight some text to open the text formatting bar.
4. Choose the HTML option to edit the text as HTML.
5. To stop an email address from linking, add the the code snippet <a name="myname"> before the email address and then </a> directly after without any spaces.
6. This will result in the code <a name="myname">youremail@example.com</a>
7. To stop a sequence of numbers from linking, add the code snippet <strong> before the sequence starts, <span> in the middle of the sequence, and </span> after the sequence without any spaces.
8. This will result in the code <strong>01234<span>56789</span>.
9. You can check the text isn’t linked by previewing the email.
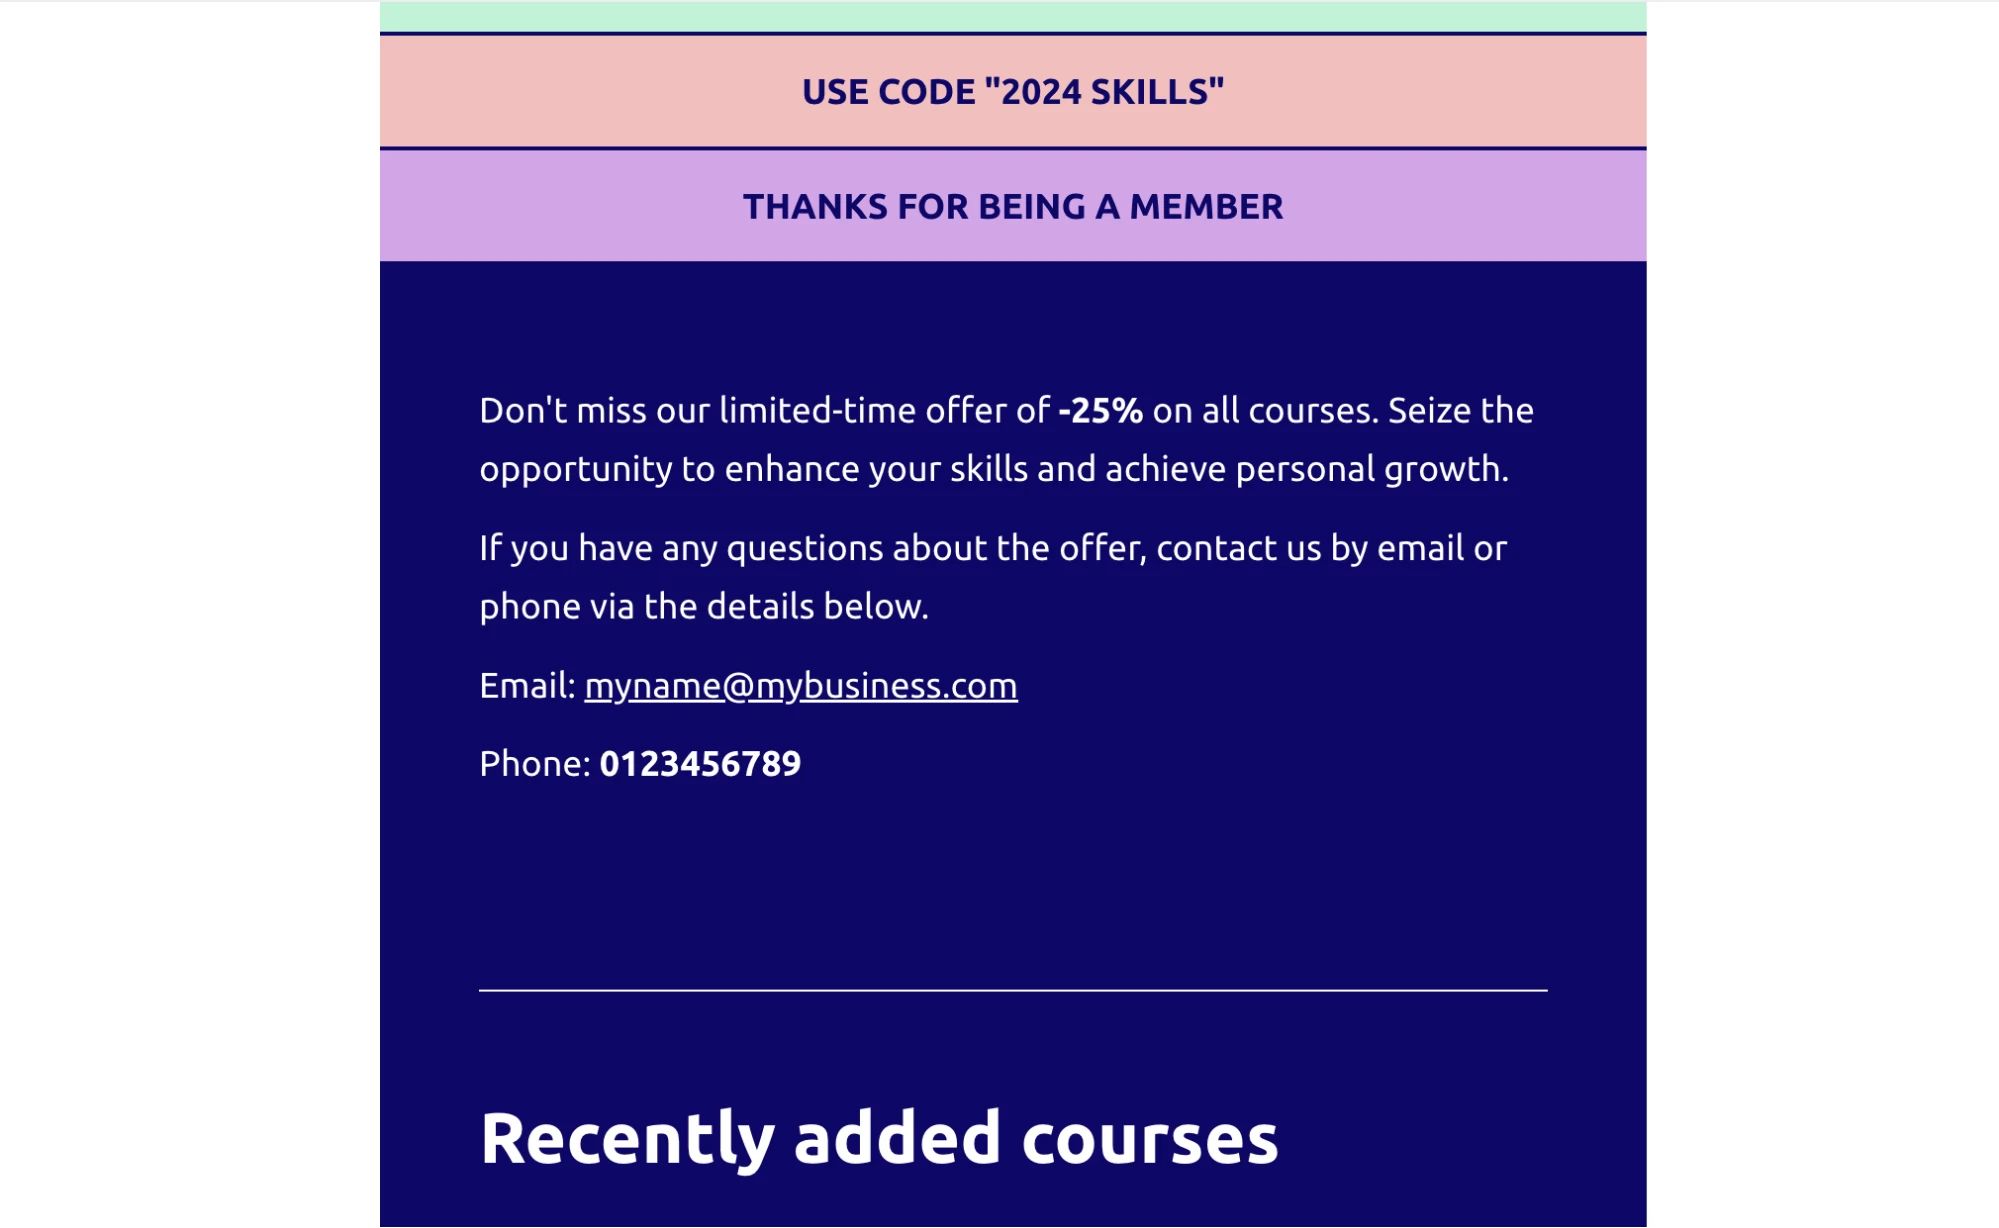
8. Hide content in email preview
Use case: Create short email preheaders that don’t also include email content.
Lite hack: Add the null variable ͏ to the preheader text multiple times.
Alongside subject lines, email preheaders are the main tool you have to encourage people to open your emails. This text is shown in the recipient’s email client next to the subject line.
Typically, email clients show the first content to appear in the email. But with MailerLite, you can choose the text you want to show by filling out the preheader text section in the campaign overview.
The only problem is that if the text is too short, email clients will also include content from the email to fill up the space.
That’s where our next hack comes in. By adding the variable ͏ multiple times to the preheader after the text, you’ll add blank space after your chosen email preheader. This will stop email clients from showing text from your email, creating a much cleaner inbox experience.
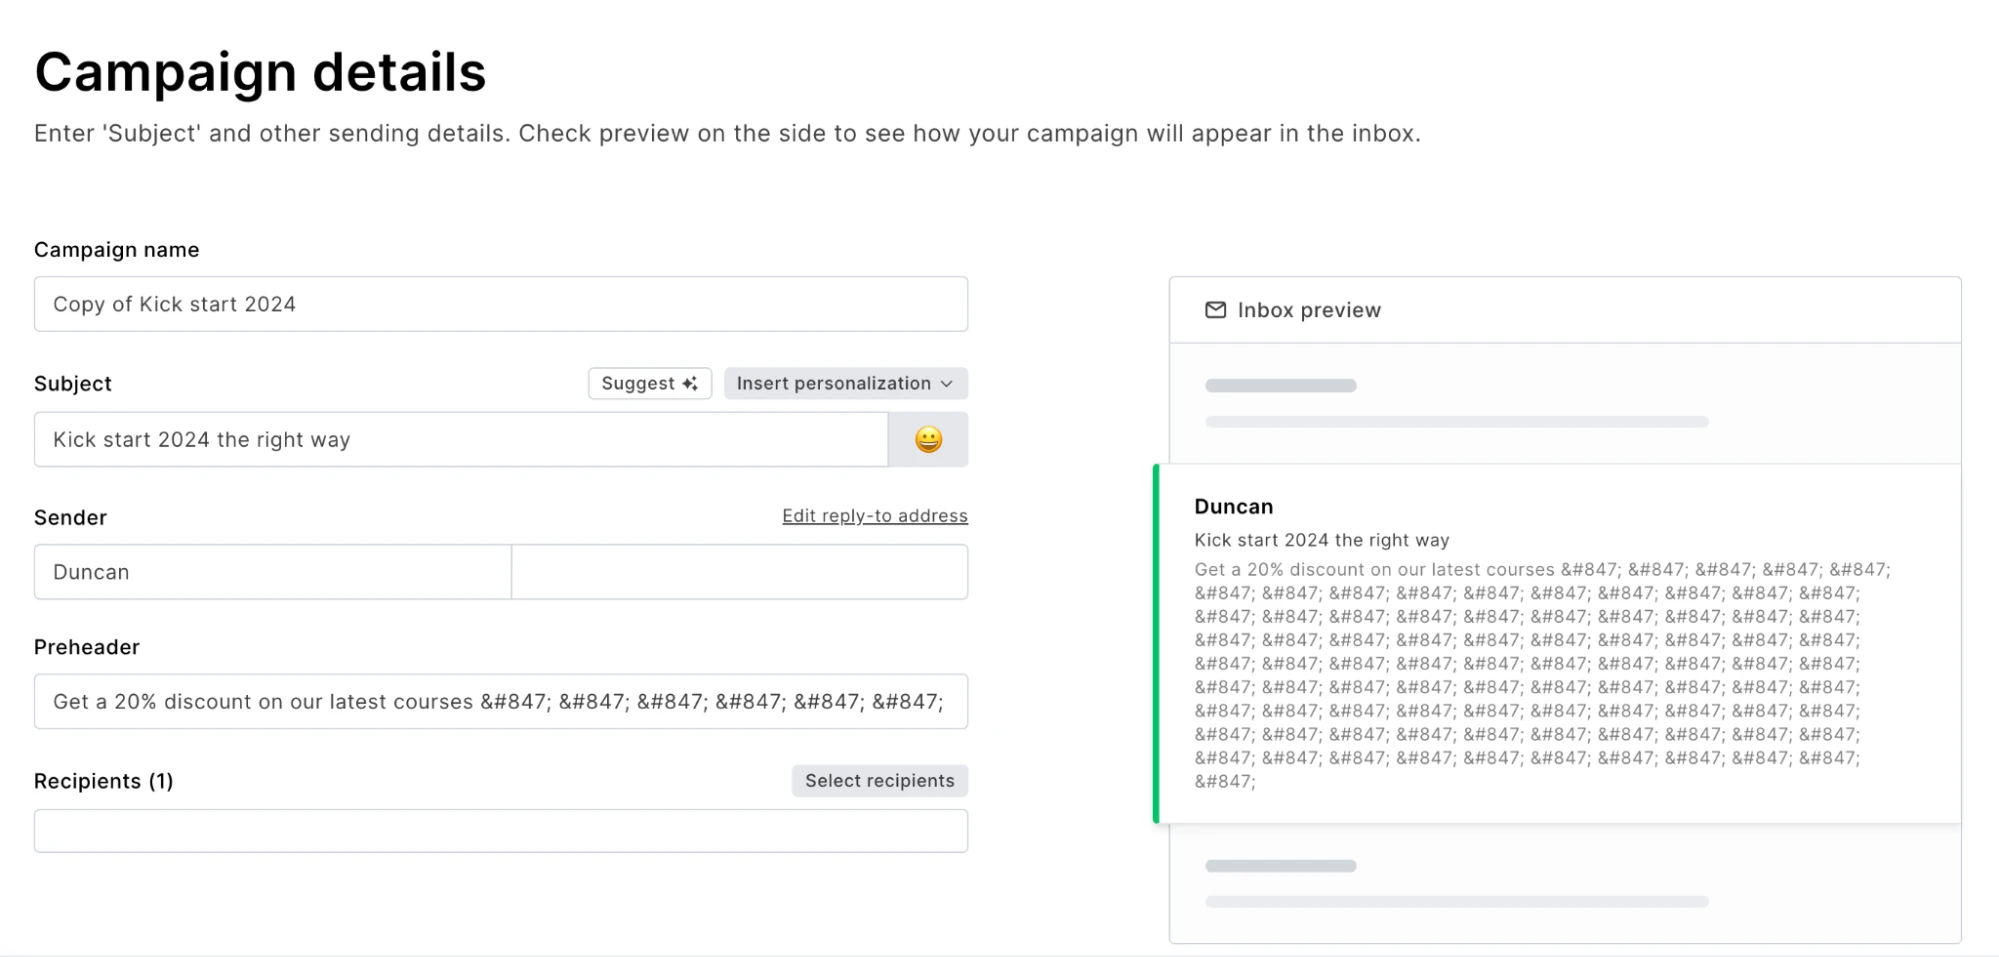
1. Write your preheader in the Campaign details section of your campaign.
2. Add multiple instances of the ͏ variable. The shorter your preheader, the more instances you’ll need.
3. Send a test campaign to see how the email preview looks.
4. Add more instances of the variable if email clients still pull in text from your email.
5. The variable will show up in the block in the email editor, but it won’t appear in previews or sent emails.
9. Design a custom social media block
Use case: Embed any social media post from any platform in your newsletter.
Lite hack: Use an image block to build a custom social media block.
Similar to hack number 3, in which you use an image block to make a custom video block, you can also use the image block to create a custom social media block.
The MailerLite drag & drop editor already contains 5 social media blocks that allow you to embed posts into your newsletter:
Twitter post
Facebook post
Facebook event
Instagram post
LinkedIn post
While those are great, they’re not as useful if your primary social media platform is, say, Pinterest or Soundcloud.
That’s where the image block comes in. You can take a screenshot of your social media post, add it to an image block, and link the image block directly to that post.
1. Take a screenshot of your desired social media post.
2. Upload the screenshot to your file manager and add it to your image block.
3. Copy and paste the social media post URL into your block settings.
It’ll appear as though the post is embedded in your email campaign, but when subscribers click on any part of the image, they’ll be directed to the actual post on your profile.
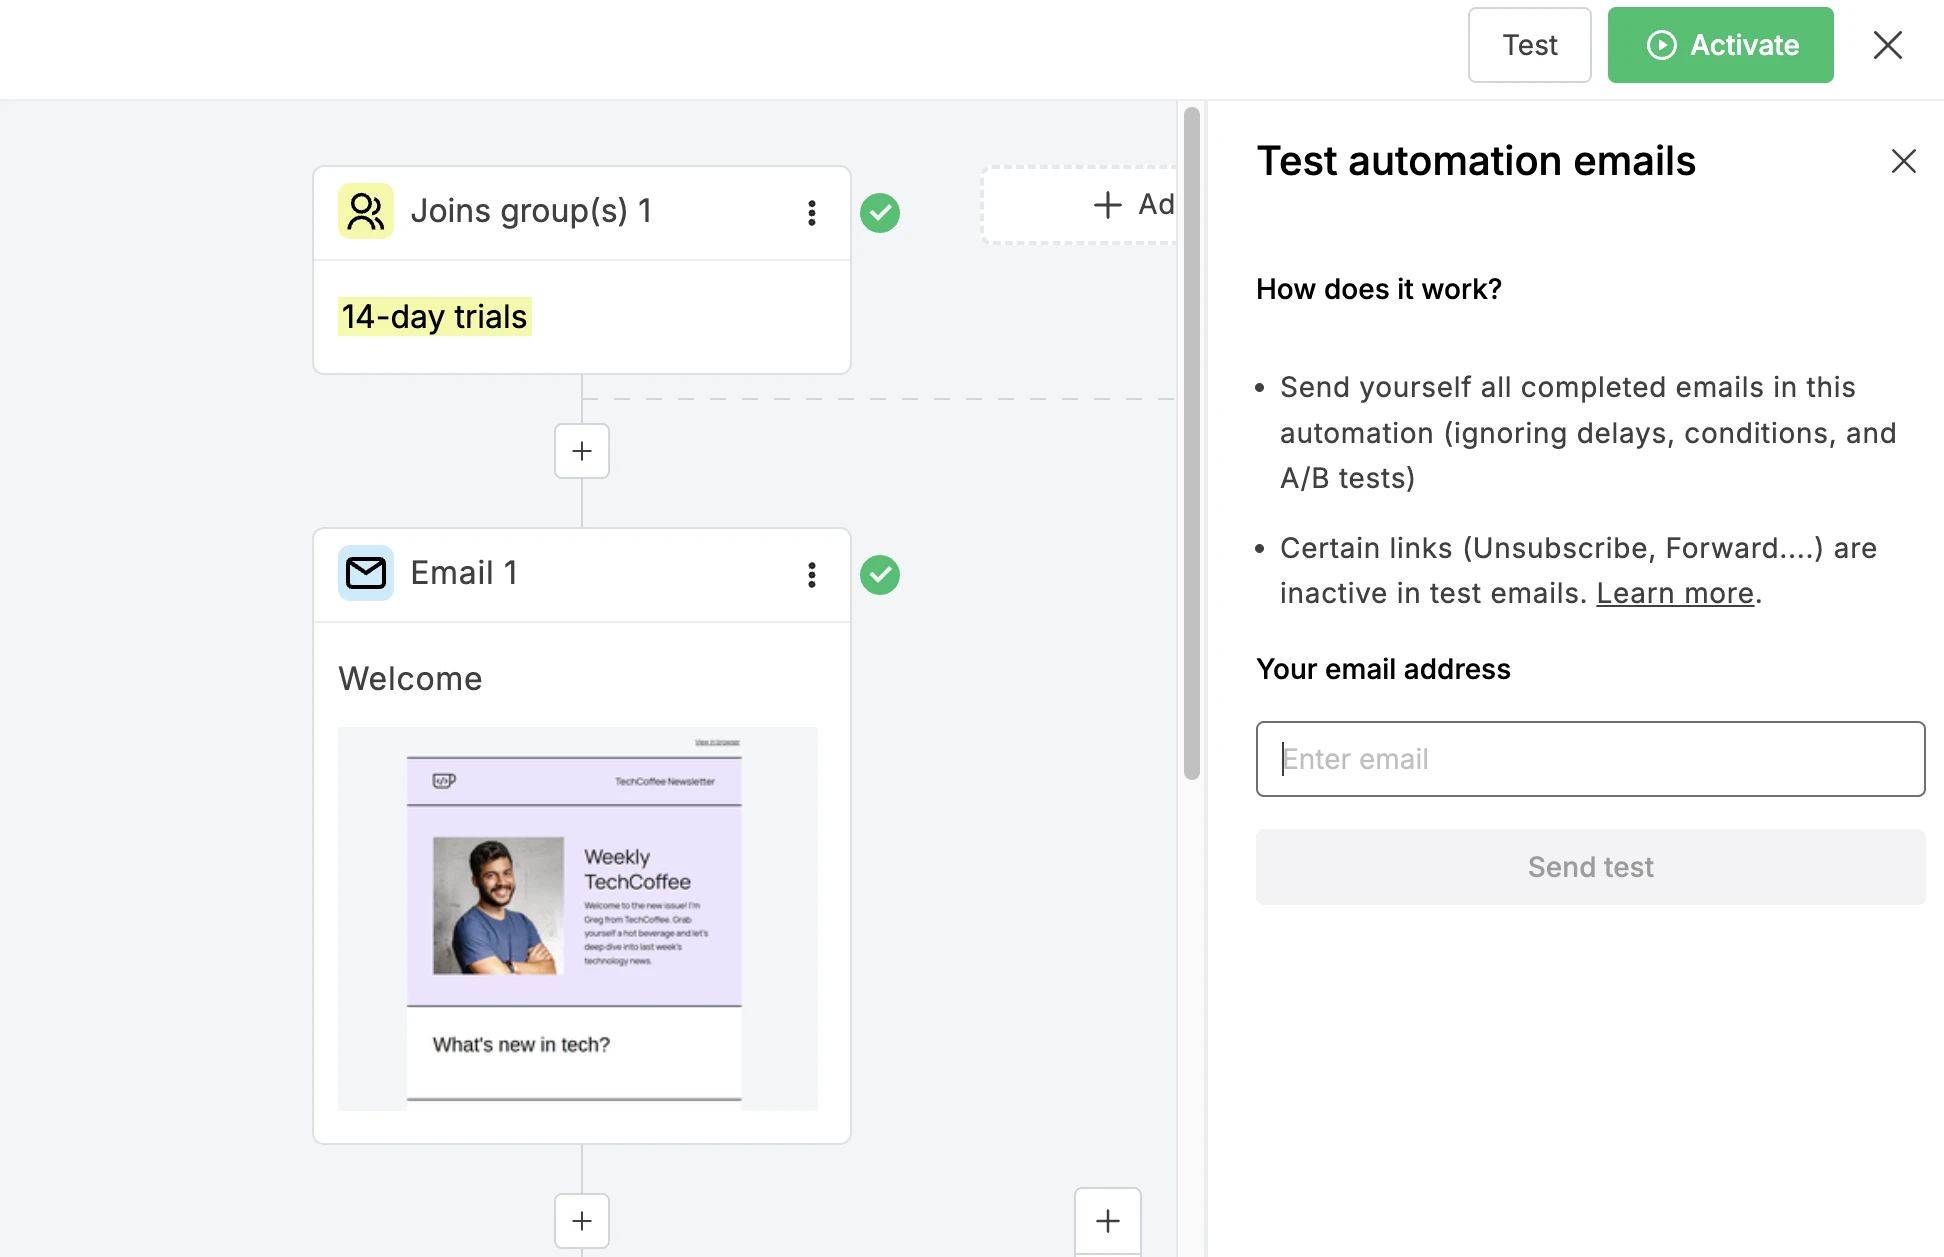
10. Test an automation by sending it to yourself
Use case: When you need to quickly review a multi-step automation sequence before setting it live.
Lite hack: Use the one-click testing feature in our updated automation builder to send the entire automation sequence to yourself at once.
With our updated automation builder, you can now use the Send test feature to instantly deliver every email in the sequence to a designated email address.
This time-saving step makes reviewing and going live with your automations significantly faster and more reliable.
Head into the automation builder interface for the automation you wish to test.
Look for the Test button, found in the upper right corner beside the Activate button.
Add an email address from one of your verified domains where you want to receive the test emails.
Click the Send test button. MailerLite will instantly deliver every email within that automation to the address you entered, allowing you to review the full sequence in your inbox.
You can do this multiple times after editing the workflows to your satisfaction.
Learn more about the upgraded features of our automated builder here.
11. Trigger a new automation when a subscriber completes a workflow
Use case: Continue a long automation workflow that has reached the maximum steps limit of 100 steps.
Lite hack: Use the last step of one automation to trigger a second automation.
This nifty hack allows you to bypass the limits of the automation builder and pick up where you left off with a brand new workflow.
The trick is setting your second automation’s trigger to “Joins group(s)” then making the final step of your original automation an action step that moves subscribers to the trigger group.
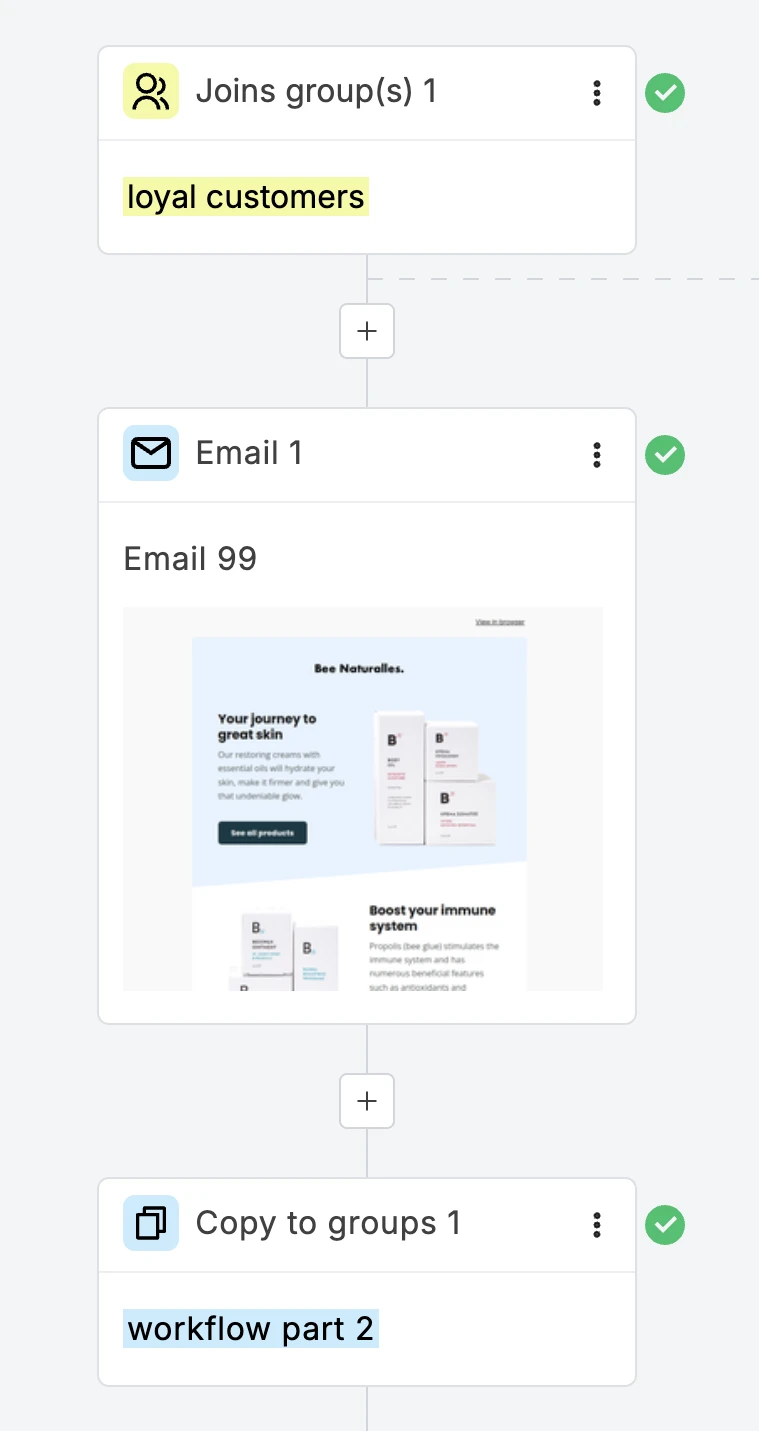
1. Add an Action step to the end of your first sequence.
2. Set the action as Copy to group.
3. Create a second automation and use the trigger “Joins group(s)”.
4. Select the group into which subscribers from the original workflow were added.
12. Update your email footer in bulk
Use case: Save time by avoiding manually updating your company address in every campaign and automation email.
Lite hack: Update the company details in your email footers en masse by resetting your default settings.
This advanced workaround can save you hours when updating your email footers. Updating the company address in your email footers manually can quickly become an extremely monotonous task.
Save your sanity and update your email footers in bulk.
This is made possible by resetting your default settings. In a few simple steps, you can update your company details in all of your campaigns, automation, and even your landing pages.
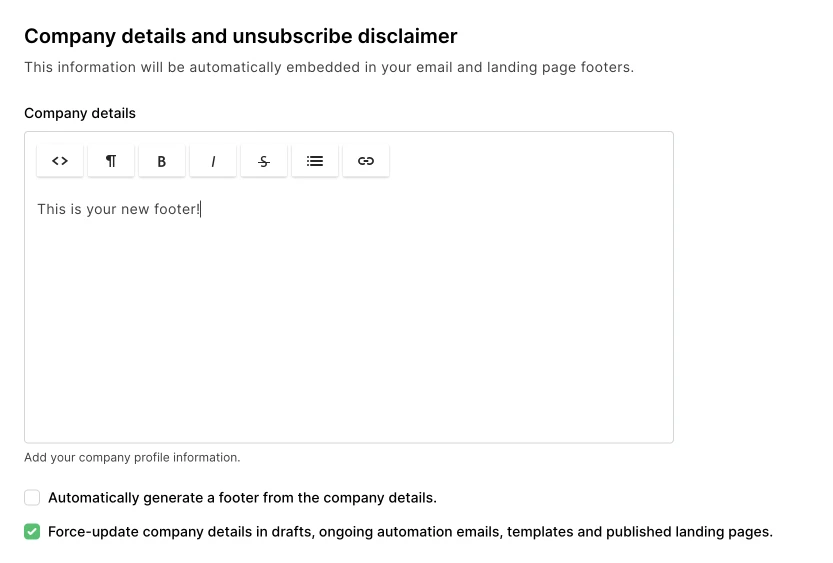
1. Navigate to Account settings > Default settings.
2. Scroll down to Company details and unsubscribe disclaimer and check the box labeled Force-update company details in drafts, sent emails, ongoing automation emails and published landing pages.
3. Uncheck the box labeled Automatically generate a footer from the company details.
4. You will then be able to enter new company details.
5. When you click Save, a window will appear asking you in which instances you’d like to update the company details. By checking all the boxes, your email footer will be updated everywhere in your MailerLite account.
Share your favorite Lite hacks!
Do you have your own secret set of Lite hacks? Share your clever tricks in the comments below!