How to create an engaging online course learners value
 From left to right: Mantas, developer; Remigijus, developer; Nikola, developer
Knowledge is power! And if you have knowledge to share, you can turn it into a powerful source of income with your very own online course.
The best thing? Creating an online course is more straightforward than you might think.
The keys to success are:
Tapping into your expertise to find a course topic people will sign up for
Planning your course around your learners' objectives
Creating comprehensive and valuable course content
Let’s walk through how you can create an online course that sells!
Why create online courses?
Online businesses are booming, and digital products such as e-learning courses are becoming more and more popular.
If you need a little extra convincing about the benefits of creating an online course, here are a few zingers:
Online learning is on fire: The e-learning industry market size surpassed $315 billion in 2021.
Low setup costs: Creating your new course won’t break the bank—especially if you record and edit the content yourself.
Become an authority in your niche: Running an online course will set you apart from the competition and boost your personal brand.
Generate passive income: Once you set up your course, it will continue to generate income while you concentrate on other parts of your business.
9 steps to creating an informative online course
Raring to go? Excellent! Here’s the step-by-step guide to creating a successful online course.
Step 1: Pick your course topic 💡
The topic you choose plays a big part in your course's success. Get off to a great start by choosing one that matches the following 3 criteria.
It should be a topic that:
You have expertise in.
People want to learn about.
People are willing to pay for.
Here’s more about each of these points.
Expertise and authority 🎓
To create a valuable course, you need to teach a topic you have a high level of expertise in. For most course creators, this means creating a course that relates to either their job or a hobby they are skilled at.
Imagine someone who is a social media marketer during the day and a proficient knitter in their free time. They should look at these two areas when creating a course.
Once you’ve identified your areas of expertise, think about specific things within these broader subjects you could teach. Begin with small topics that bring value to your audience, even better if it's something you have direct experience in.
Sticking with the example above, this could result in course ideas such as:
Social media marketing
How to get your first 1,000 followers on Instagram
Tips for writing social media copy your followers love
Steps for creating viral videos on TikTok
Knitting
Master knitting basics
Step-by-step guide to knitting a cardigan
How to knit brioche patterns
If you’re unsure about the types of courses you can create, search on Google or head to a platform like Udemy to see the courses other entrepreneurs are creating in your area of expertise.
High demand 📈
Once you have a list of potential topics, check whether your idea is a problem many people struggle with. You can do this by discovering whether people search for the problem on Google.
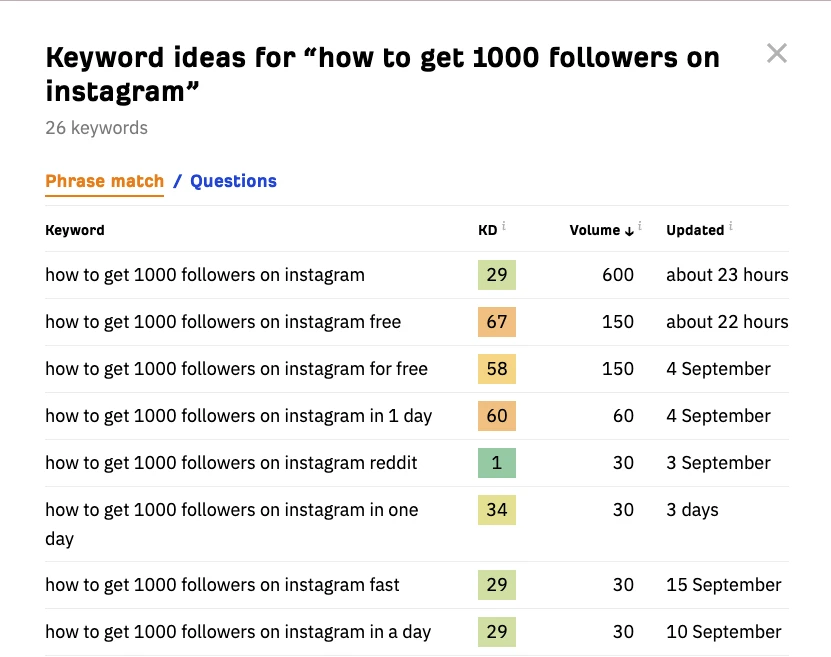
Ahrefs free keyword generator is an easy-to-use tool that shows search volume for your chosen term. Just enter the problem your course solves into the search bar to see if people look for the keyword.
The tool shows that the search term “How to get 1,000 followers on Instagram” has 600 monthly searches in the U.S. There are also several other similar terms that generate a lot of searches. This suggests people are interested in learning more about how to get more Instagram followers.
Repeat this process for all your topic ideas to see which ones have the most demand.
People are willing to pay 💰
Find out if people are willing to pay for your course idea by looking for paid courses on similar subjects. If you find other successful courses, people likely value the information they contain enough to pay for them.
Searching on Google will often highlight any paid competitors. Just search for your topic plus a keyword like “course.”
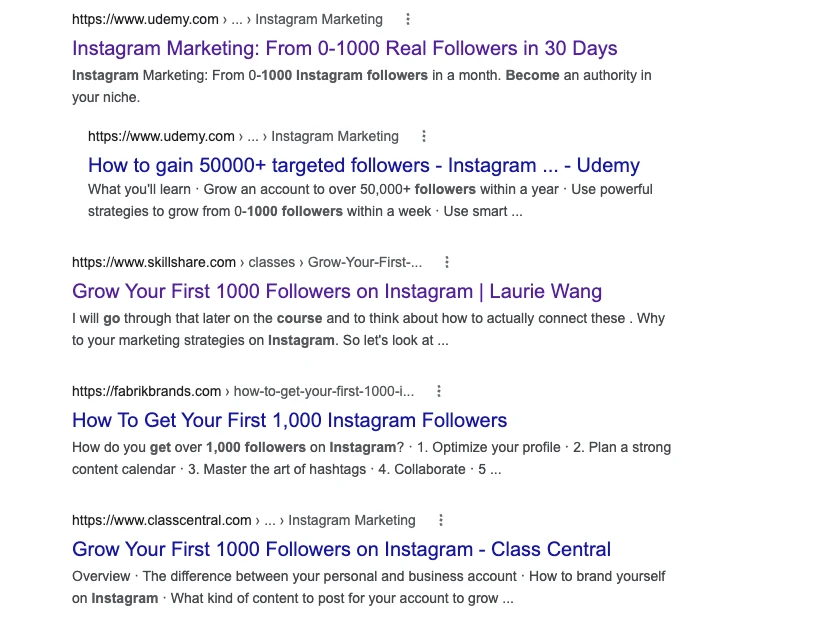
Another option is to head to a paid course platform like Udemy to see if similar courses exist.
This platform is handy because it shows exactly how many people take each course. We can see that over 2,000 people have taken the below course on how to get 1,000 Instagram followers.

That depends. Some competition is good because it shows it's possible to succeed with your idea. In many cases, it’s worse if there is no competition as this suggests no one has made the idea work.
It's hard to stand out if there is too much competition. But with the right marketing tactics, you can succeed. We cover some strategies you can use later in this article.
Bonus tip: Use your audience 📊
The above points assume you're creating your first course from scratch. If you already have a website, email list, or social media audience, you have a ton of data you can use to generate course ideas.
For example:
Look at your website analytics to discover your most popular content and topics
Look at your social posts to see which topics get the most interaction
Look at your email metrics to see which topics have the most clicks or highest open rates
All these points show topics people are interested in. Use this as a starting point to develop course ideas on related topics.
Step 2: Validate your course idea 🤔
The above steps will give you an idea about whether your course has the potential to be successful. Go one step further by asking your target audience what they think about your idea directly.
Here are 3 strategies to help validate your idea:
Present your idea in a newsletter: Then include an embedded survey in your email to get people’s opinions.
Hold a quick poll on social media: Present your course idea and ask people to react with a ‘❤️’ if they would sign up straight away, a ‘💡’ if they aren’t sure, or a ‘🤔’ if they wouldn’t.
Run a pre-course pilot program: Create a free bite-size version of your course. You can then run a survey to see what people thought of the program.
The more positive validation you get, the more likely your idea will be a good one. Don’t be put off by negative feedback. Take these suggestions on board and use them to refine your idea.
Step 3: Identify your audience 🔎
Once you’ve chosen your topic, think more about your target audience. Do this before creating your course so you can tailor content to your audience’s needs.
Customer personas are an easy way to identify your audience. This fictionalized version of your target customer encourages you to think deeply about people’s motivations for taking your course. It helps with creating course content, marketing and pricing.
Include the following information in your persona.
Name: Use this to identify your avatar
Bio: Include factors like age, gender, job, and income
Goals: What does the person want to achieve?
Challenges: What do they struggle with?
Channels: Where do they hang out online or offline?
Create customer personas for each group of people interested in your course. Feel free to add or remove information where relevant.
Here’s an example of a customer persona for the course on growing an Instagram account to 1,000 followers.
Name: E-commerce Ethan
Age: 24
Job: E-commerce store founder
Goals:
Generate sales for their e-commerce store
Increase presence on social media to grow brand awareness
Challenges:
Small budget to promote their product
They run the entire business, so have little time to dedicate to social media
Channels
Member of Subreddits including r/entrepreuneur, r/ecommerce, r/marketing
Follows competing brands on Instagram
Follows e-commerce influencers on Twitter and YouTube
Step 4: Plan your course content 👀
Once you’ve validated your course idea and you know it will be marketable, it’s time to focus on the content. Planning your course ensures you create a program that is valuable for learners.
Here are 5 steps to take when planning your course.
1. Define your primary objective
The best online courses have a clear primary objective. This is the main thing you expect participants to learn. It should be specific and appeal to your target audience.
Be clear about your primary objective. If you can’t define a particular goal, rethink the above steps until you can better explain what you want people to learn.
MailerLite offers several courses about email marketing, including one we just launched on Udemy. This course has the clear objective of teaching people how to master email marketing by collecting subscribers, creating effective emails, and automating campaigns.
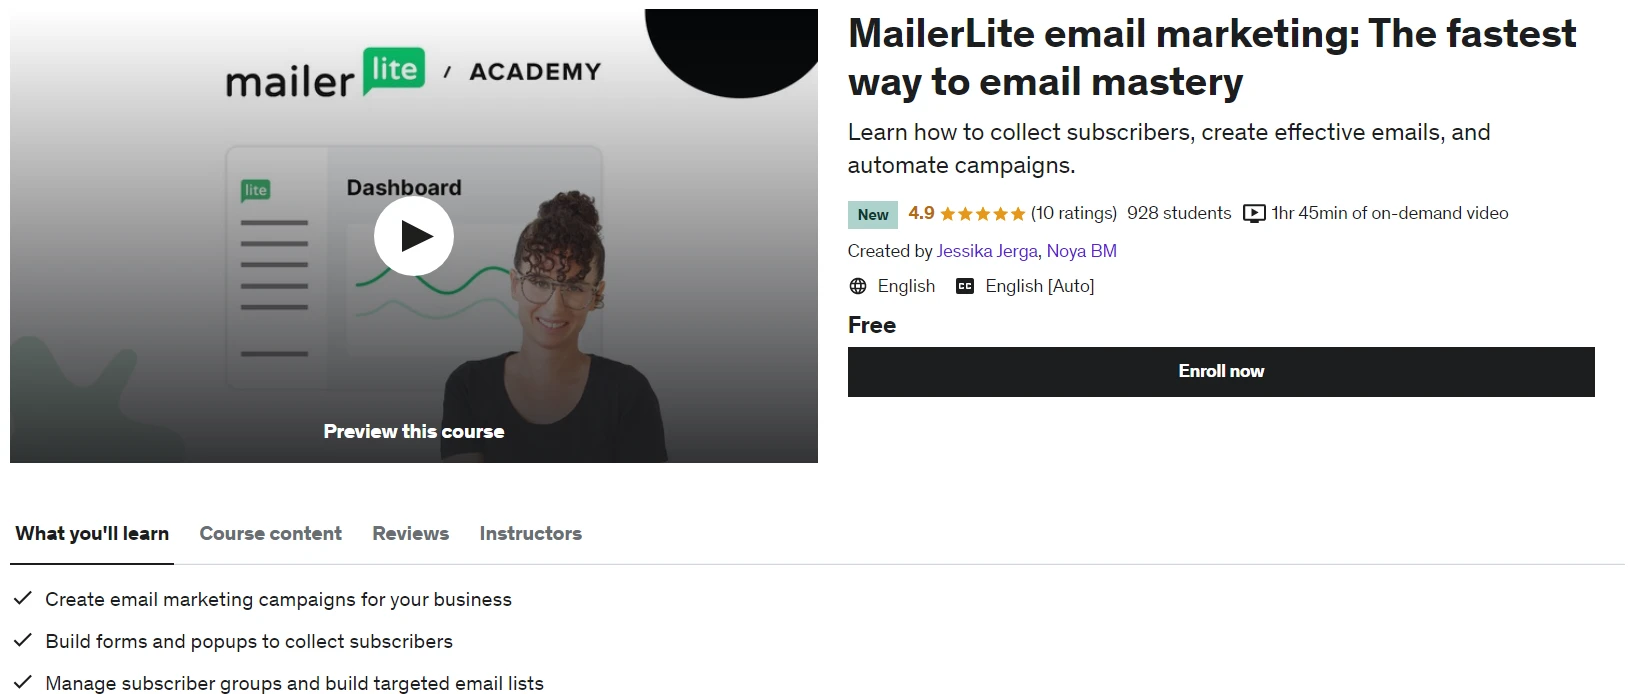
Once you’ve defined your primary objective, plan the rest of your course to ensure it pushes people towards this goal.
2. Identify secondary objectives
Secondary objectives are things participants will learn that help them reach the main objective. Think about everything that you need to teach students to get them to hit their primary goal.
Going back to our email marketing course, you can see that we have a list of secondary objectives.
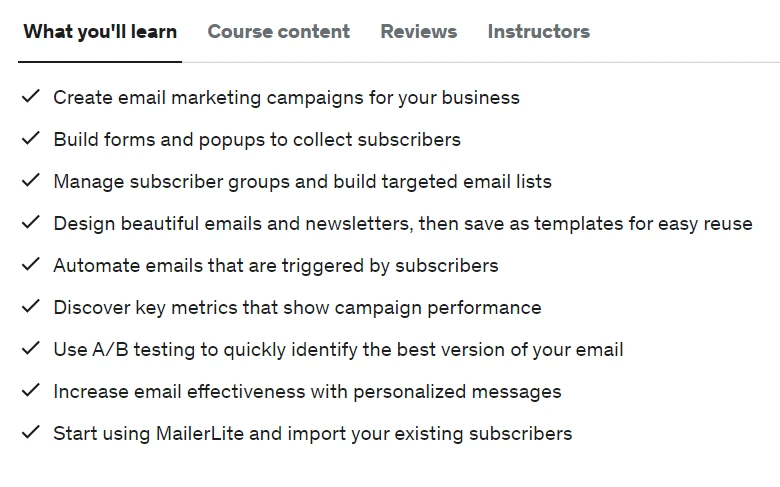
These are things that help students master email marketing.
3. Create a structure that works towards these goals
Now you have defined your primary and secondary objectives, creating your course structure should be a breeze—you already know exactly what you need to teach.
A typical course is divided into sections and lessons. Each section teaches a broad topic, while each lesson teaches a specific part of the topic.
Lessons and topics need to build on what you taught previously. Start with the basics and move into more complex ideas later.
Let's go back to the MailerLite email marketing course to see an example of a great course structure. We split the course into five modules which you can see in the screenshot below.
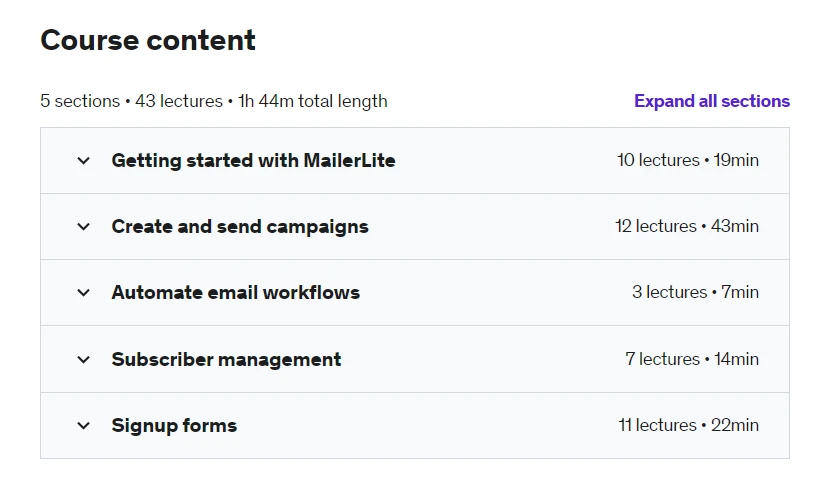
This structure works because each step builds on the previous one. You need to know how to set up your account before you learn to create campaigns, and you need to know how to create campaigns before you learn to automate workflows.
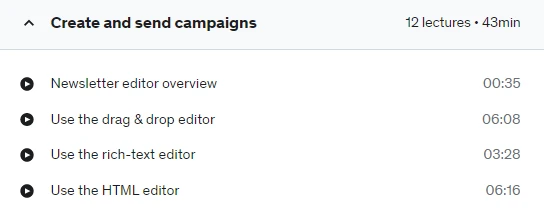
Individual sections are structured in the same way as each lesson builds on the information taught in the previous one. The section on creating campaigns starts with an introduction to the feature and moves through creation, design, sending and testing.
You’re unlikely to come up with a perfect course structure immediately. Start with a broad course outline and then add sections and individual lessons. As you draft your course, you’ll better understand what you need to include, add or remove.
4. Plan your lessons
Once your structure is in place, start to plan individual lessons. Just like your overall course, each lesson should also have primary and (when relevant) secondary objectives.
The primary objective is the lesson you want students to learn during that class. It should be super specific, and all your content should push people towards that goal.
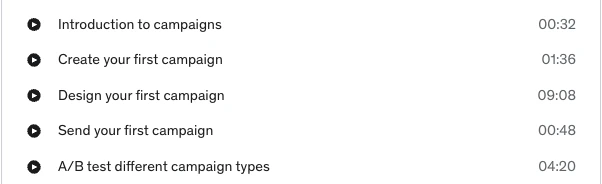
In the MailerLite course, each lesson title is also the primary objective. You can see that each goal is specific and shows what participants will learn.
At this point, think about the lesson format—choose one that will best help learners.
Depending on the content of your course or lesson, this could be a screen recording, a lecture-style video, or a recording of you performing an activity. In some cases, it may be best to use text or audio.
You can then plan your lesson structure and the specific things you’ll teach. You may even decide to write a script.
5. Add assessments
The final structural point is whether to include assessments. Quizzes and tests are an excellent way to let learners test their knowledge and identify weak points they should go over again.
You can use your test as a condition for certification. Even if you don’t plan to create certification, tests are a good way for learners to measure what they’ve learned. They can also help break up the structure of the course.
At MailerLite, we do short multiple-choice quizzes at the end of each course section. These cover lessons learned in the previous section. We also allow people to retake the quiz to improve their scores.
Step 5: Buy audio and video equipment 🎬
Now for the fun part—recording your content! People will be paying for the course and committing their time to learning with you. You should do all you can to make your course professional.
The good news is that recording equipment is more accessible than ever before. In many cases, your smartphone is enough to create high-quality video lessons.
We spoke to Ashley Lawson, MailerLite’s video and motion graphics editor, to learn some tips for creating professional courses.
Camera: Smartphones can work
Smartphone cameras are a terrific option for people on a budget. Many phones can record high-quality video that is more than suitable for an online course. I wouldn't shoot on anything less than 4k, though.
For people with cash to spare, I recommend a 4k mirrorless camera such as the Lumix GH6 or the Sony A7S III.
Lighting: The most important factor for quality video
Lighting is more important than the camera. You can have the best camera, but if your lighting is terrible, your video will look bad, whereas you can get quality footage on a limited camera with decent lighting.
If you're on a budget and don't have any lights, set up the recording near a window. There are some downsides to this strategy, such as the noise level and being unable to control the type of light that enters the window, but it's better than using typical home or work lighting.
If you wish to invest in lighting, research a 3-point setup to achieve a professional look for your videos. Long gone are the days of expensive lighting. You can pick up 3-point lighting kits on amazon for $300.
Audio: Choose a clip-on mic for hands-free operation
A good mic is a must! It’s no good if people can see you but can't hear you. Buy a lavalier mic as you can clip these to your clothes for hands-free operation. The Tascam DR-10L and the Zoom F2 are good options.
Editing software: There are good free and paid options
Davinci or iMovie are good free options for editing your course videos. Adobe Premiere Pro and Apple Final Cut Pro are good professional options if you have the budget and think you will use the features.
Tripod: Choose one that suits your camera
You need a good tripod. The type of tripod you need depends on the camera—a smartphone and DSLR require very different setups. There are many tripods for a plethora of budgets available online.
Background: You have several options
Your background is an essential part of a professional video. You could use a greenscreen, but this requires time and skill, and the results often aren’t great.
Using a colored or textured backdrop is a good alternative. These can produce great-looking results and typically involve less work in post-production than greenscreen. There are plenty of good backdrops you can buy online, from brick walls to rustic wood.
Another option is to film your actual background, such as an office, kitchen or library. Hide some colored light tubes in the background to make the scene look really cool. You can easily get these online.
Not all courses require all the above equipment. If you plan to mainly record your screen, you could get by with nothing more than a decent microphone and basic video editing software. If most of your course involves live video, you’ll need more equipment to create a professional course.
Step 6: Create content for your online course 🎥
You’ve finished your planning and have all the equipment you need, there’s just one thing left: creating your course content.
The exact content you create depends on your subject matter, course, and learners. But the one thing you should focus on is creating content that best suits your learning objectives.
A good lesson will typically have this structure:
Introduce the topic: Explain what the topic is, what the learner will learn, and why it’s important.
Explanation: This is the main part of your lesson. Teach the student the information you promised in the introduction.
Going deeper: Add in-depth course material that builds upon the explanation. For example, step-by-step guides, real-life examples, or counterpoints.
Activities: Consider adding activities so students can test their learning.
Review: Summarize the lesson. Tie it into what happens in the next lesson.
You can then create learning materials to support each part of your lesson.
This could include:
Explainer videos where you face the camera and discuss the topic. Use a presentation and on-screen resources to support your point.
Step-by-step videos highlight the exact steps people need to take to complete the objective. This could be screen recordings or over-the-shoulder style tutorials.
Activities that learners should complete to test their understanding. This could be worksheets, quizzes, or real-world challenges.
Third-party resources such as journal articles, podcasts, YouTube videos, or informative blog posts can provide further context.
Your existing content, such as blog posts or videos, can help explain your points.
Don’t be tied to a particular type of content. Assess each lesson’s learning goals and choose the medium that fits best.
Here are some tools that can help with the course content creation process.
Powerpoint or Google Slides for presentations
Loom for screen recording
Canva for creating graphics or worksheets
iMovie or Davinci for editing videos
Many online learning platforms like LearnWorlds, Kajabi and Teachable also have built-in tools you can use for course content creation. For example, creating quizzes or editing videos.
Step 7: Host your online course 🤝
Great! Your course is finished and ready to go out into the world. Now, you need to decide how to share it.
Here are 4 great options:
Self-host on your own website: This gives the most control and freedom, but you’ll need to be able to build and run your own site. If your website is built on MailerLite, you can collect payments using our Stripe integration and then use our password protection feature to ensure that only people who have paid can access course content.
Create an automated email series: With MailerLite, you can set up an automation workflow of a series of emails that contain your course content. The major benefit of this is there’s no need to set up a whole site: you can simply share the course directly in your audience’s inboxes. Our email builder is super powerful, so it’s easy to create professional-looking lessons with text and video.
Use an online course platform: Using an online course platform is a straightforward way to publish your online course. For the MailerLite Academy, we chose Thinkific for its straightforward interface and advanced features.
Upload to an online course marketplace: Open marketplaces like Udemy and Skillshare can help you reach a wider audience. These platforms may take a cut of the revenue.
It’s also possible to offer courses on multiple online learning platforms. For example, we offer our introduction to email marketing course on both the MailerLite Academy and Udemy. Just tweak the course content so it fits each platform.
Grow your course with MailerLite
Generate course signups with powerful email marketing tools then collect payments with our Stripe integration. Plans start at $9 per month.
Step 8: Decide on your pricing 🤑
Your price point depends on multiple factors, including the length of your course, how much you invested in it, the competition, and the outcome value for your audience. The most common pricing methods to monetize an online course are:
Free: Free courses work well as lead magnets to gather potential customers you can upsell to.
One-time payment: Your customers pay for everything upfront, and then have lifetime access to your online course.
Subscription: People can pay monthly or annually to complete the course. For this model, you need to constantly create new content to keep people coming back.
Premium: People could pay extra to access a premium version of the course, for example, where they receive a certificate of completion at the end.
If you are not sure how to price your course, take a look at similar courses. Do an analysis of the average prices and then experiment. If course sales are slow, consider offering a discount to the first 100 sign-ups to gain feedback and testimonials.
Stripe is an online payment processor which you can add to your MailerLite sites. You can set up one-time and recurring purchases, then sit back and let your course run itself! Find out more on how to sell digital products and subscriptions with MailerLite.
Step 9: Market and sell your online course 📢
The final step to creating a successful course is marketing it to your audience. Selling courses is a huge topic, and we go into great detail on how to market your online course in this article.
Here is a condensed summary of some course marketing strategies to consider.
Build a website or landing page for your course. Use this sales page to highlight its benefits and drive people to sign up.
Create lead magnets. Offer a freebie like a webinar or mini-course that encourages website visitors to give you their email addresses.
Use email marketing: Use an email marketing strategy to promote your course to subscribers.
Upload your course to third-party platforms. Sites like Udemy have built-in audiences of people that may find your course.
Run paid ads. This is an effective way to get your course in front of more people. Google Ads and Facebook Ads are the main platforms.
Establish partnerships. Team up with other creators to promote your course.
Build your audience. Build an audience on social media and then promote your course to these people. Twitter, Instagram, and TikTok are good options.
Just choose the options that fit your skills, budget, and available time. Use the customer persona you created in step 3 to find the best places to promote your course and the messaging you should use.
Creating an online course: Best practices
You should have a pretty good idea about the steps required to create an online course. Here are some final online course creation best practices to consider before you start.
Make your content easy to digest
Break each topic into subtopics
Focus on one objective in each lesson
Break long lessons into multiple parts
Consider whether all information is absolutely essential
Set measurable goals
Course goals clarify outcomes and give learners something to aim for
They can increase motivation and focus
Choose measurable goals so students can see progress
Setting goals helps with marketing by giving a clear selling point you can focus on
Create a learner community
An online community brings a social element to your course
Learners can discuss lessons
Use communities and forums to share updates, course content and connect with students
Anyone can create a Facebook group or a Subreddit in minutes for free
Collect testimonials and improve as you go
Collect feedback to determine what people like or dislike about your course
Surveys are an easy way to gather feedback
Ask for reviews and testimonials from people who provide positive feedback
If many learners have the same negative feedback, use this insight to improve your course in future updates
Are you ready to create a profitable online course?
That’s fantastic! Remember you can integrate MailerLite with Stripe and sell your online course via your landing pages and websites.
And if you want to experience a top-notch online course to see how it works, you are invited to sign up for MailerLite Academy! It’s completely free. You can see an online course in action while also learning more about email marketing.