Note: If you're a Legacy (Classic) user, please log in to your account to access the dedicated Legacy (Classic) Help Center.
Welcome to the MailerLite family! We're so excited that you've chosen to bring your email marketing over to our platform. Switching email providers can seem like a daunting task, but this guide is here to walk you through the key steps to make your move from Mailchimp as smooth as possible.
First things first, let's get you acquainted with your new home.
Take a few minutes to explore MailerLite & our terminology and get familiar with where everything is.
Migrate to MailerLite in 4 steps:
1. Import your subscribers
In just a few simple steps, you can bring your subscribers from Mailchimp to MailerLite using our Mailchimp import tool.
To bring your subscribers over from Mailchimp:
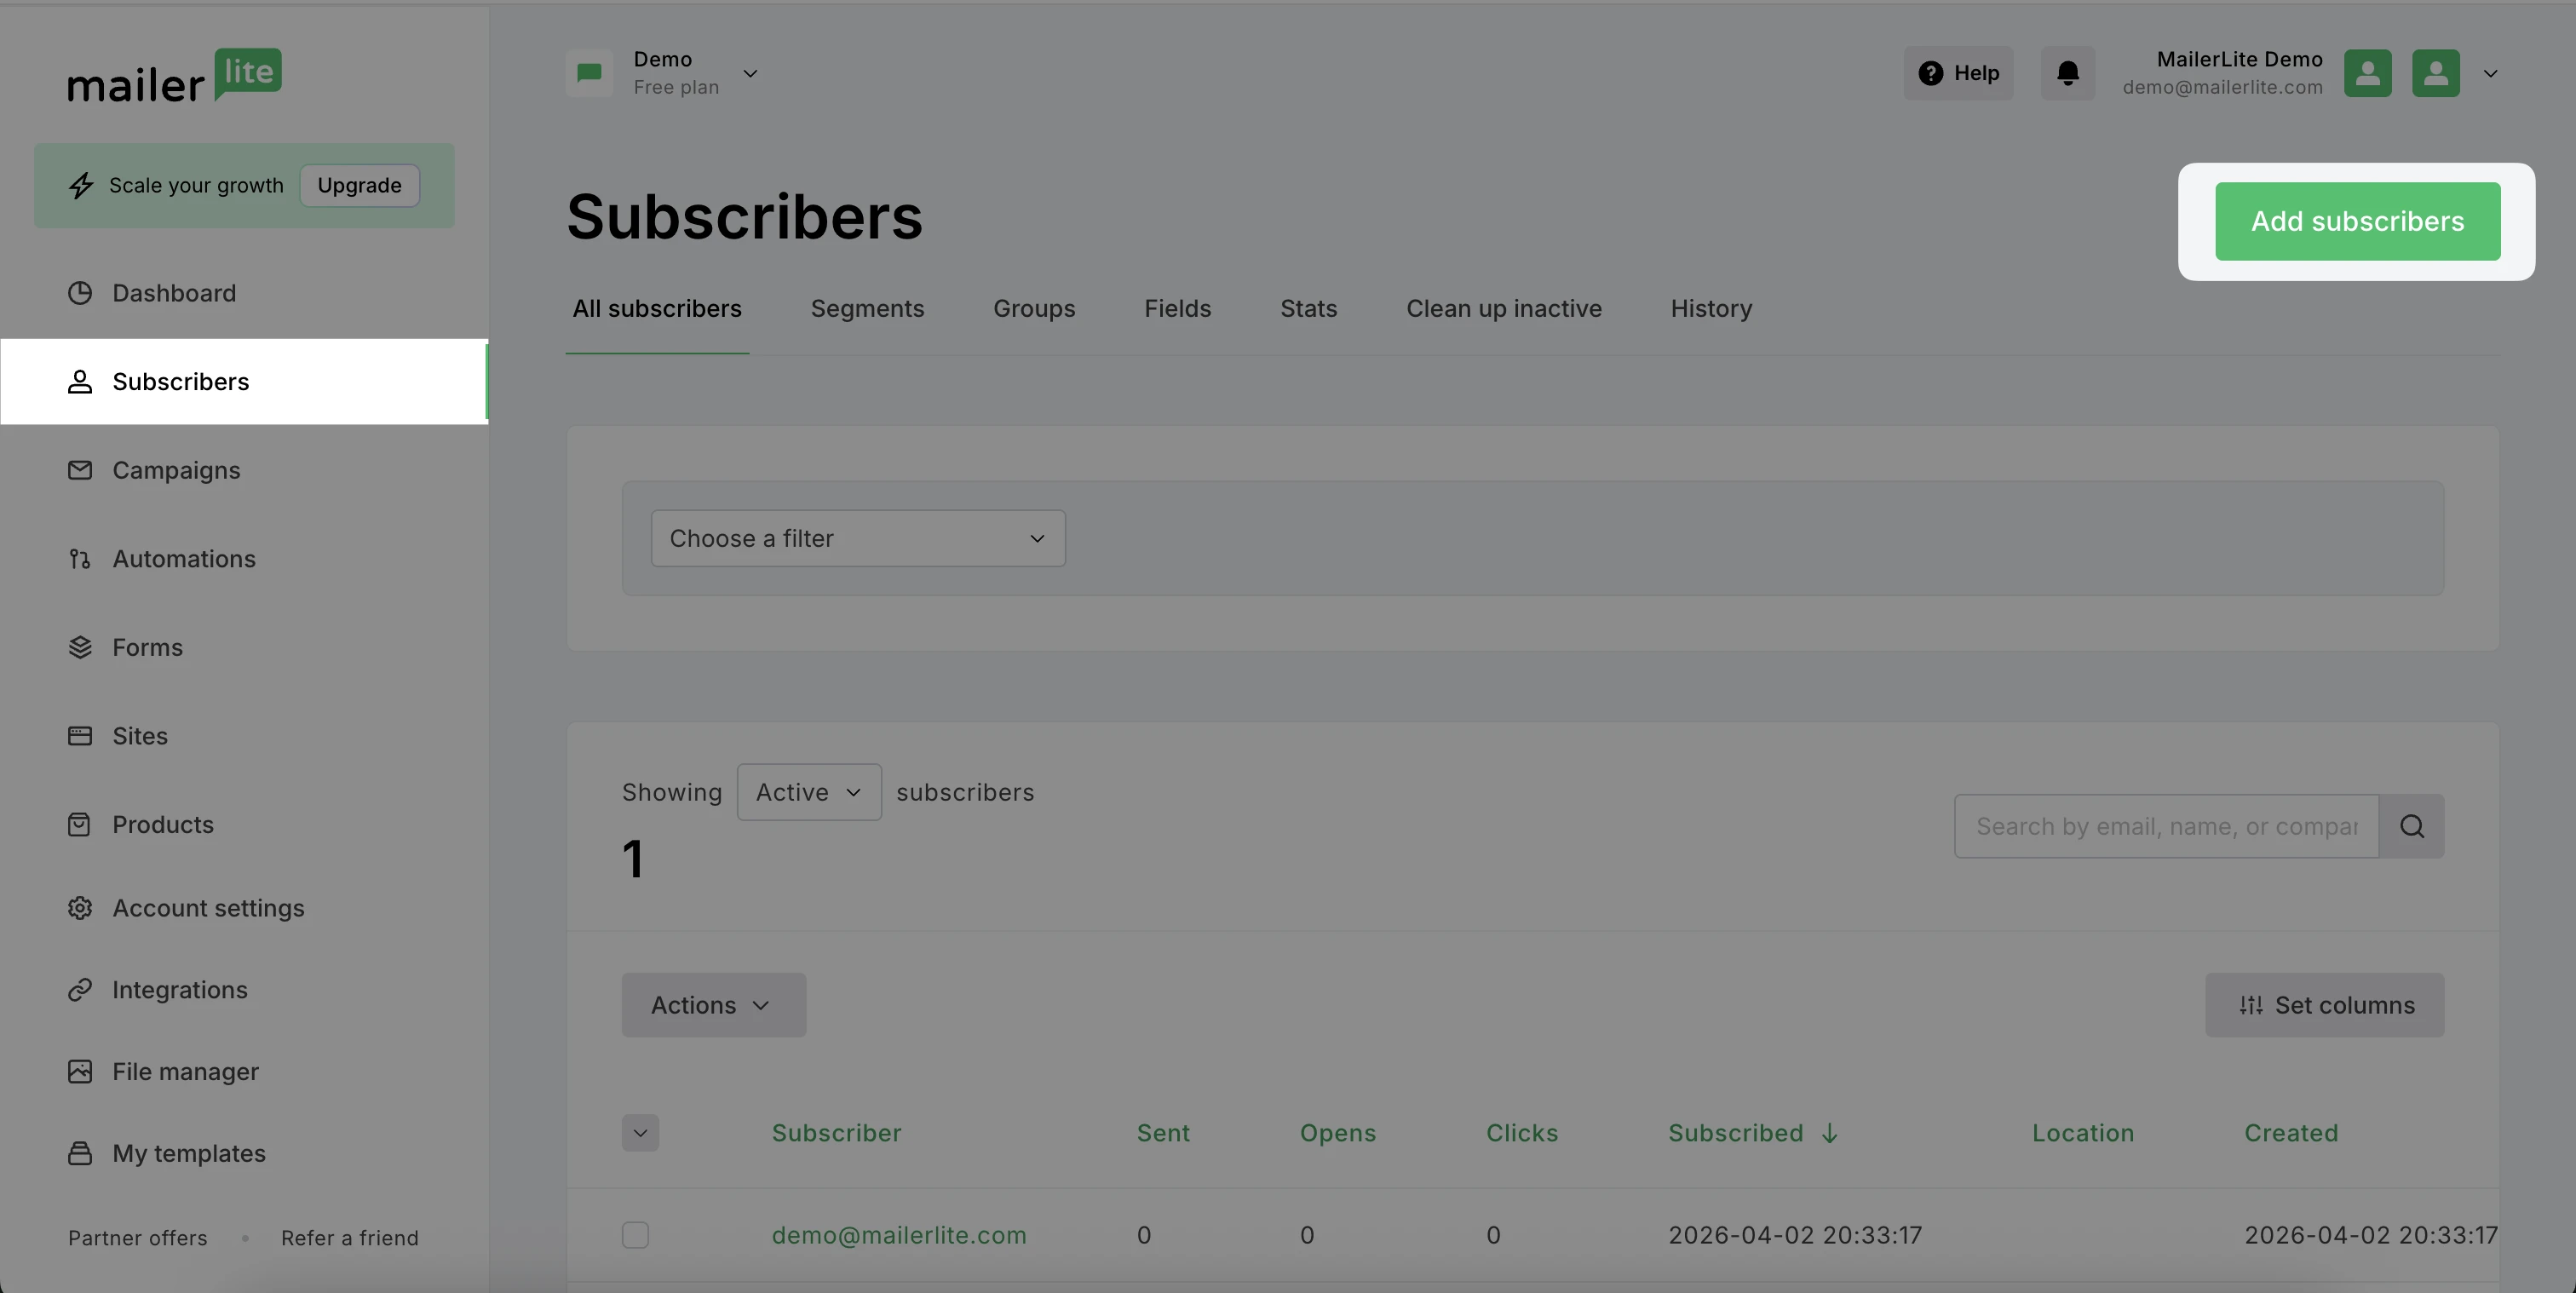
Navigate to the Subscribers page in your MailerLite account.
Click Add subscribers.
Locate the Import from Mailchimp tab. Here, you will see two options for migrating your information.
Log in using credentials: Connect to your Mailchimp account by logging in with your credentials.
Connect via API key: Use the API key associated with your Mailchimp account to integrate the two platforms.
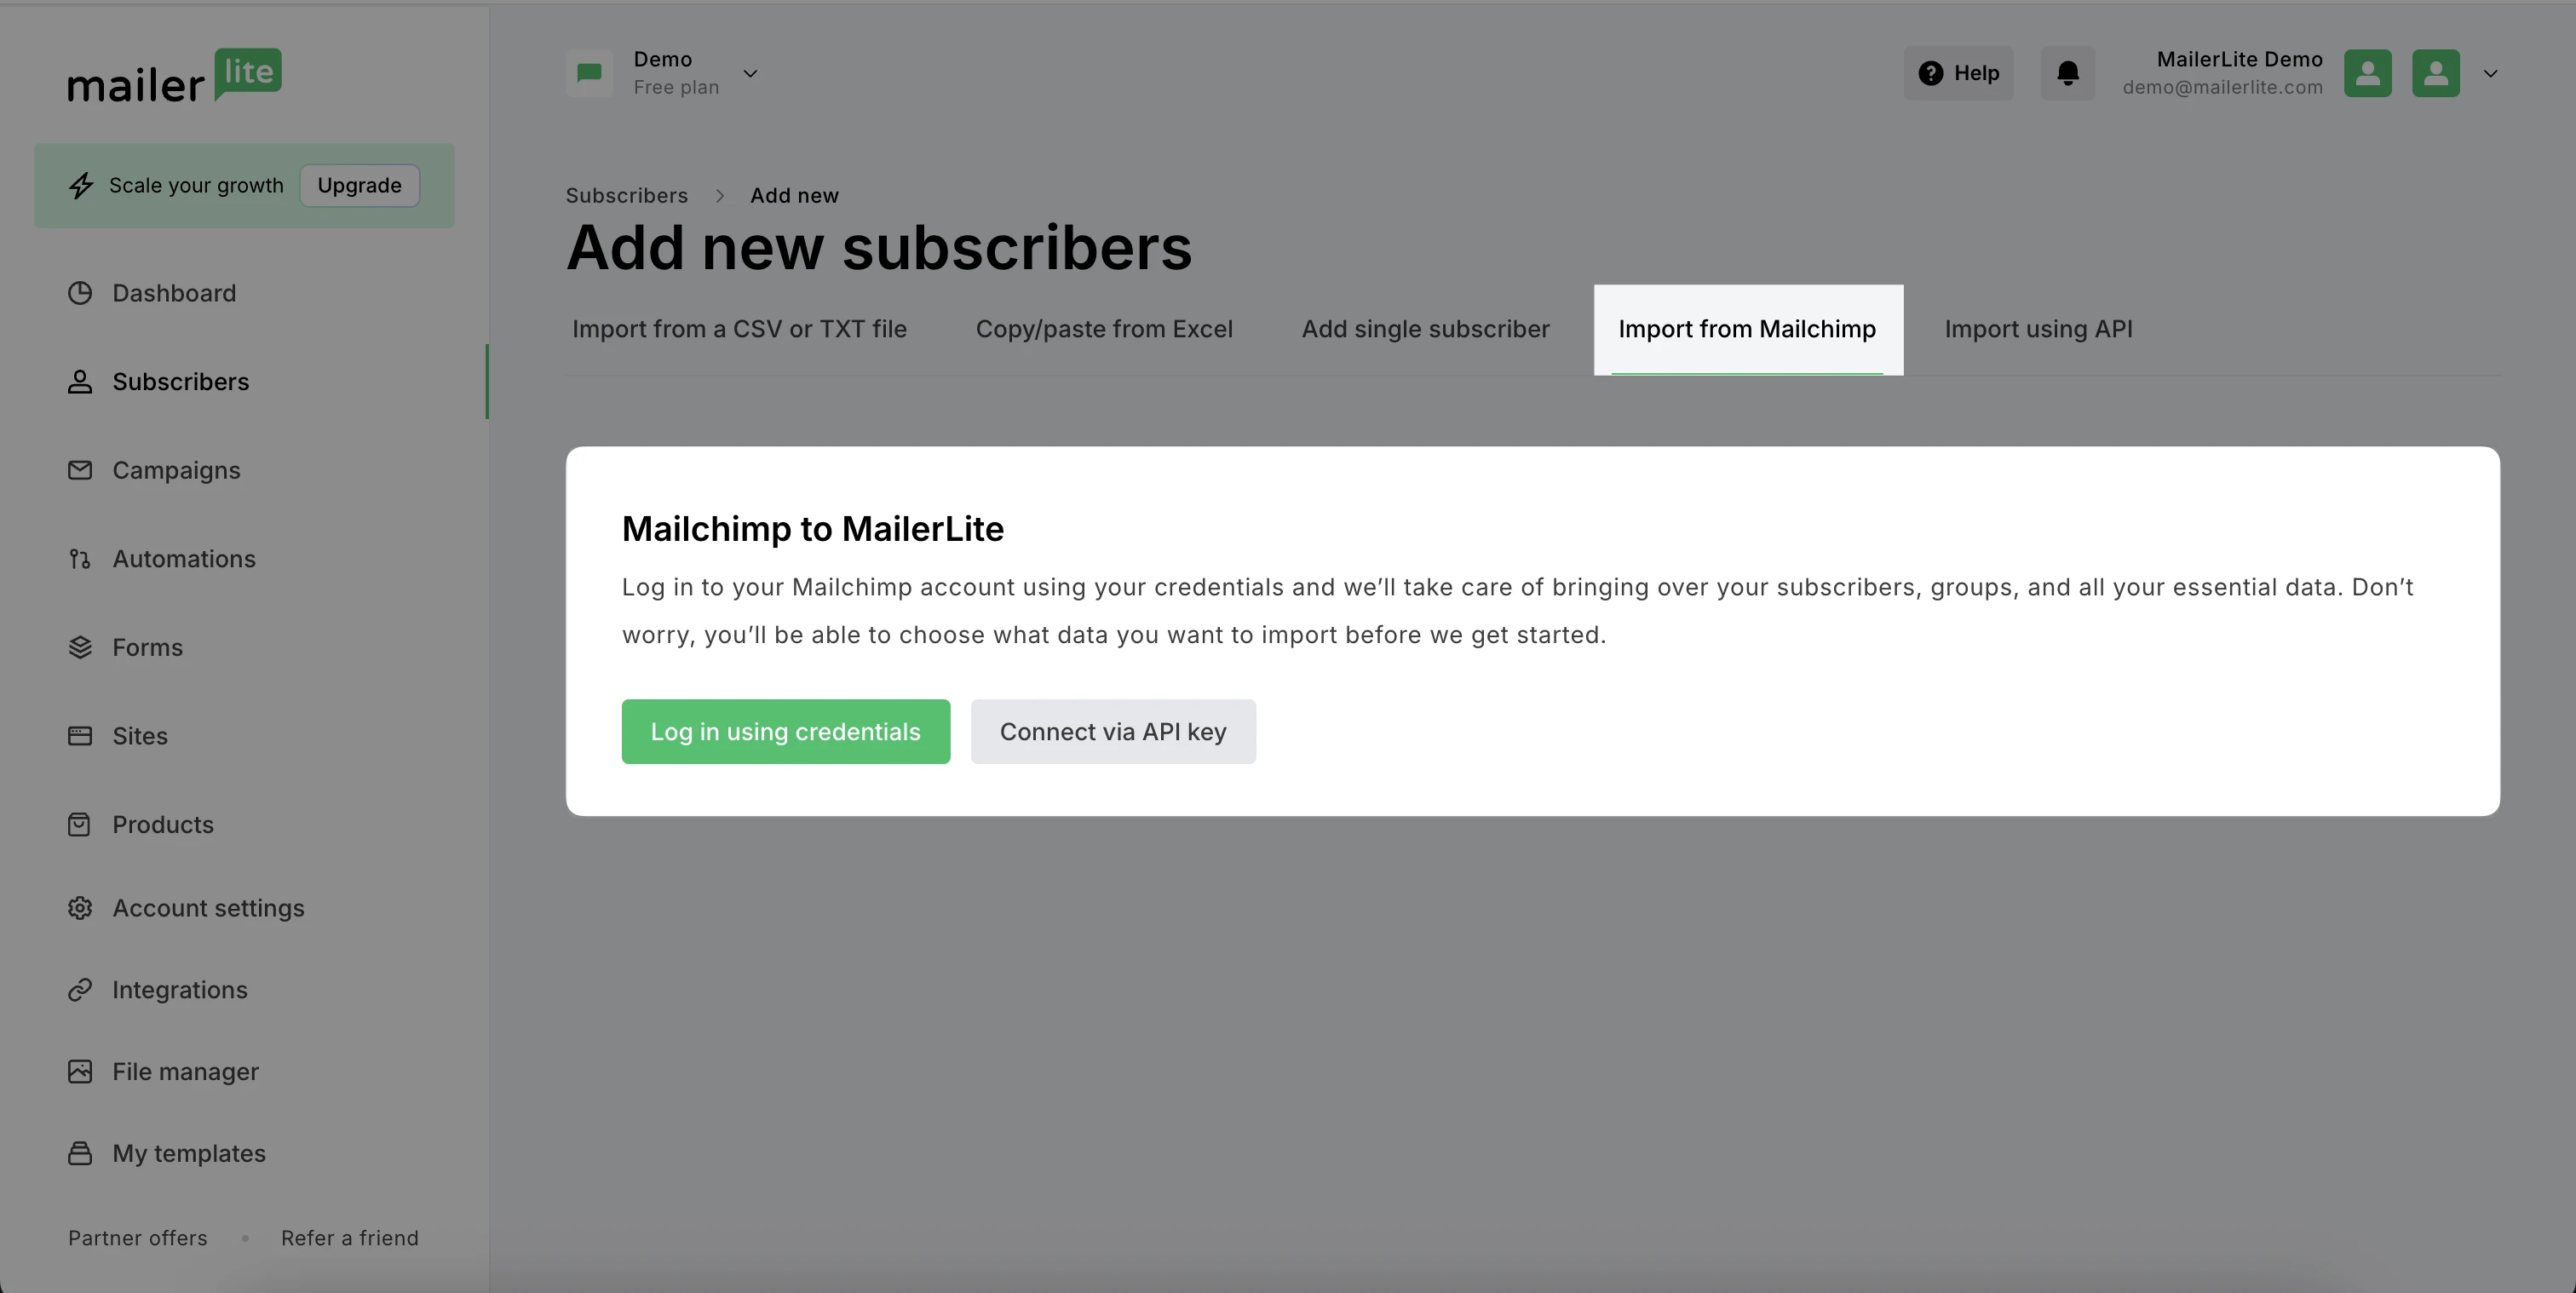
If you choose to Log in using credentials, you will be taken to Mailchimp to log in to your account.
Click Allow to authorize MailerLite to access your account information.
Select subscriber lists - Choose the lists to bring over from Mailchimp by selecting the names that appear. Individual tags will be organized at a later step.
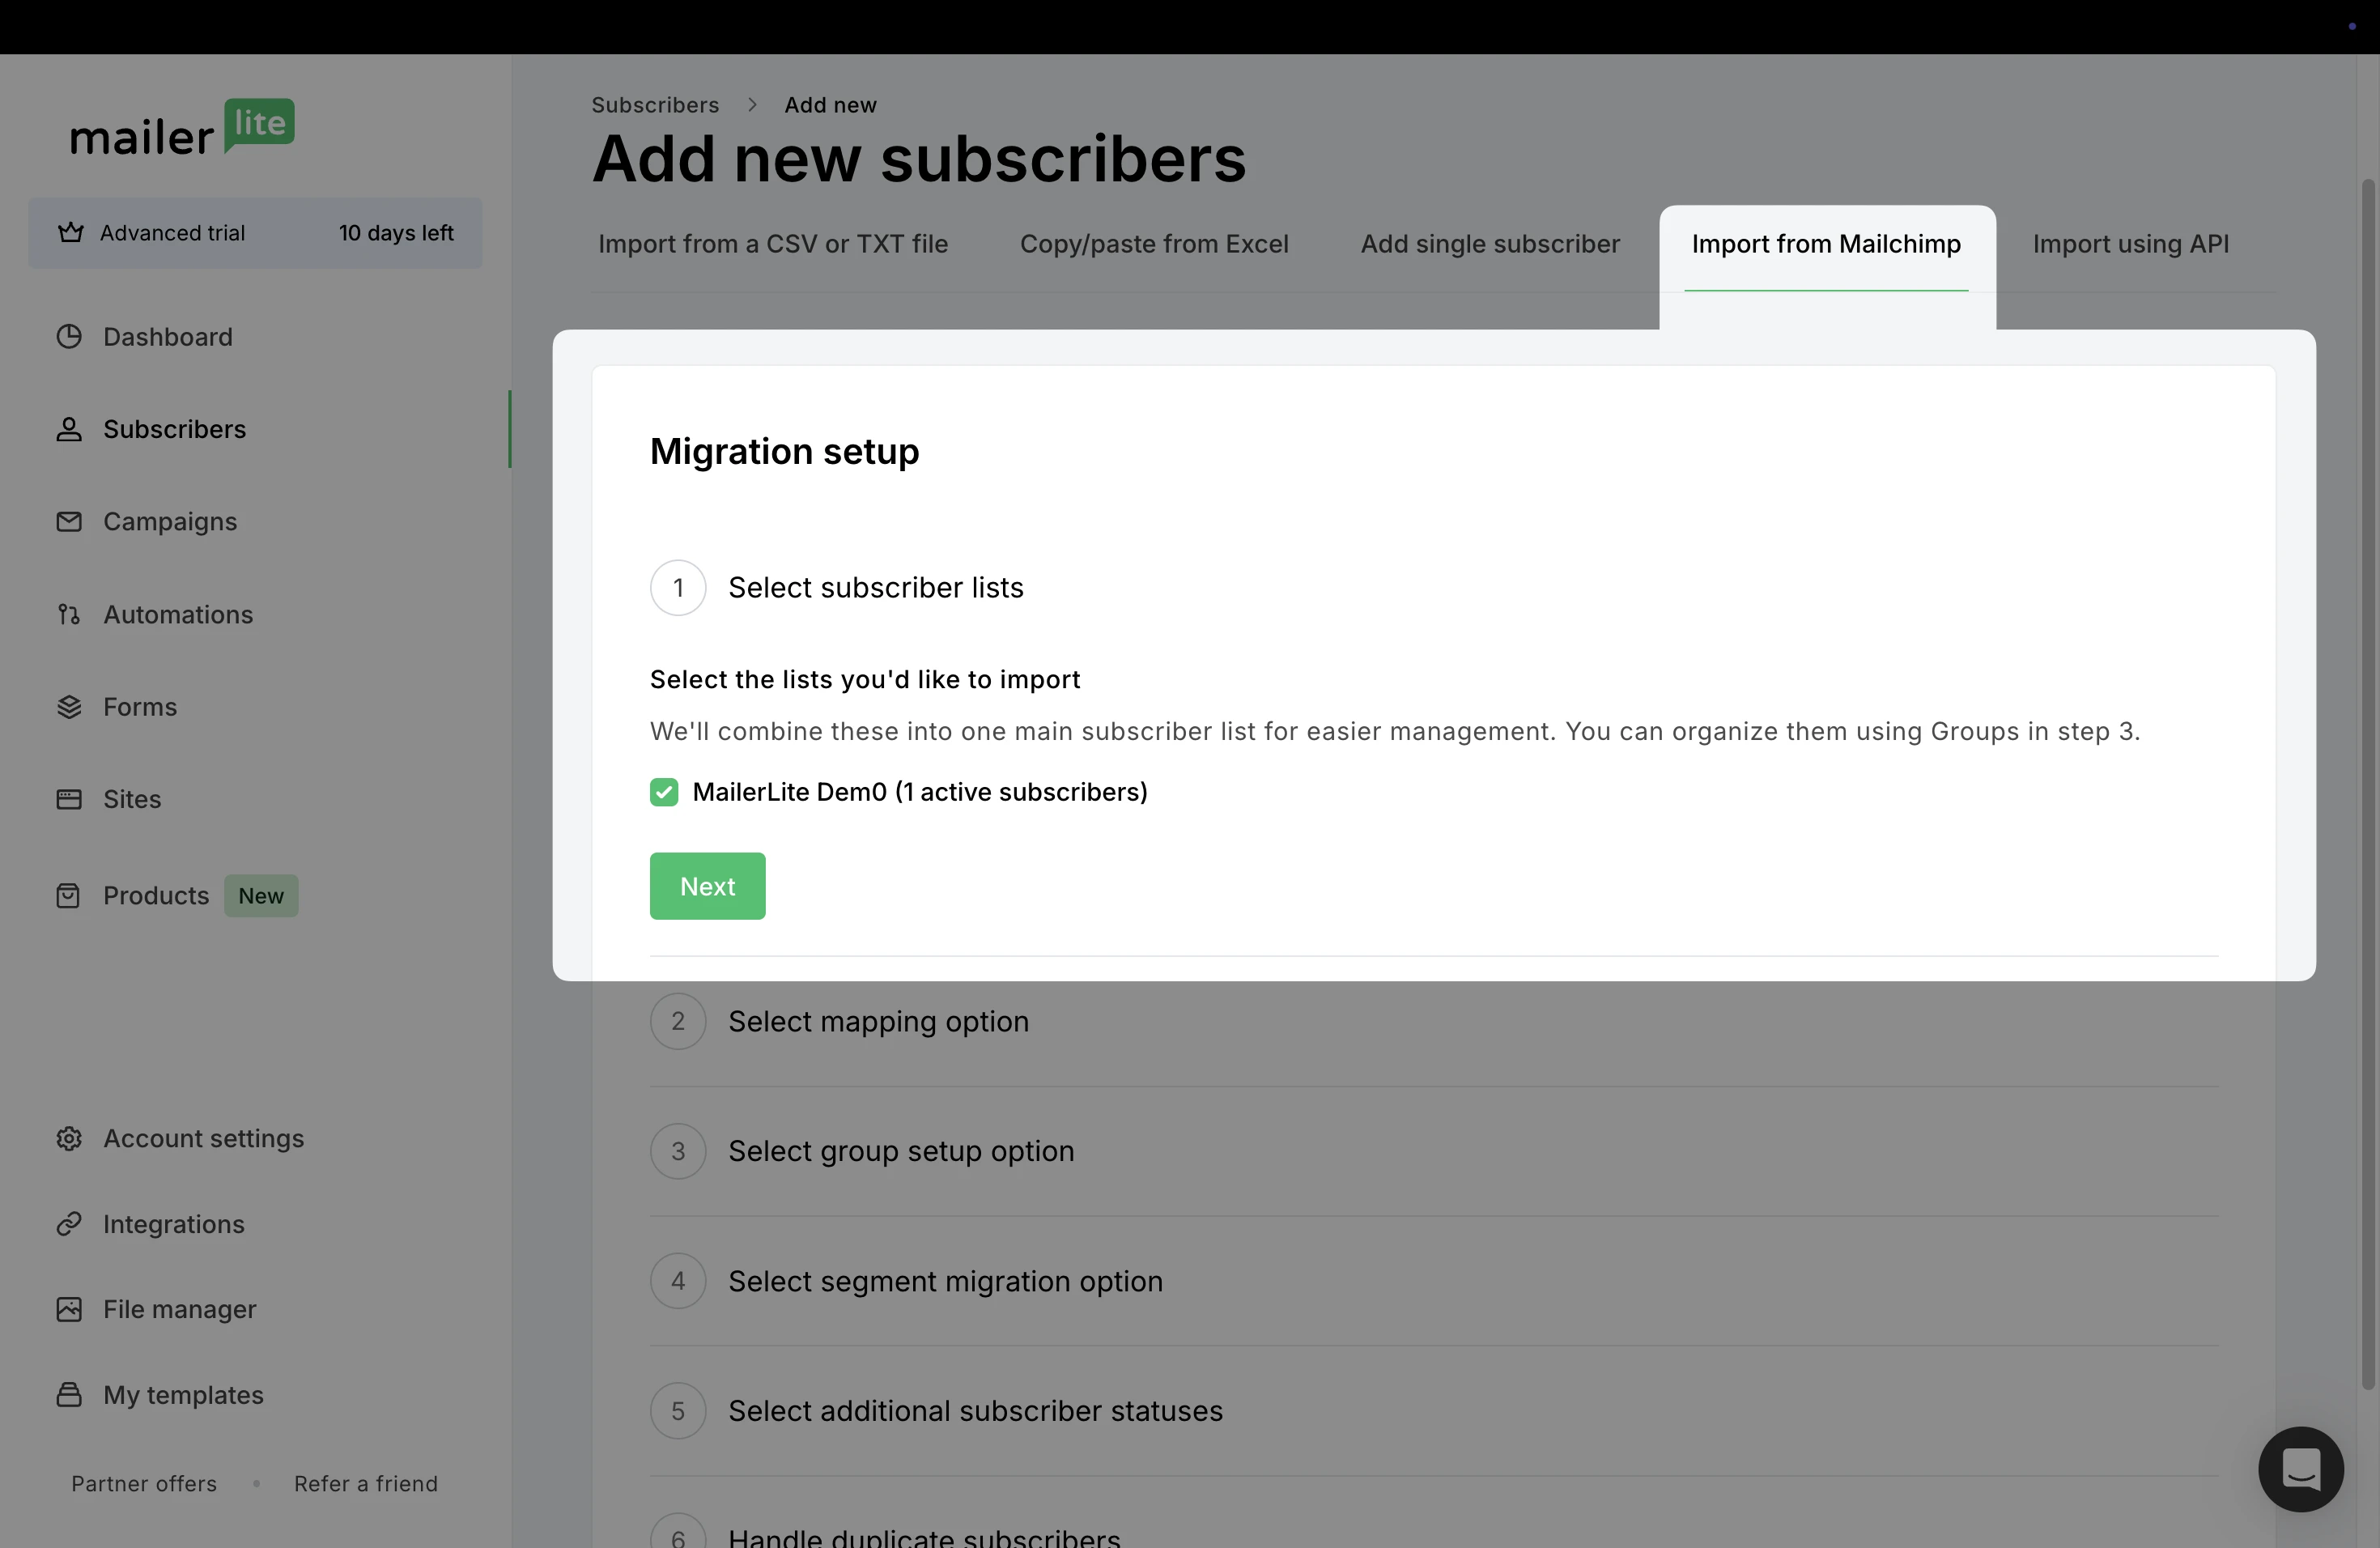
Click Next.
Select mapping option - Choose how the information in subscriber fields is migrated.
📇 What is a subscriber field?
Subscriber fields store information about your contacts like a subscriber’s name, company, location, or any custom information you want to collect.
You can use this data to personalize emails, segment your audience, and create more targeted campaigns. Learn more
Map the fields for me: Our system will automatically detect, match, and create custom fields in MailerLite based on the information from your Mailchimp account.
Map the fields myself: Manually choose what information is migrated from Mailchimp, and where it should appear in MailerLite.
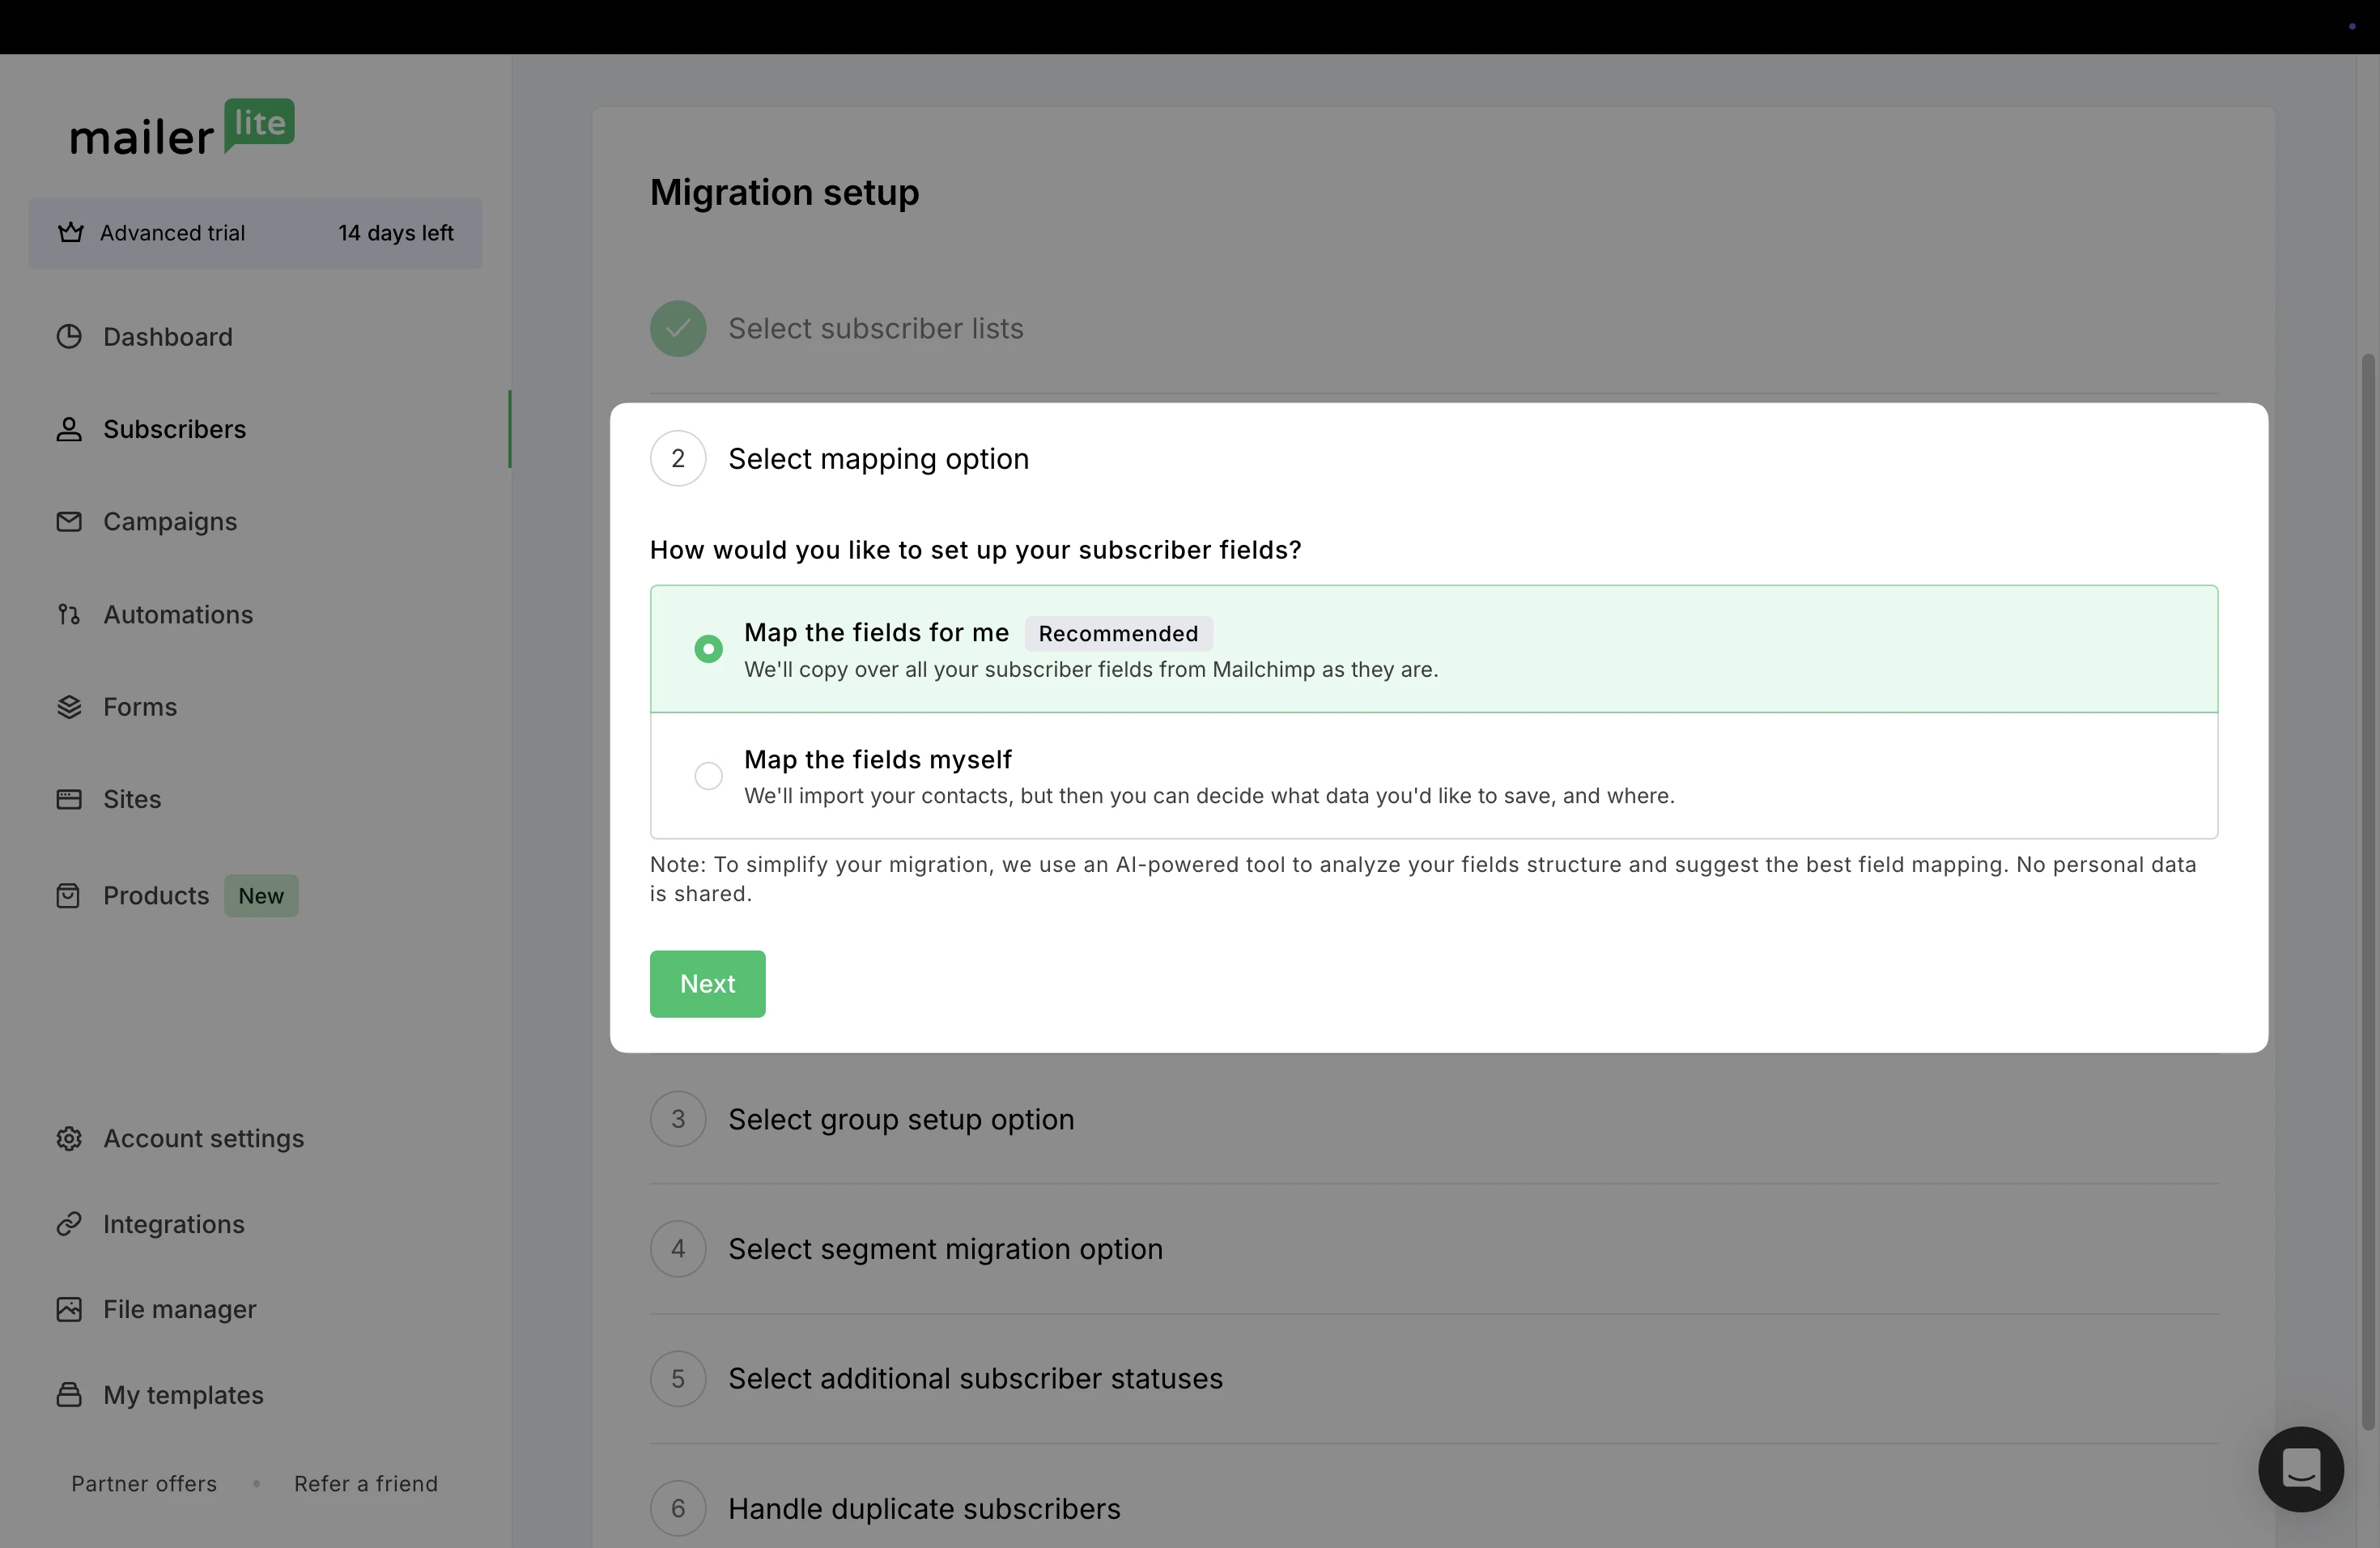
Click Next.
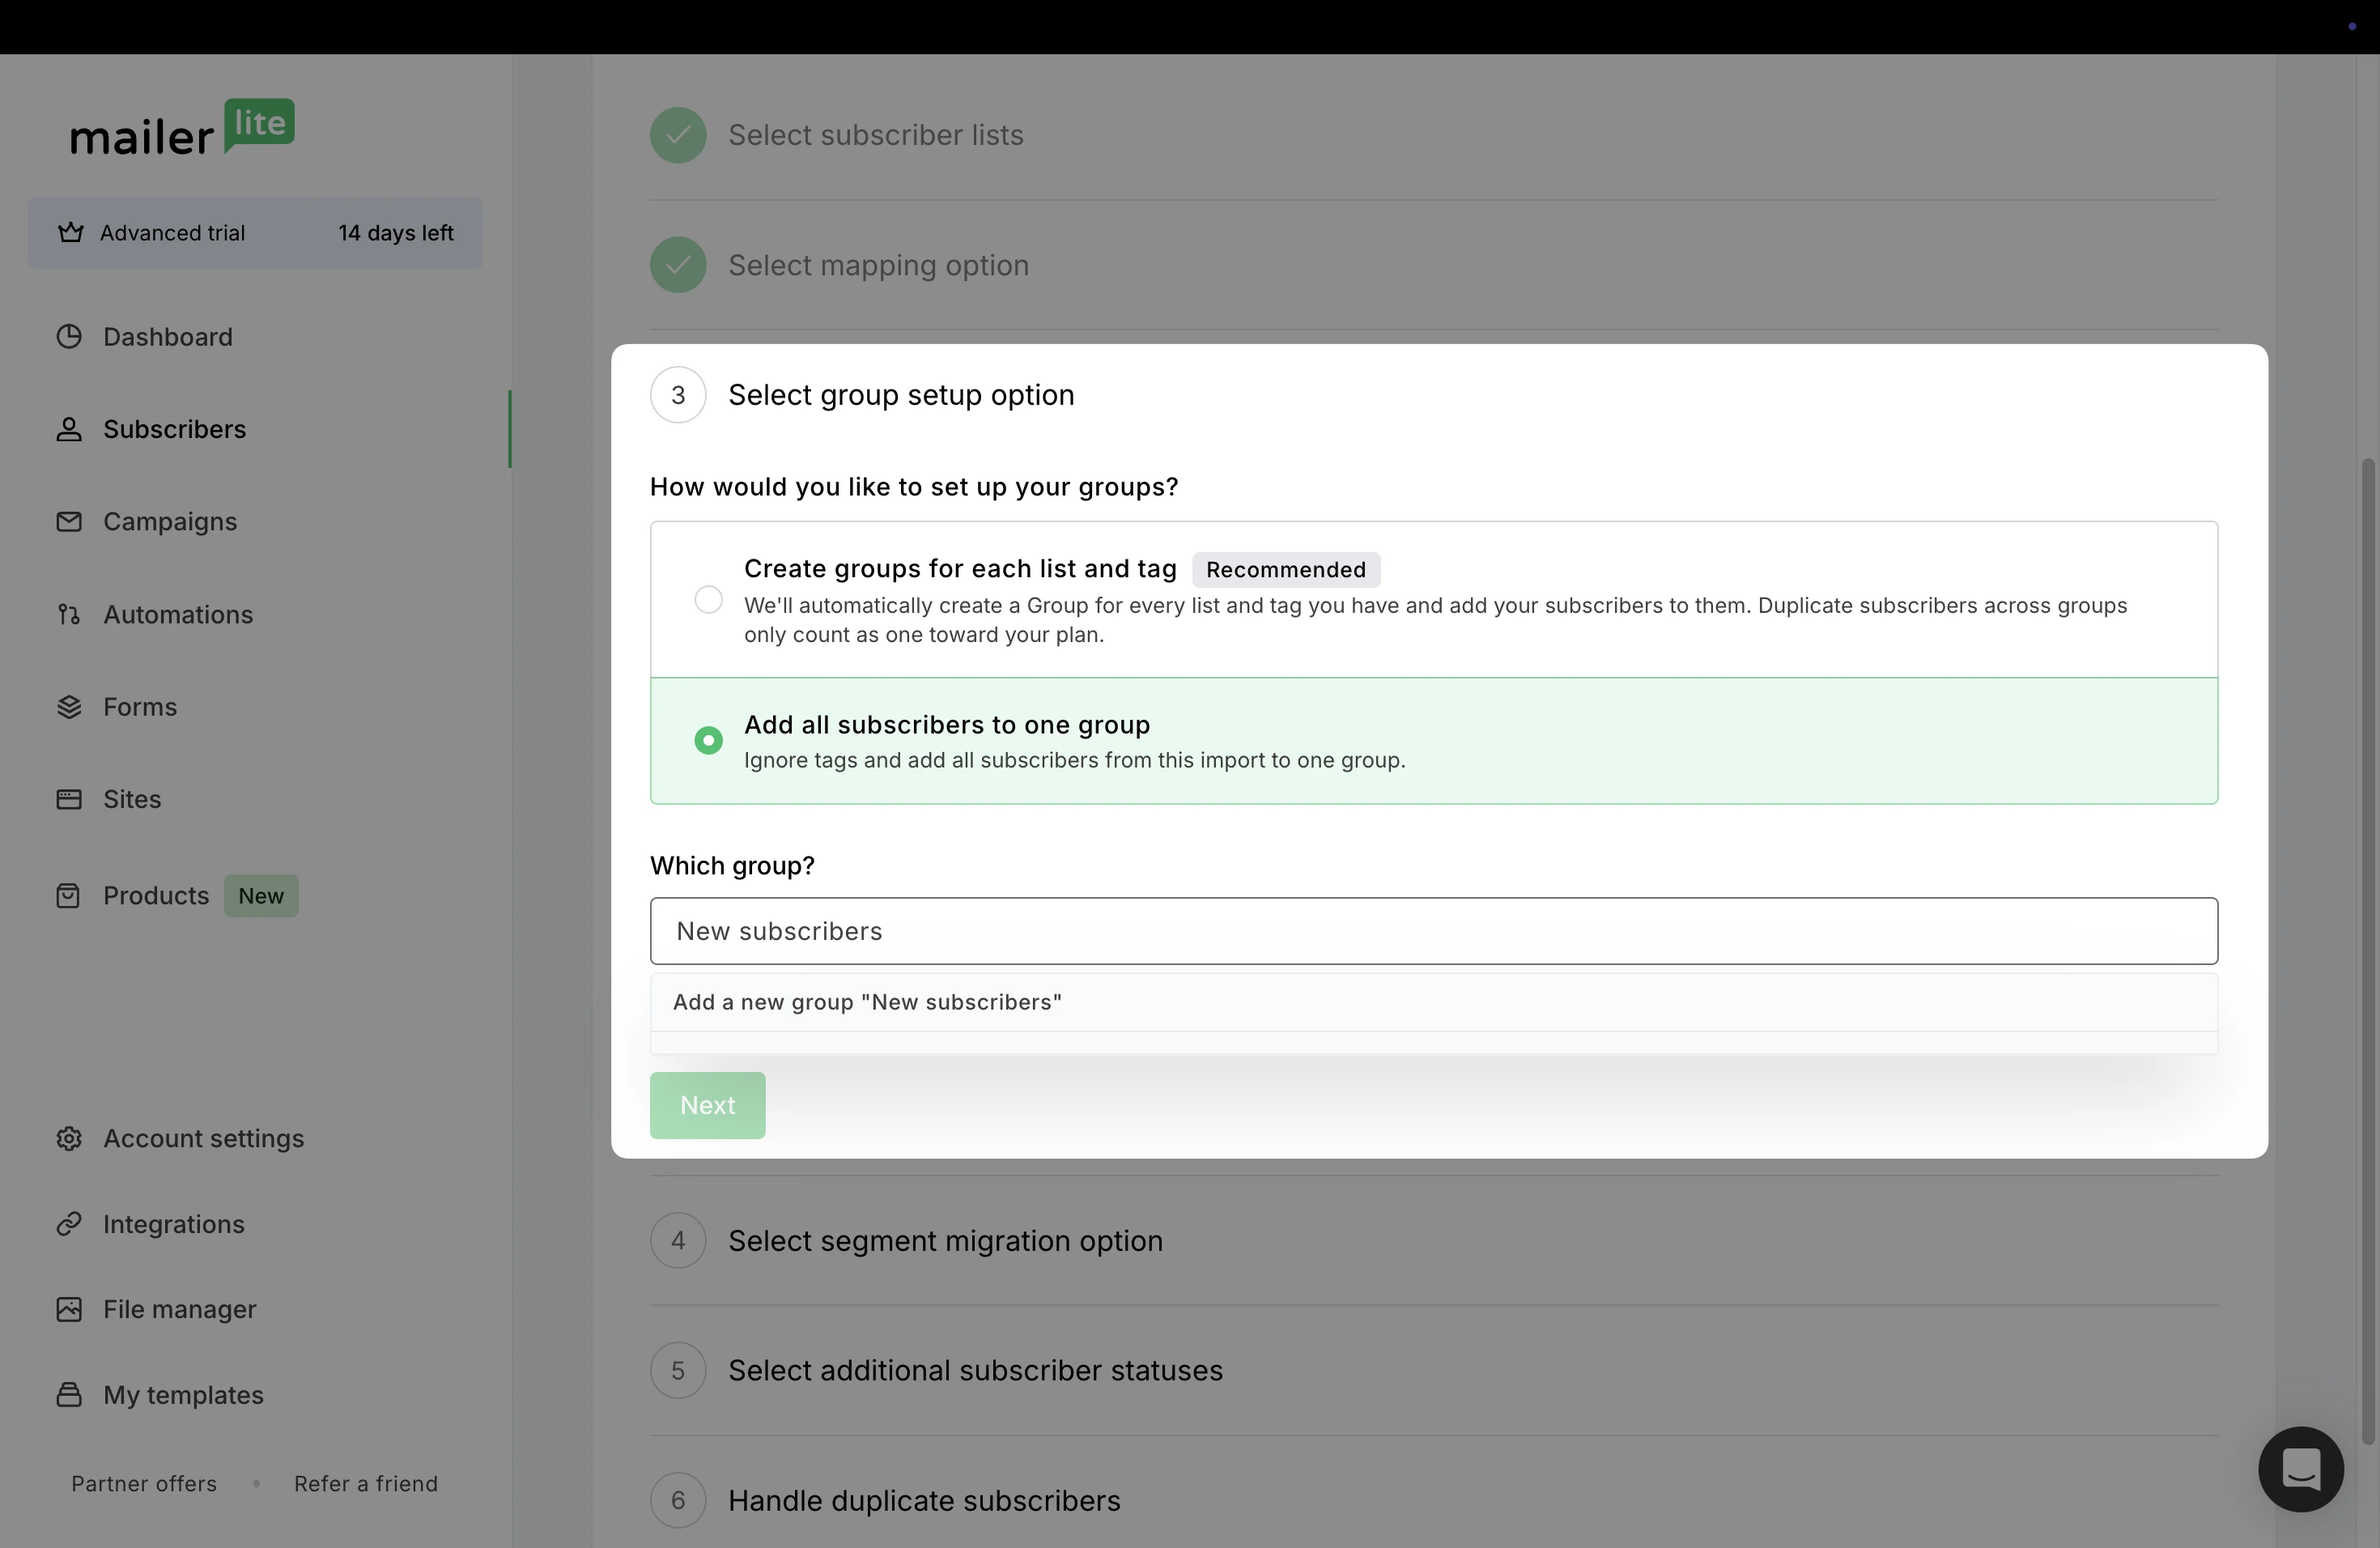
Select group setup option - Choose how your Mailchimp tags will be organized in MailerLite.
Create groups for each list and tag: We'll automatically create a Group in MailerLite for every list and tag you have in Mailchimp and add your subscribers to them. Duplicate subscribers across groups only count as one toward your plan.
Add all subscribers to one group: Ignore individual tags and add all subscribers from this import to one group.
💡Tags vs. Groups
If you’re used to working with Mailchimp, you might notice a difference in terminology:
Mailchimp uses “Tags”, MailerLite uses “Groups”.
They work in essentially the same way — both are used to label and organize subscribers.
If you choose this option, choose a MailerLite group to add these subscribers to, or create a new group by typing the name into the field.
Click Next.
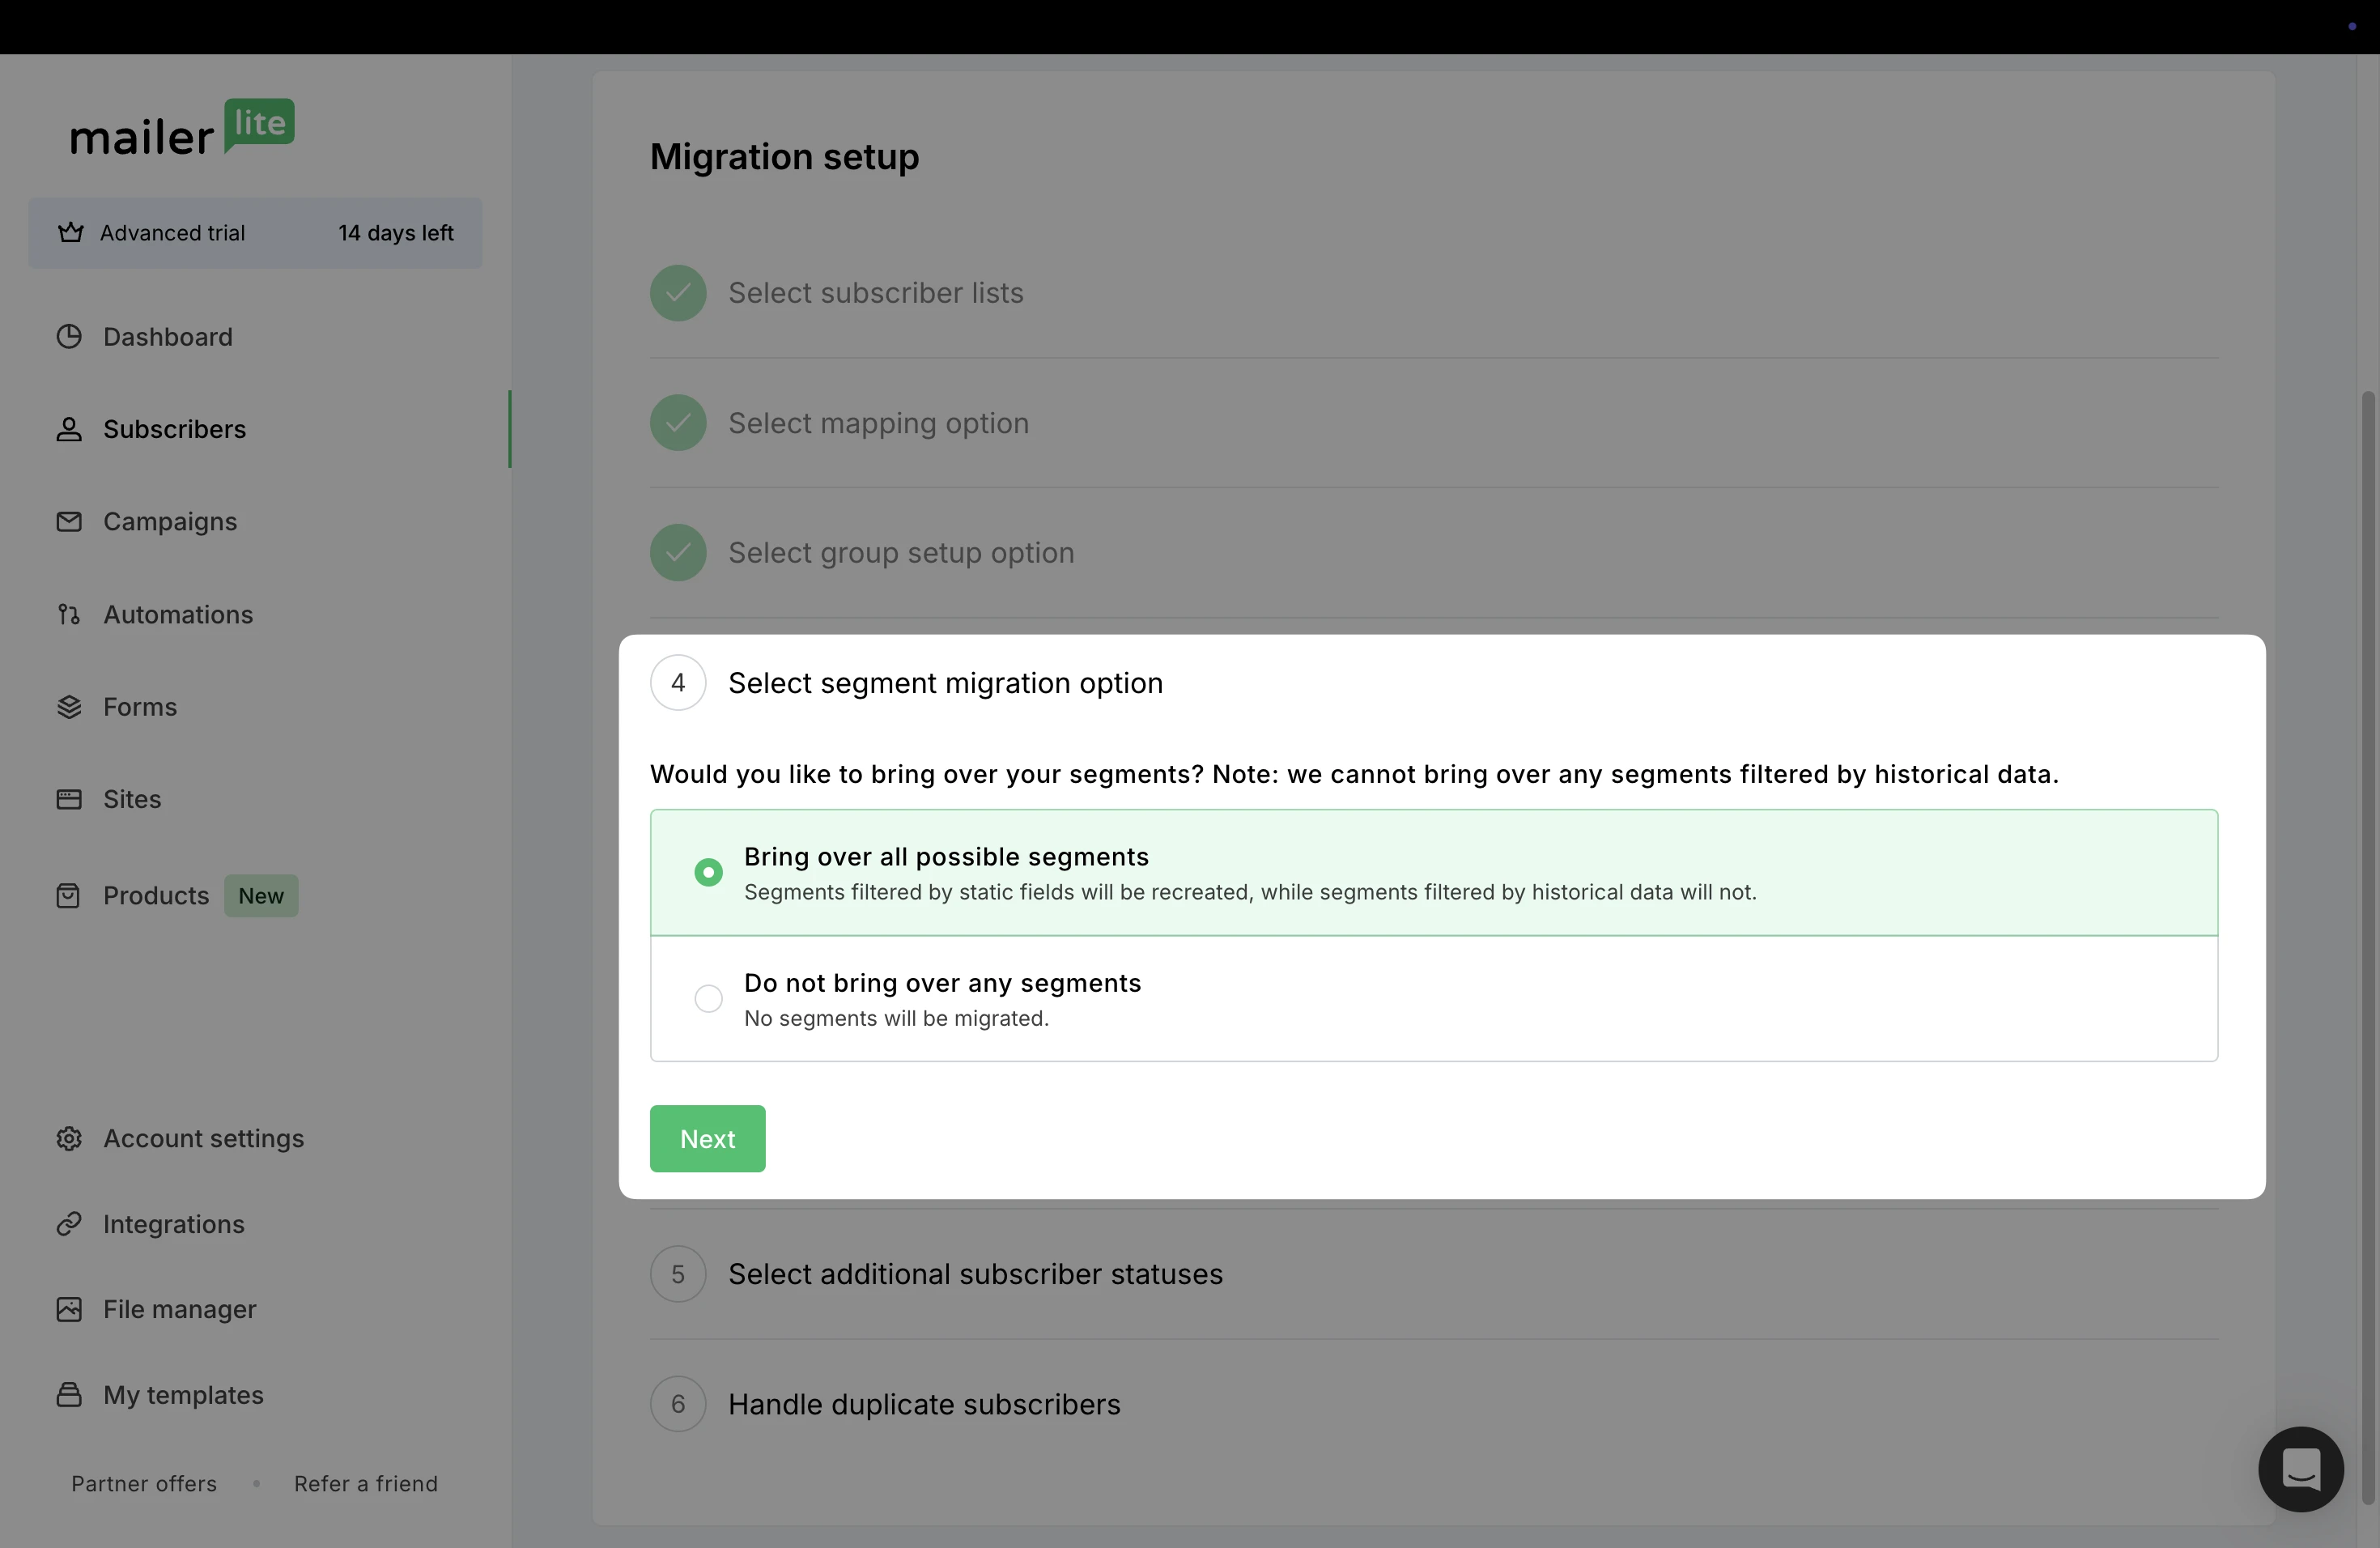
Select segment migration option - Choose how segments in your Mailchimp account will be migrated. Keep in mind, historical/behavioral, e-commerce-based, or advanced segments cannot be migrated automatically.
Why do some segments not migrate?
Mailchimp has two types of segments: basic segments and advanced segments. Only basic segments are accessible for MailerLite, while Advanced segments (such as behavioral, e-commerce, or activity-based conditions) are not, and therefore cannot be imported over.
👉 In short: Only simple, field-based segments can be recreated. More complex segment logic will need to be rebuilt manually in MailerLite.
Bring over all possible segments: Segments filtered by static fields will be recreated, while segments filtered by the above conditions will not.
Do not bring over any segments: No segments will be migrated from your Mailchimp account.
Select additional subscriber statuses - Decide if you would like to bring over subscribers that have the status Unsubscribed and/or Unconfirmed by selecting each option.
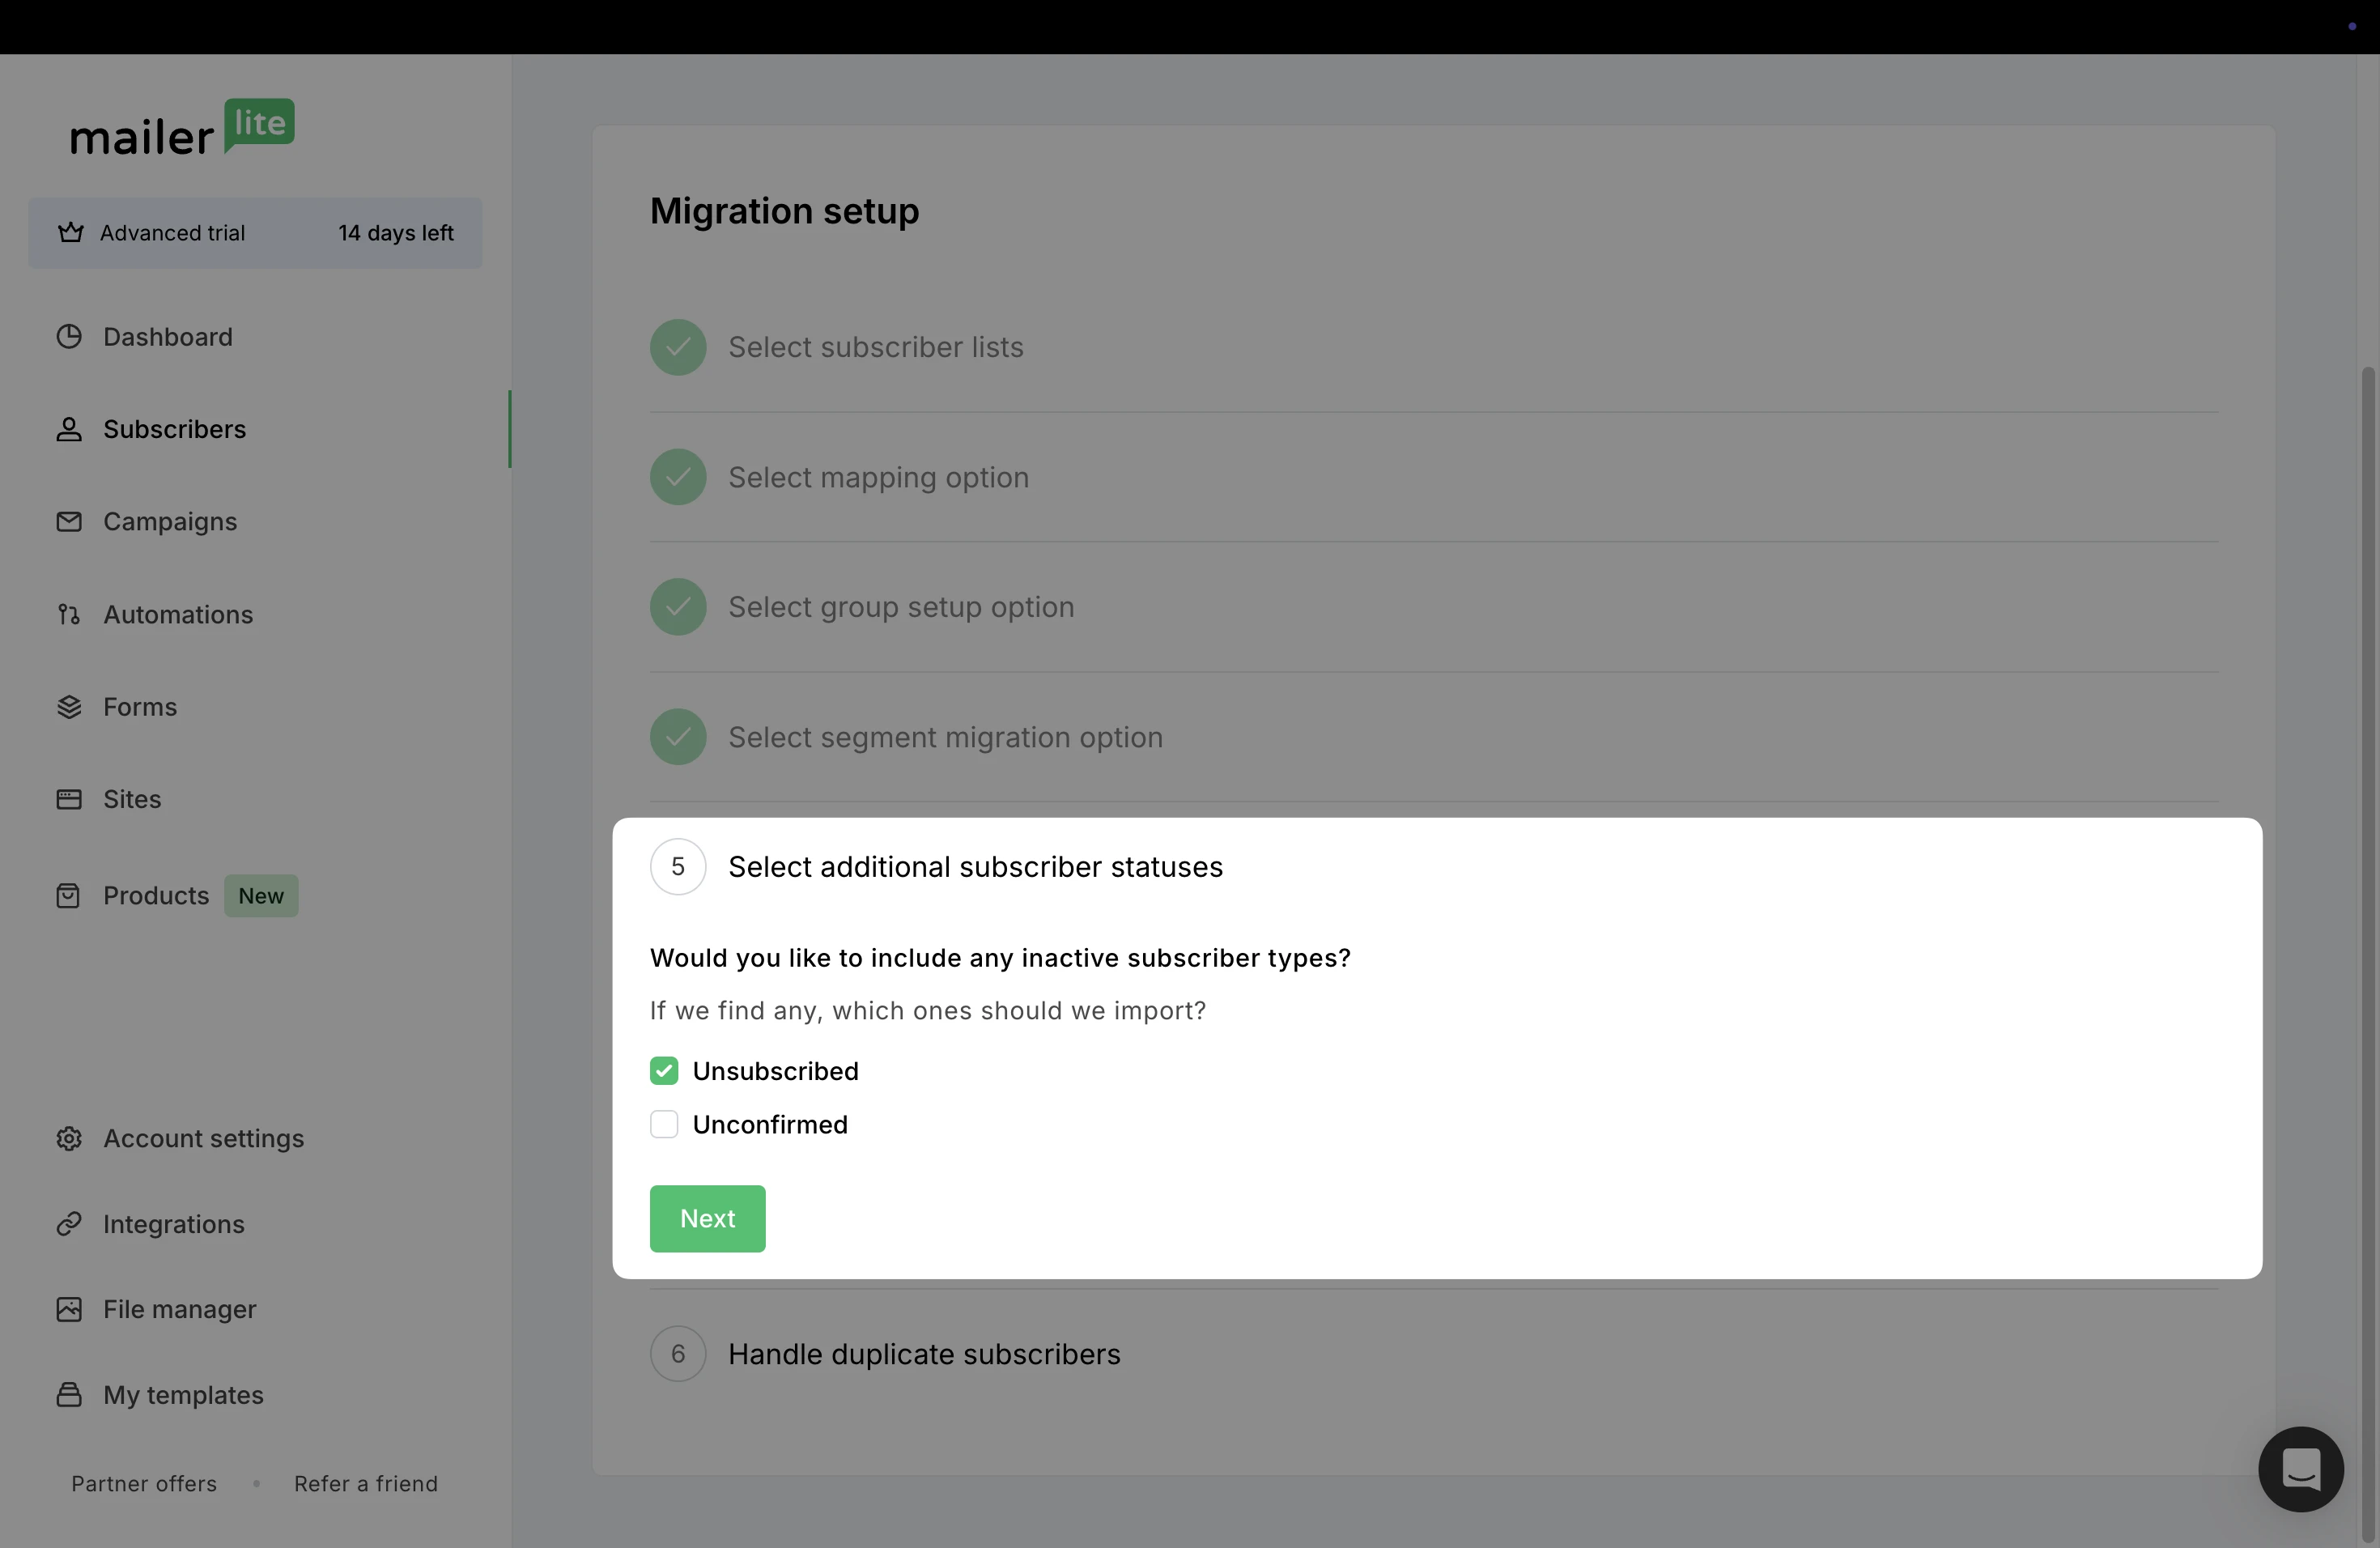
These subscribers will appear in the Subscribers area in their own separate category from Active subscribers, and cannot be sent newsletters.
Click Next.
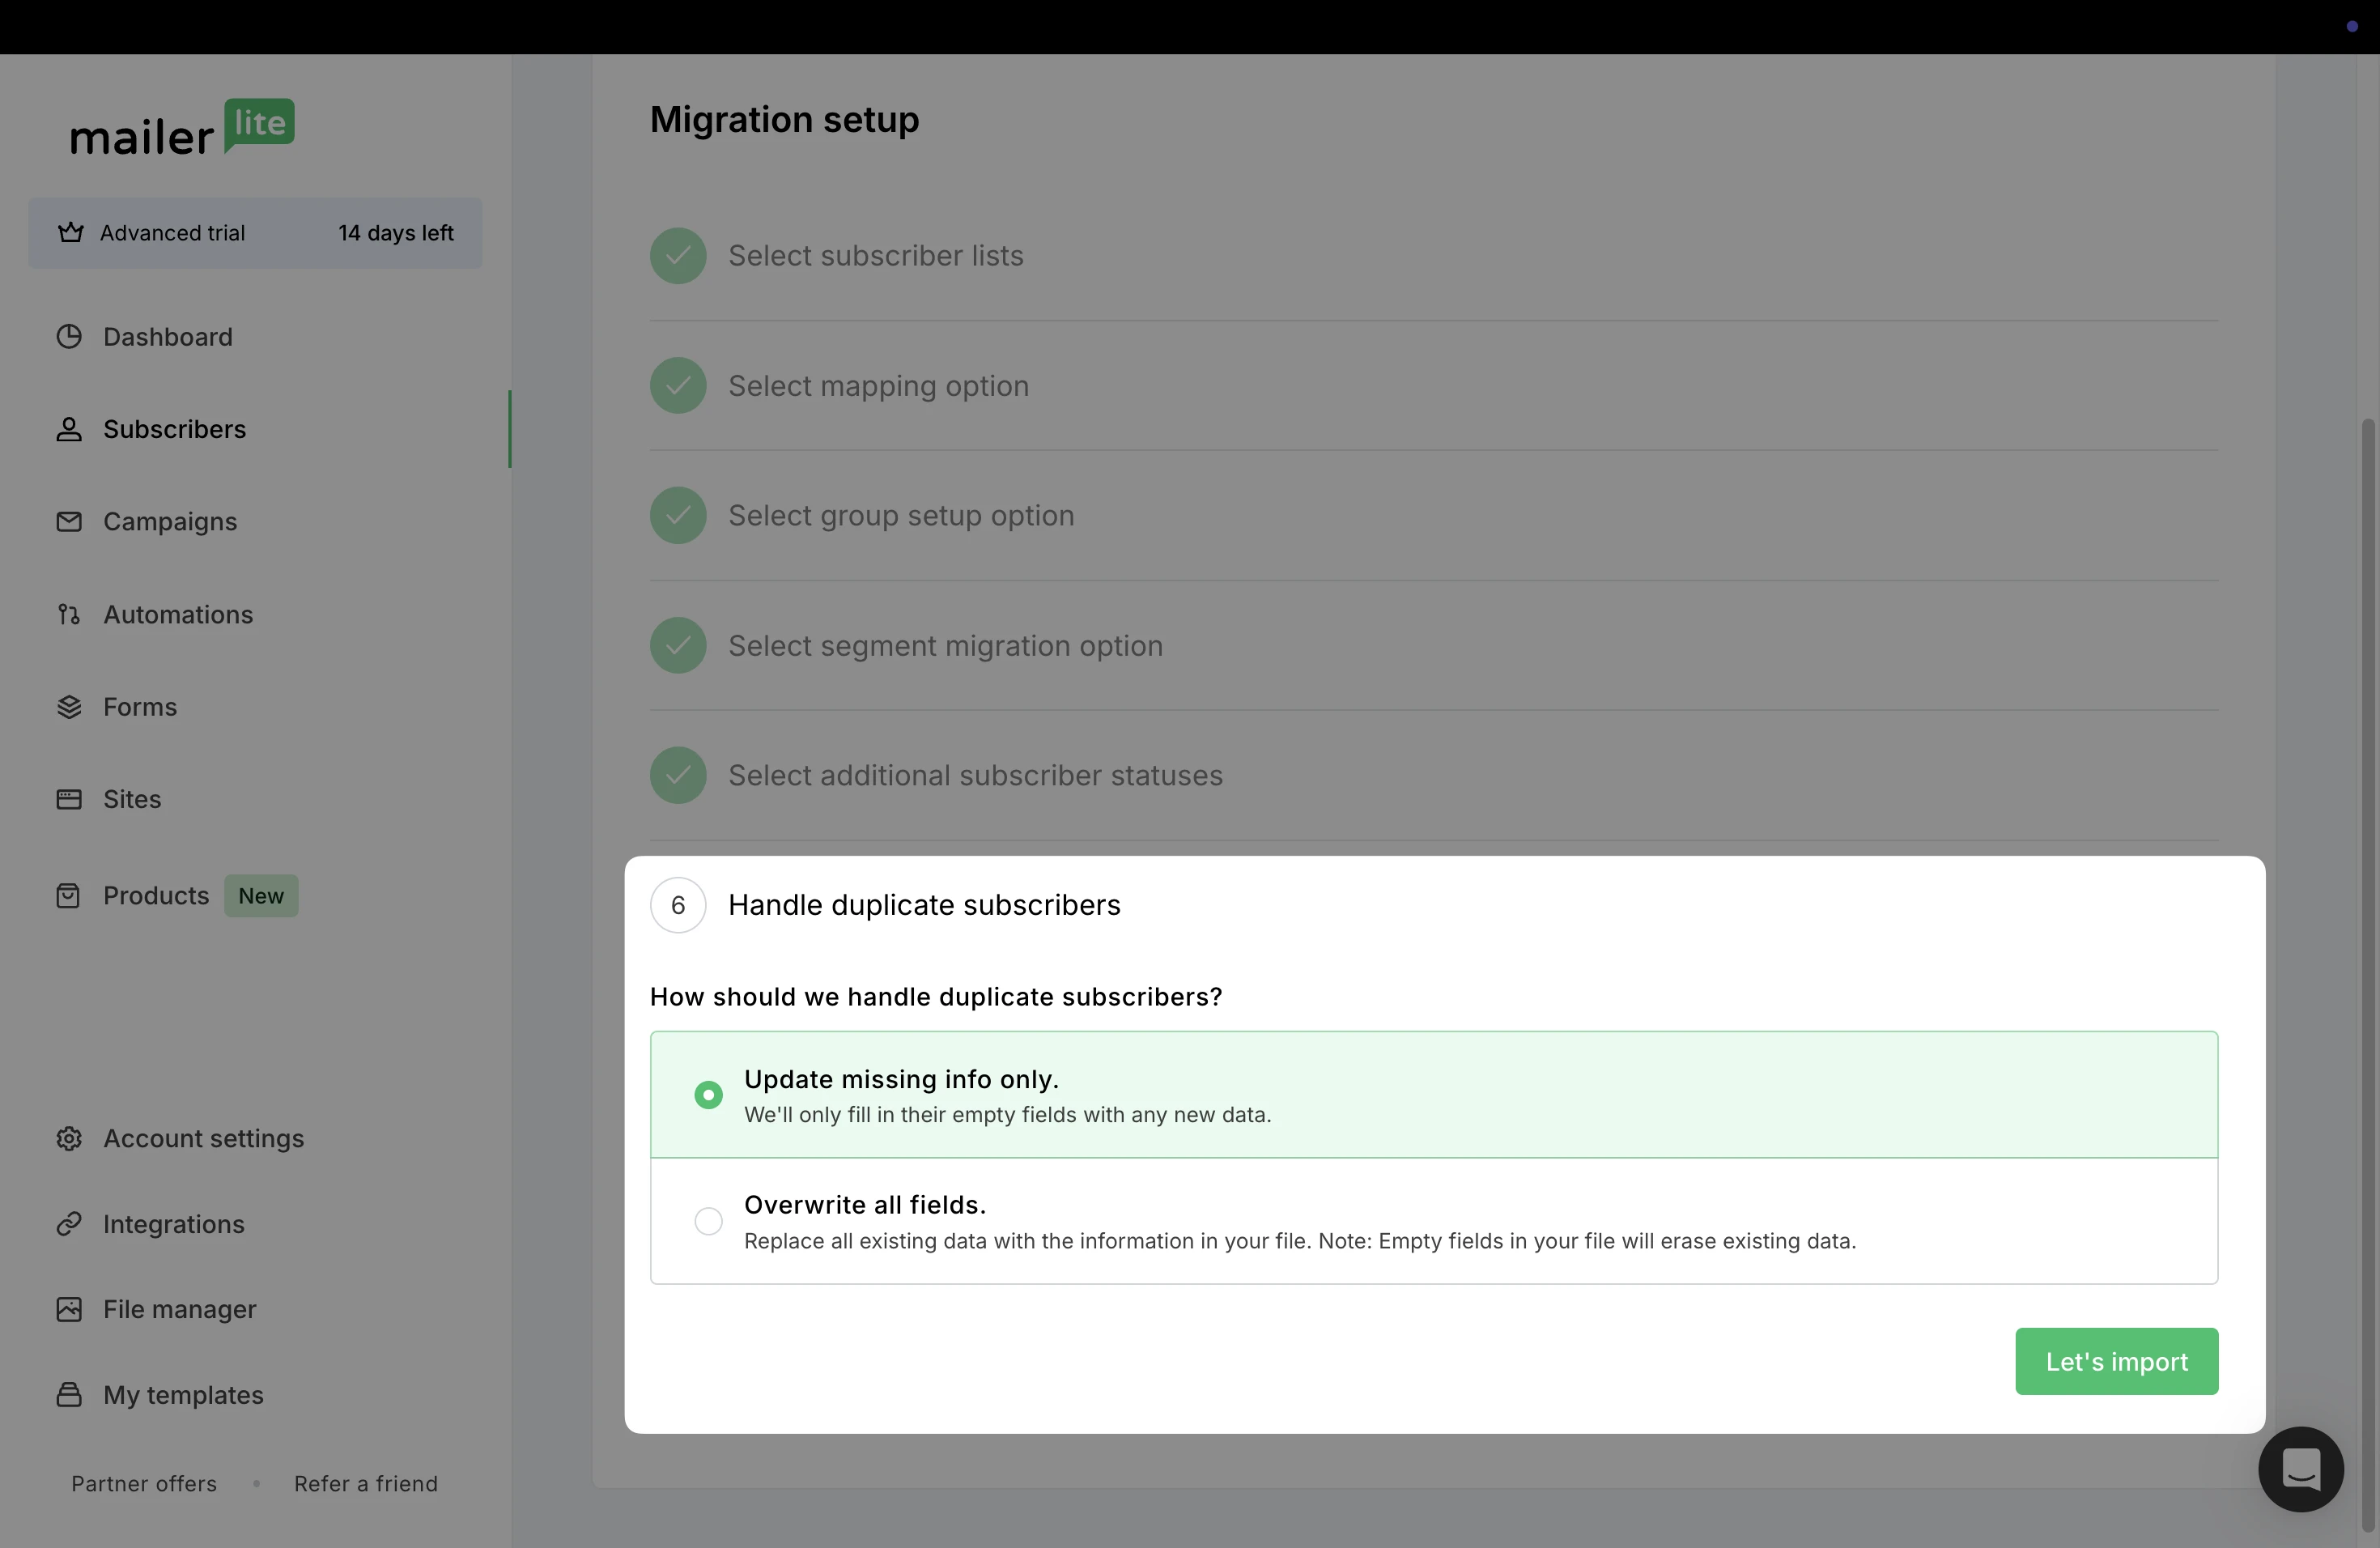
Handle duplicate subscribers - Decide how MailerLite should handle duplicate subscribers from your import if they are already in your MailerLite account.
Update missing info only: Any empty fields will be updated with new information.
Overwrite all fields: Any new information that is imported will replace all existing data with the information. Note: Empty fields in your import will erase existing data.
Click Let’s import.
Match fields
If you chose to match subscriber fields manually, you can now match the fields from your Mailchimp export to the correct subscriber fields in your MailerLite account.
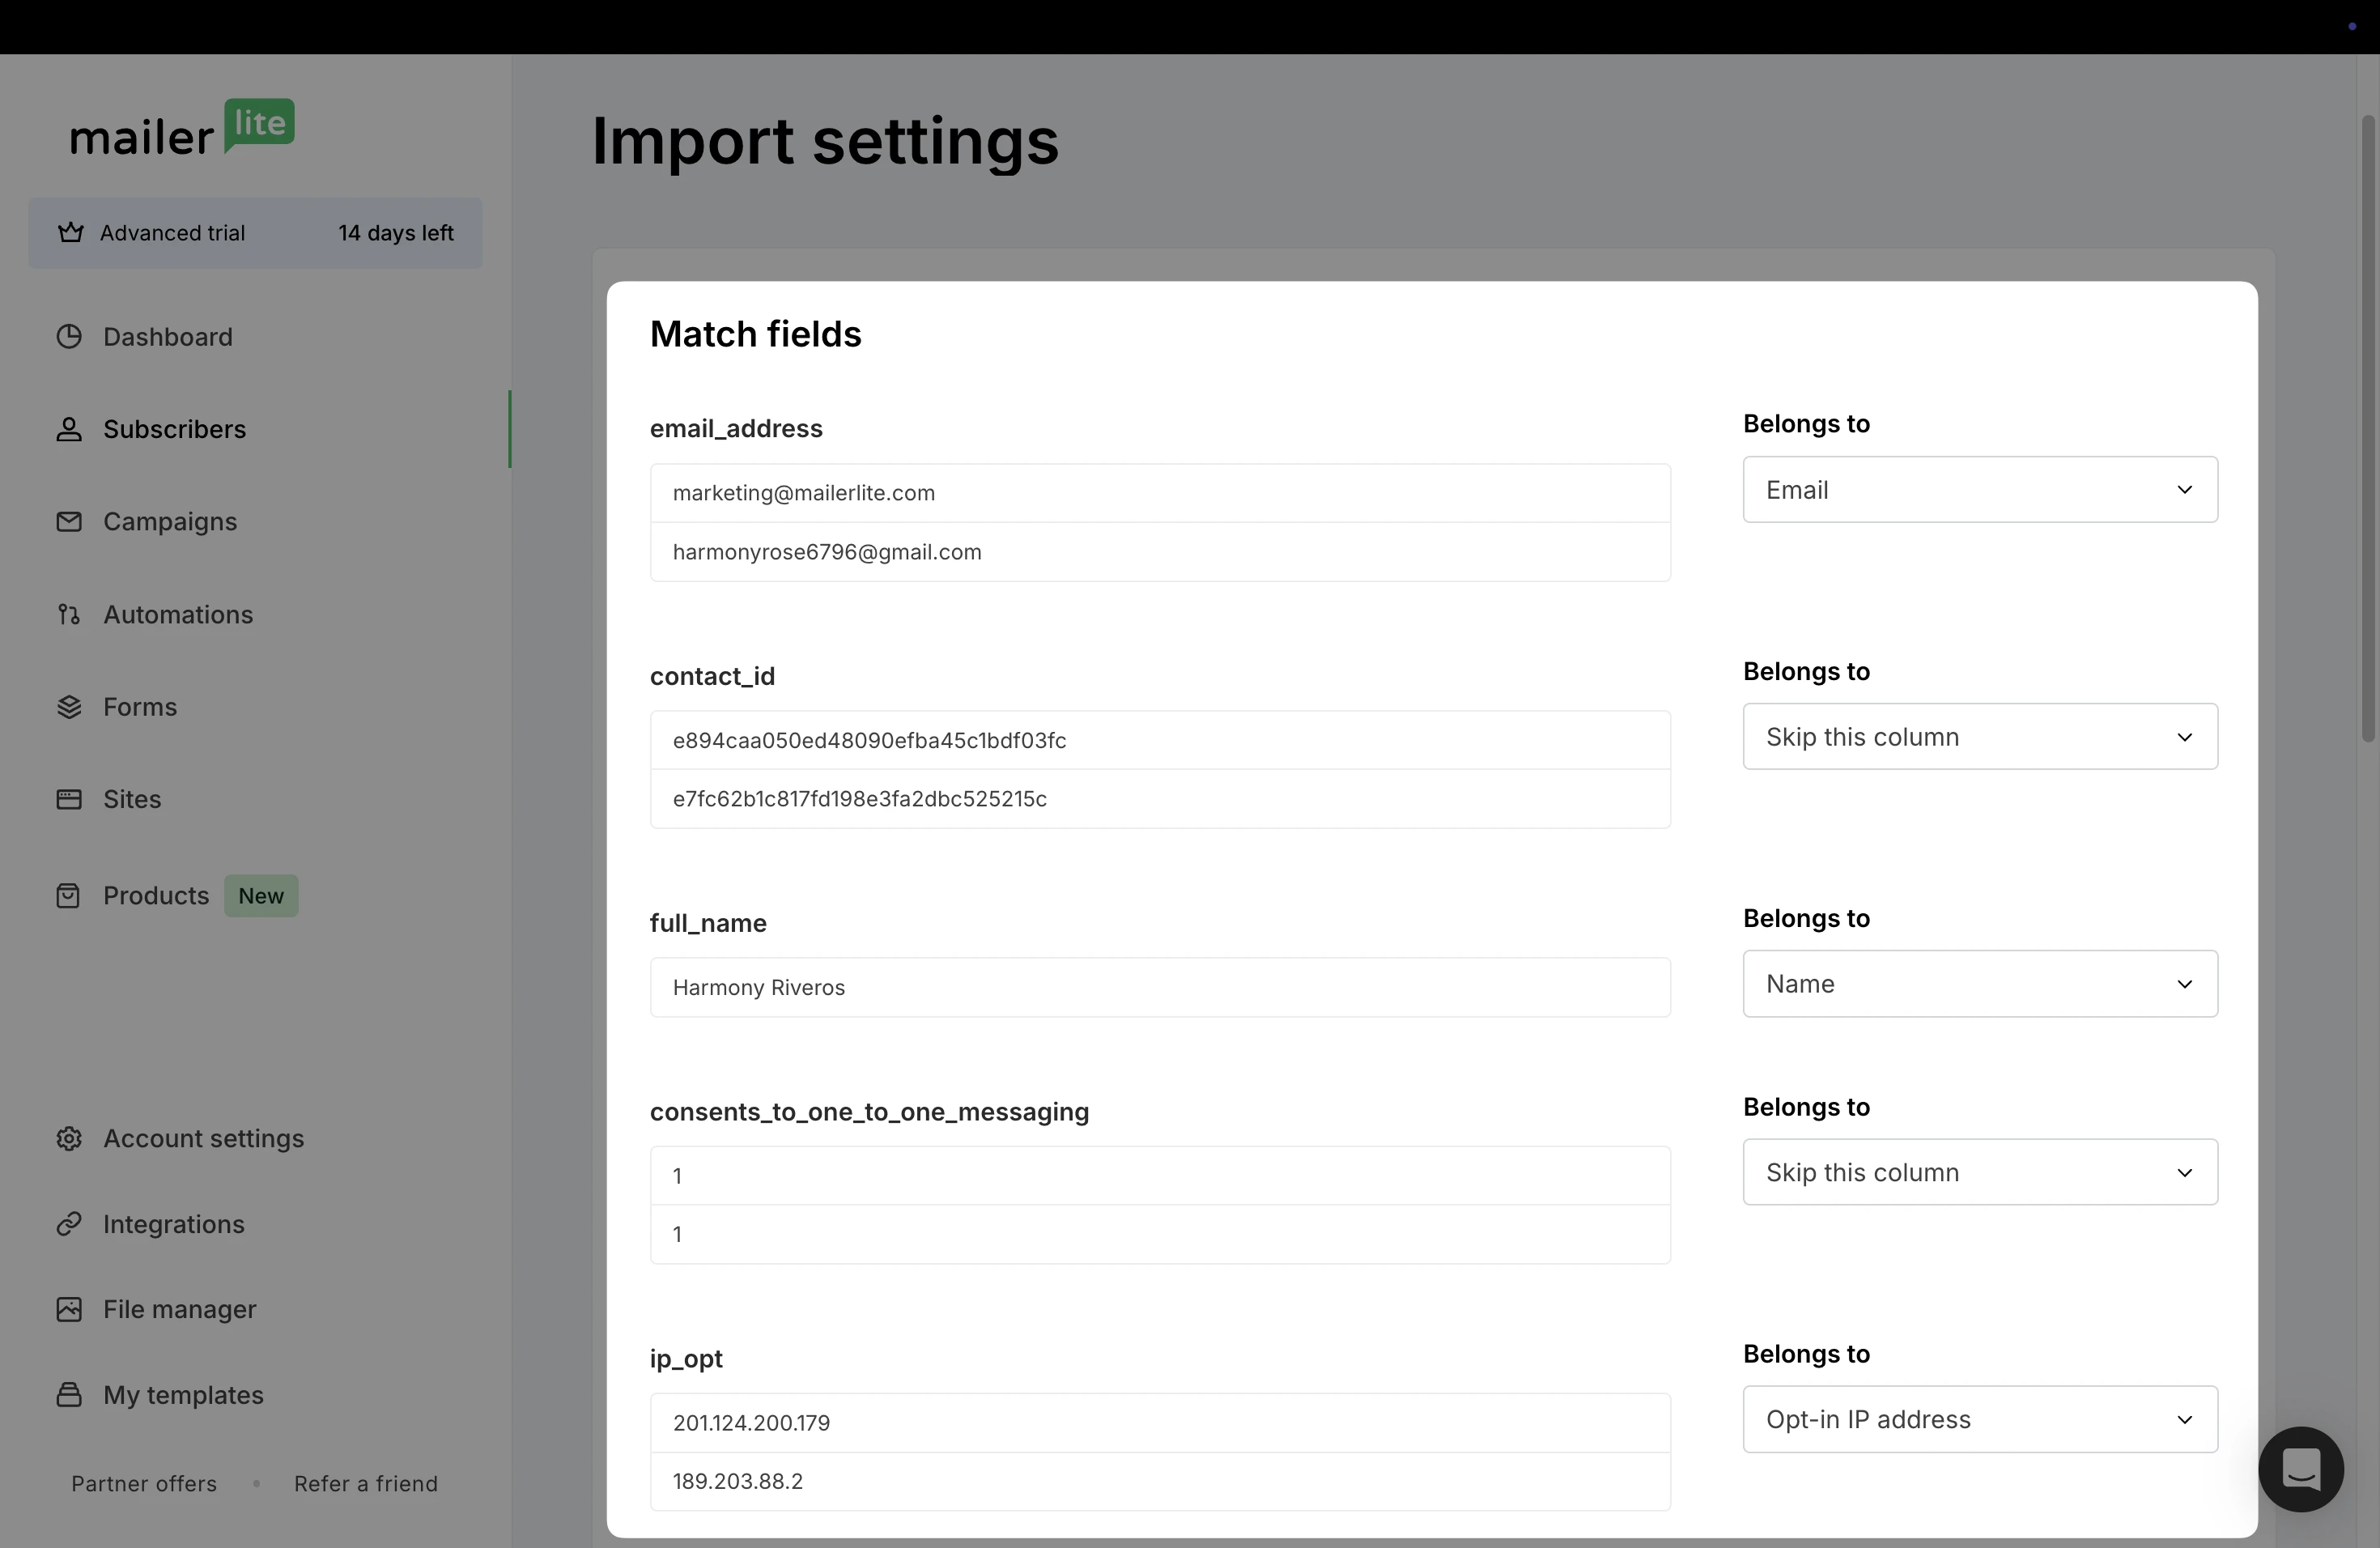
The Match fields step lets you review the fields in Mailchimp and decide where each piece of data should be stored in MailerLite.
Each row represents a field from the imported list, and the Belongs to dropdown lets you map that data to an existing MailerLite field or create a new one.
Email address → Email
This column contains the subscriber’s email address. It is automatically matched to the Email field in MailerLite since this is the primary identifier for each subscriber.
contact_id → Skip this column
This is a unique ID used internally by Mailchimp. Since it isn’t needed in MailerLite, you can safely choose Skip this column to ignore it during the import.
consents_to_one_to_one_messaging → Skip this column (or create Custom field)
This field relates to a specific consent setting used by Mailchimp. If you don’t need to store this data in MailerLite, you can skip it. Otherwise, create a new Custom field to store this information.
ip_opt → Opt-in IP address
This column contains the IP address used when the subscriber opted in. If you don’t need to store this data in MailerLite, you can skip it. Otherwise, create a new Custom field to store this information such as Opt-in IP address to retain proof of consent for compliance purposes.
Once all fields are correctly mapped, you can continue by clicking Finish import.
You will see a summary of the import including the total subscribers added, updated, and not added.
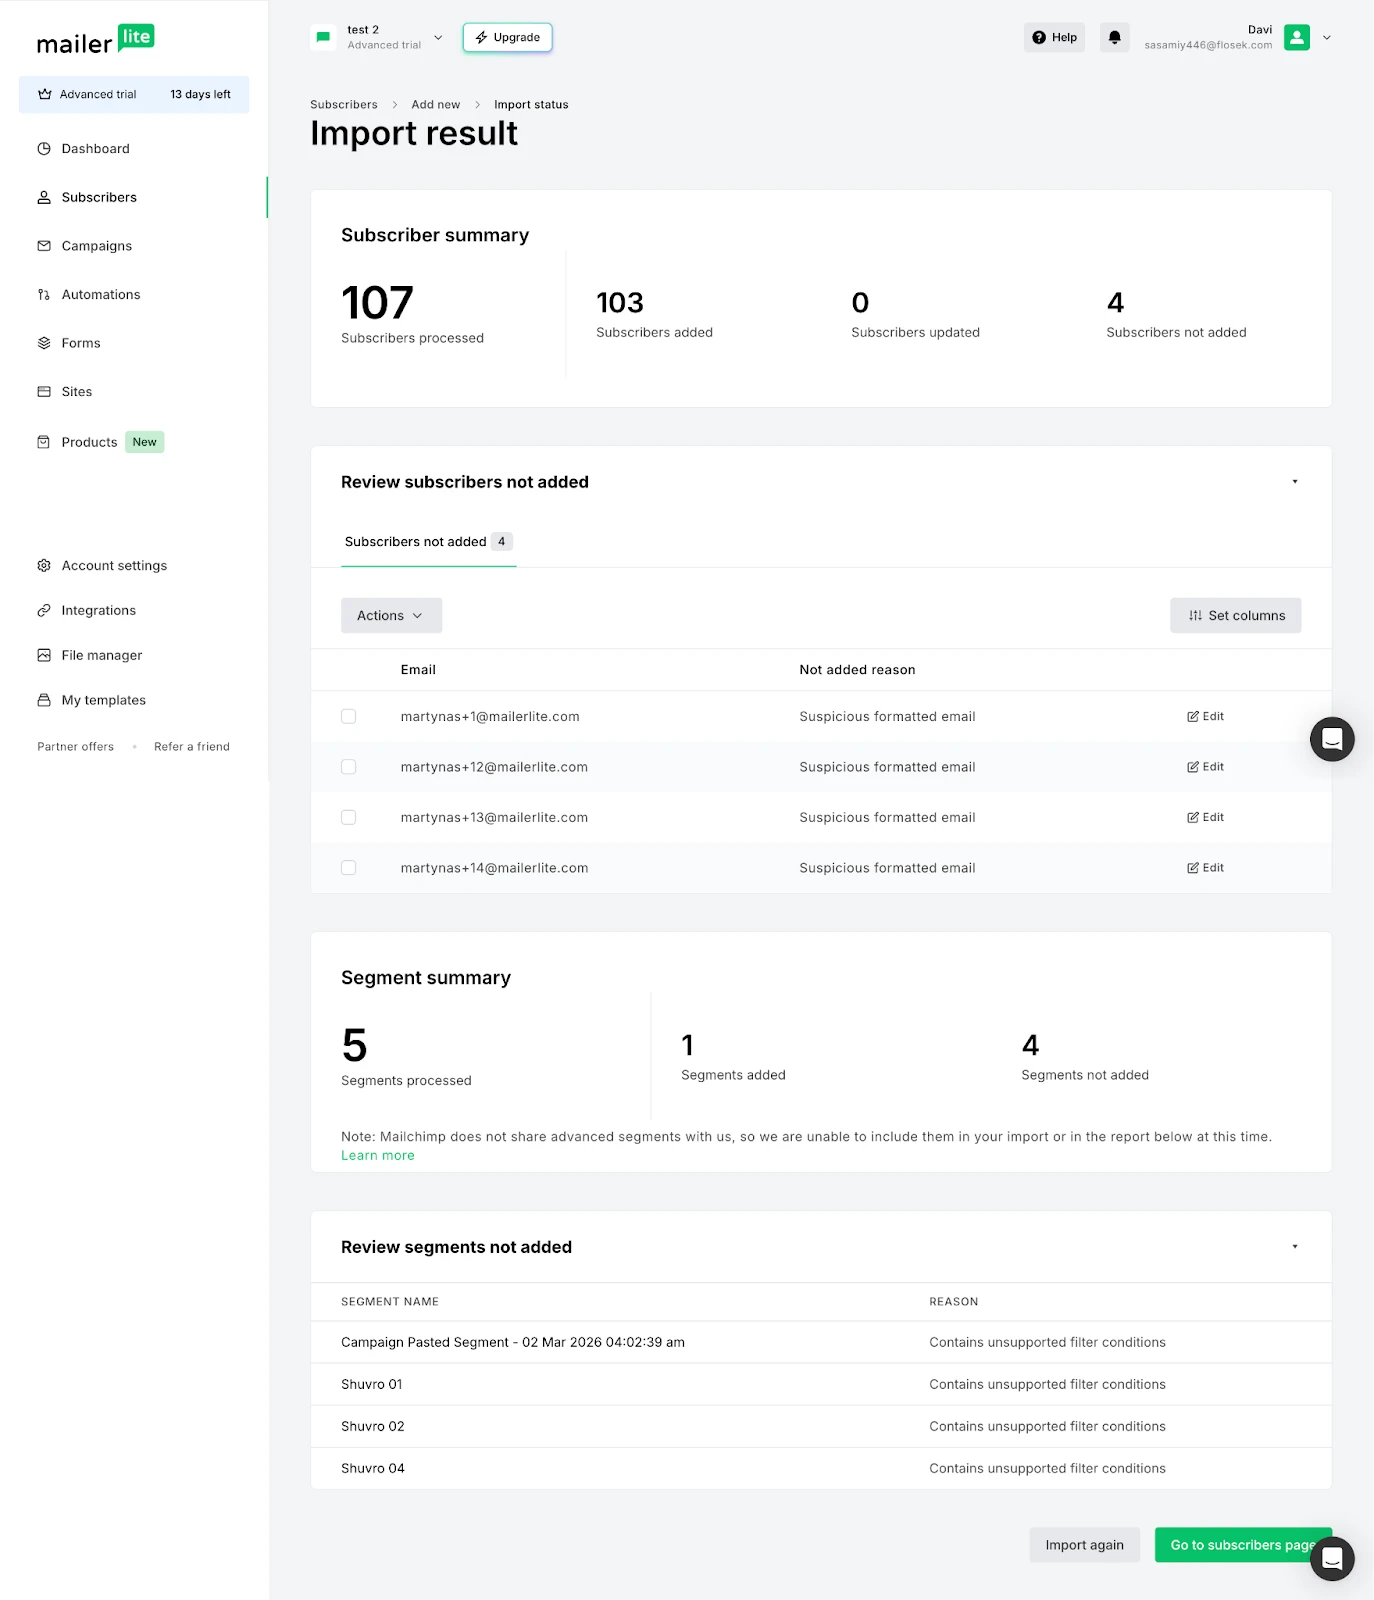
Re-sync account or subscribers
Subscriber information that is added to Mailchimp does not automatically update in MailerLite.
If you need to migrate any updated information:
Go to Subscribers.
Navigate to Import from Mailchimp.
Under Subscribers, click Sync again.
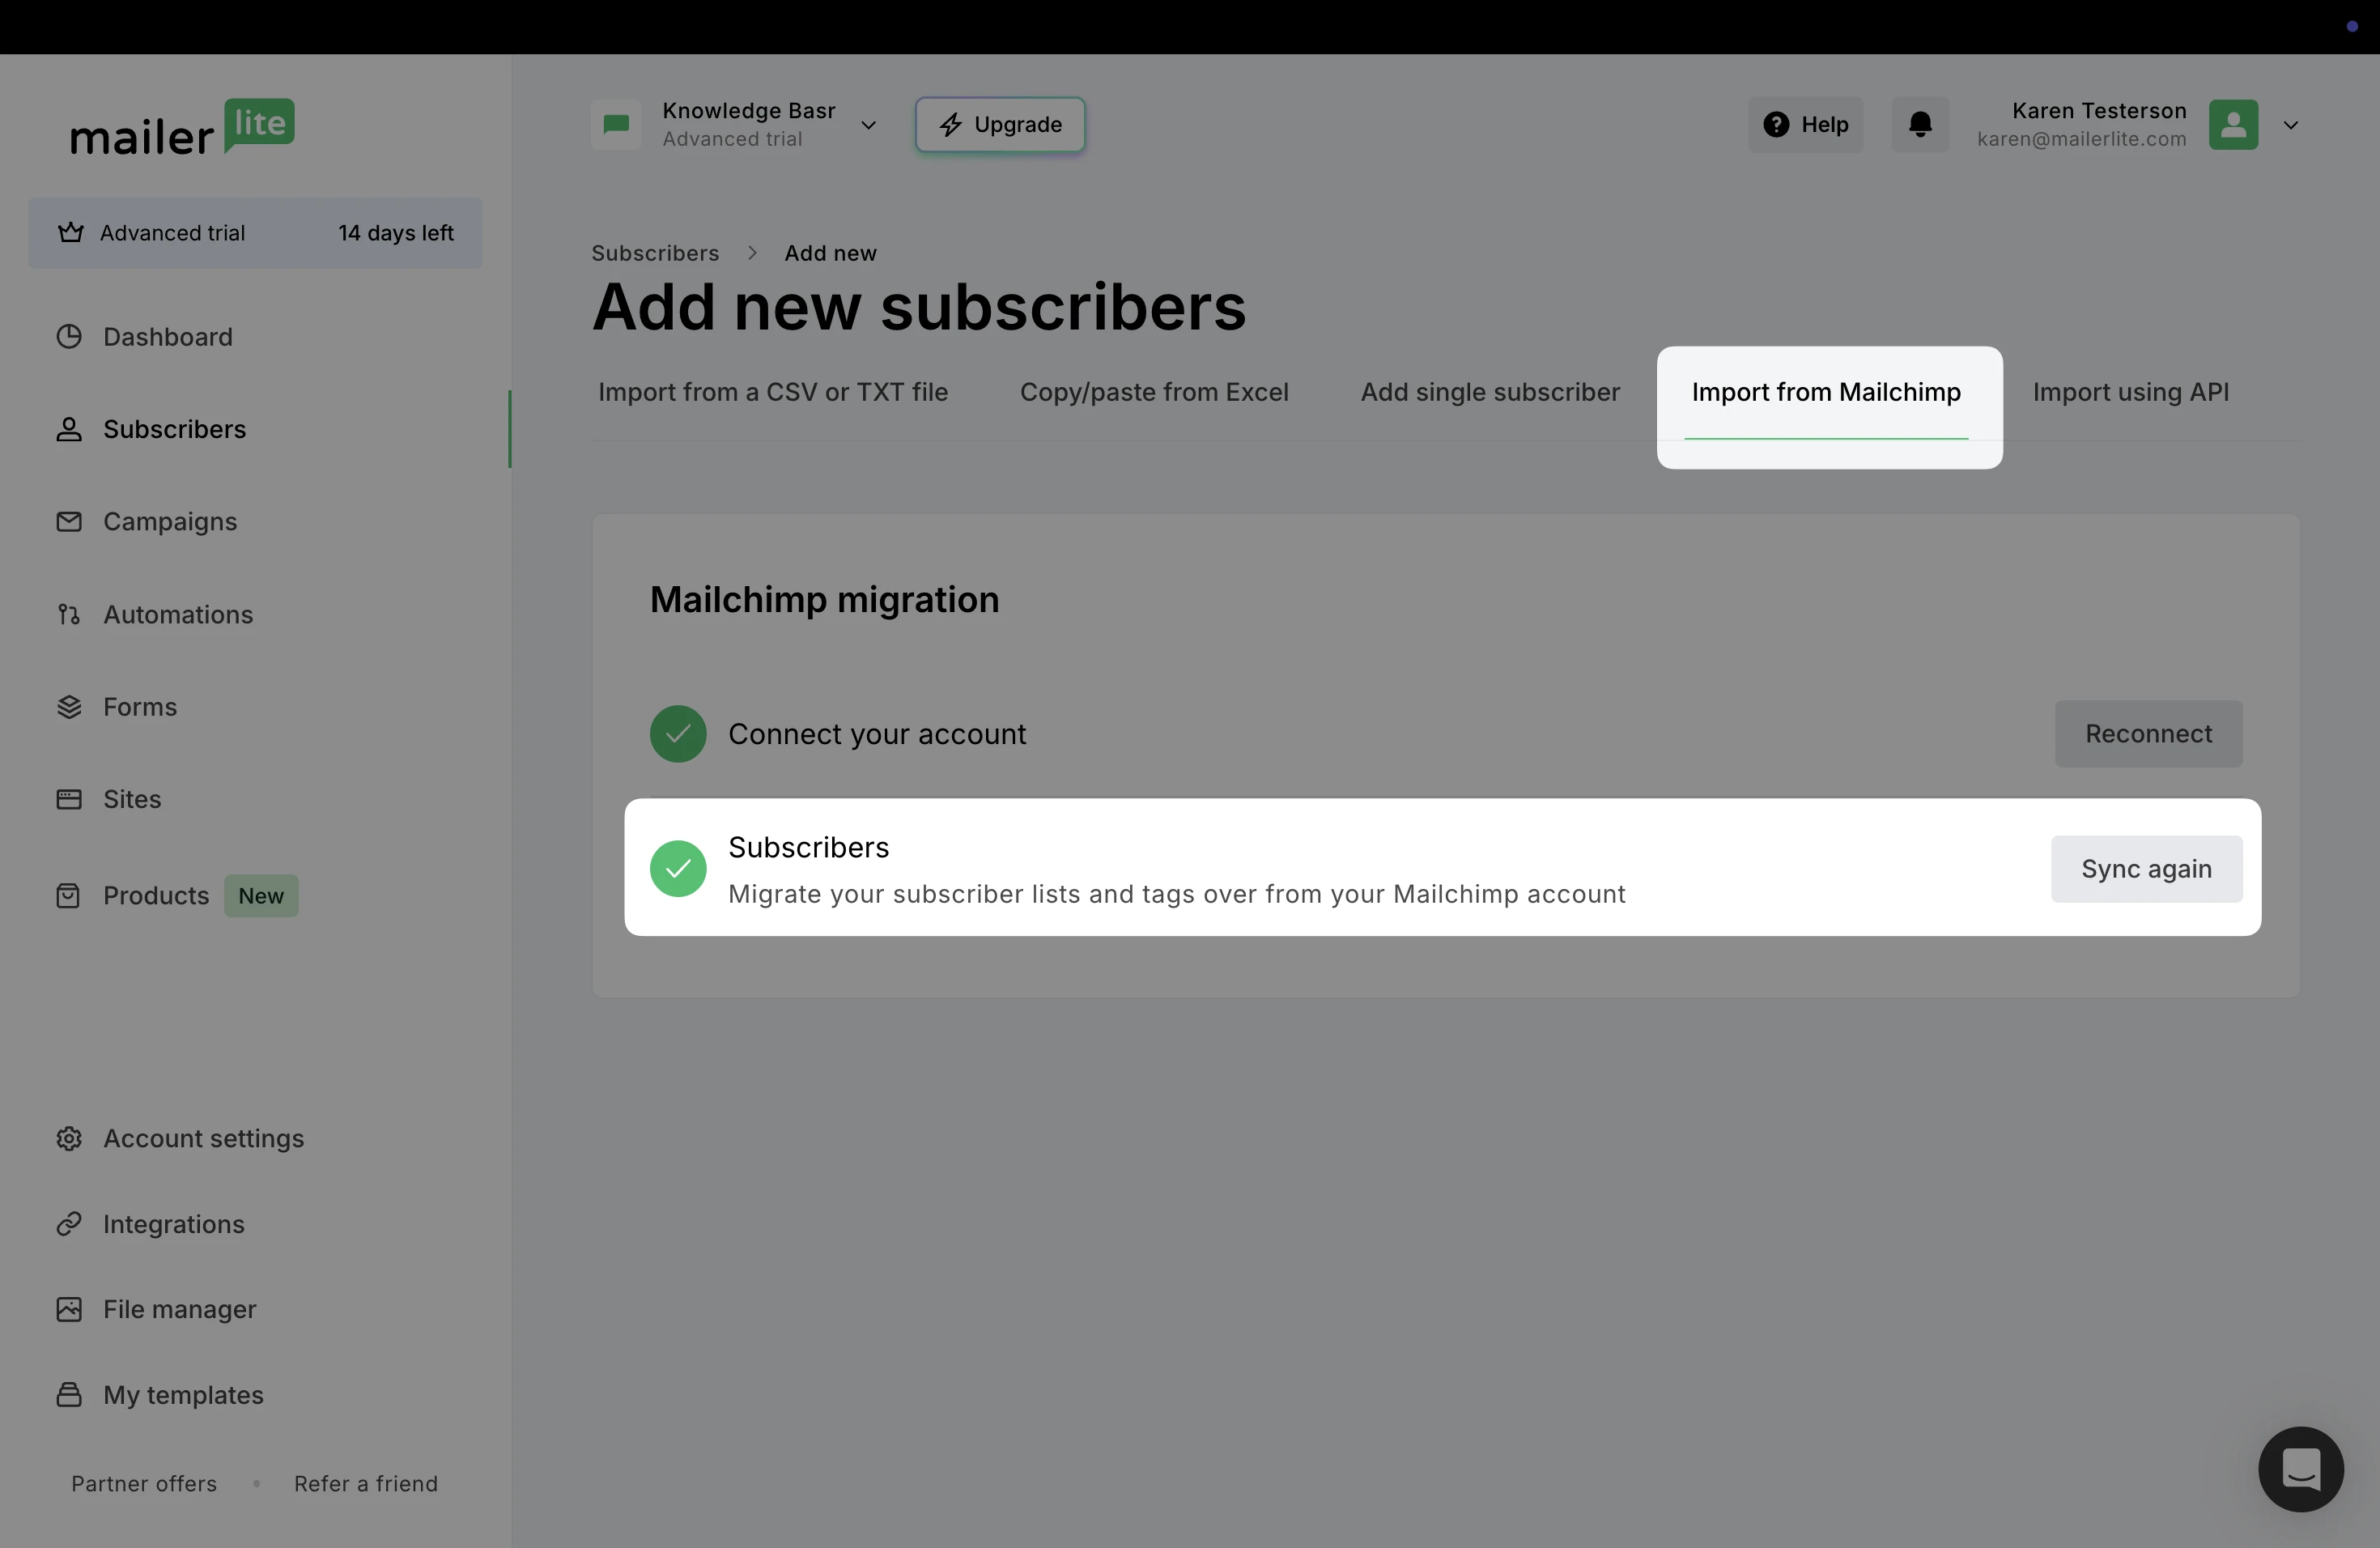
That’s it! You can find your imported subscribers in the Subscribers area, as well as any Groups and Segments that have been created from the Tags and Segments in your Mailchimp account.
If needed, you can also reconnect your Mailchimp account by clicking Reconnect, or connect a different Mailchimp account if needed.
2. Recreate your forms and landing pages

In MailerLite, you can recreate your forms and landing pages using our easy-to-use templates. Customize them to match your old designs or take this opportunity to give them a fresh new look.
To recreate your forms in MailerLite:
1. Head to the Forms tab.
2. Pick the form type you want to create, and click Create.
To recreate your landing page in MailerLite:
1. Head to the Sites tab.
2. Navigate to Landing pages and click Create to build your landing page.
Once you're happy with your new forms, update your website with the MailerLite versions. Check out our guides on adding forms to your website and creating landing pages for more tips.
3. Recreate your email templates
Head to the My templates page in MailerLite to recreate an email/newsletter. Whether you start with one of our ready-made templates or build from scratch, our Drag & drop editor makes it simple to match your brand’s look and feel. Check out our video on how to create an email template.
💡 Remember to preview and test your new templates to ensure they look and function as expected.
4. Rebuild your automated email flow

In MailerLite, automated campaigns are called "Automations." These are automated sequences of emails triggered by specific actions, like a new subscriber joining your list or buying a product.
To recreate your automations in MailerLite:
1. Head to the Automation tab.
2. Click New automation and start building your workflow.
You can choose to start from scratch or use one of our ready-made templates. This automation guide will walk you through it.
Test everything
Note: Before diving into the final steps, make sure to authenticate your domain. This ensures your emails are delivered successfully and helps avoid spam issues. For more detailed instructions, check out our step-by-step guide on domain authentication.
Before you finalize the migration, it's crucial to test your setup:
Preview your forms and landing pages to make sure they look and work as intended
Send test emails to yourself to check their appearance
Trigger your automations to see if they're behaving as expected
That’s it! You're all set for a smooth transition from Mailchimp to MailerLite. We're here to support you along the way — welcome to a more creative, efficient, and enjoyable email marketing journey! 🌟