Send ultra-relevant emails using groups (aka email tagging)
 Lay, Kinga, and Paulius, Marketing team.
Like you, your subscribers are dynamic and interesting people who don't fit into one particular box. We all have diverse interests, buying behaviors and habits.
But how can you use these individual subscriber characteristics at scale to send more relevant emails?
The answer is email tagging. In MailerLite, we call these Groups, but they serve the exact same purpose: categorizing your subscribers so you can send personalized emails to their inboxes.
Add new members to your groups based on things like their interests, hobbies, job title, or even buying behaviors.
We’ll show you all the cool ways to add tags in MailerLite so you can start benefiting from this targeting superpower.
But first off, why do you need email tagging?
In short, tagging subscribers allows you to deliver more personalized content that actually matters to them. When you stop treating your list as one giant block of names, and start treating people as individuals with specific tastes, your entire marketing strategy shifts.
Tagging also helps to easily identify your most active fans versus those who have checked out, making it simple to keep your list clean and your costs down.
Here are some benefits that personalized treatment leads to:
Higher engagement: When your subject line matches a subscriber's specific interest, your open and click rates naturally climb
Increased conversions: You stop guessing what people want. By sending personalized offers based on past behavior, you drive more sales
Better deliverability: Sending relevant content keeps you out of the spam folder. When subscribers consistently open your emails, mailbox providers recognize you as a "good" sender
Stronger brand loyalty: People stay subscribed to newsletters that provide value. Tagging ensures you aren't "annoying" a subscriber with tips, guides and tutorials when they only signed up for product updates 🤷
MailerLite groups are the same as email marketing tags
As we mentioned before, MailerLite groups serve the exact same purpose as email tagging commonly used by other email marketing platforms.

You can create a group and use email tags to manually assign that group to different subscribers. Or, you can assign groups automatically based on subscriber behaviors, such as when they fill out a form or make a purchase.
Imagine you manage a newsletter covering sports. During the subscriber signup, you can ask people to choose the sports that they like. Using email tags, subscribers will instantly be added to a specific group based on their choice. Now, instead of sending a bulk email to your full list that includes all sports, you can send a targeted email to each group based on the sport your subscribers are most interested in.
MailerLite makes it easy to create and assign different email tags.
You have the flexibility to organize your subscribers in almost any way you need to deliver the most relevant email marketing campaigns possible.
Here’s your step-by-step guide on setting up groups:
The difference between groups and segments
While groups and segments are both ways to break up your subscriber list into smaller sections, each serves a different purpose.
Segmentation in MailerLite is dynamic. It is dictated by a ‘rule’ that you can create with a filter. Subscribers who comply with that rule are automatically included in the segment. If a subscriber no longer meets the conditions of the segment, they will no longer be included in it.
Let’s say you want to create a segment that only includes subscribers that signed up in the last 30 days. To do this, you would use the filters: Sign up date > Is in the last > 30 days.
When the subscriber has been a member of your email list for more than 30 days, They’ll automatically be removed from the segment because they no longer comply with the 30-day rule.
Subscribers are continually added or removed from your segment automatically based on the rules you set.
Groups, on the other hand, are not based on a rule, and you can assign them to any subscriber across segments.
Imagine you have a few different lead magnets offering various freebies related to separate topics. By using tags, you can send targeted group emails to selected contacts based on the free content they were interested in.
You add and remove email tags manually, or set up an automation to move subscribers to different groups.
At a glance: Groups vs. segments
| Feature | Groups (Tags) | Segments |
|---|---|---|
| Nature | Static: Subscribers stay in the group until removed manually or by an automation | Dynamic: Subscribers move in and out automatically based on specific rules |
| Logic | Action-based: Based on a specific event (e.g., "Clicked a link" or "Joined via Form A"), or when added manually | Condition-based: Based on current data (e.g., "Lives in USA" or "Opened an email in the last 30 days") |
| Management | You decide who enters and leaves the group | MailerLite’s filters decide who belongs based on your rules |
Real-world use cases: Seeing the value of groups vs. segments
Still finding it a bit confusing to see why you’d use one over the other? Let’s look at how these two tools work in the "real world" to save you time and keep your list healthy.
When to use segments
Segments are your best friend for automated list maintenance. Because they are dynamic, they do the work of checking your subscriber data so you don't have to.
Automatic list cleaning: You can create a segment for "Inactive Users" (e.g., Has not opened any of the last 10 emails). You can then set up an automation so that the moment someone falls into this segment, they receive a "We miss you" email or are automatically unsubscribed. This keeps your deliverability high without you lifting a finger
Filtering specific domains: Perhaps you want to send a specific B2B offer only to people with corporate emails. You can create a segment that filters out common domains like @gmail.com or @yahoo.com
Condition-based entries: If you want to trigger an automation for everyone who lives in London and signed up in the last week, a segment handles these multiple conditions instantly
When to use groups
Groups are better for specific, permanent traits that won't change based on a date or a filter rule.
Specific interest tracking: If someone clicks a link in your newsletter about "Home Office Decor," you tag them with that group. That interest is now part of their profile forever (or until you change it), regardless of how often they open your emails
Lead magnet tracking: Use groups to see exactly which freebie brought a subscriber to your list (e.g., "eBook: 10 SEO Tips")
Purchase history: Tagging someone as "VIP Customer" after they spend over $500 allows you to send them exclusive "thank you" discounts at any time in the future
Say you have 5 different segments based on geography, but within all those segments are individuals who buy Xbox video games. By using groups, you can send those people emails about Xbox without the need to set up completely new segments.
7 group examples and when to use them
Everyone’s business and audience is different, and your contact list is totally unique to you. Which is why we let all users completely customize their email marketing tags.
That said, there are some standard practices, depending on your email marketing goals, that we can share to get you started. Here are 7 categories of group ideas to help you organize your list:
1. Sign-up source tags
Knowing where your subscribers come from helps you understand which marketing channels are working best. It also allows you to tailor your initial "Hello!" based on their first touchpoint with your brand.
When to apply: Tag subscribers as they join your list from specific forms, landing pages or app integrations
Group ideas to try:
Signup source (social media vs. website)
Attended event (great for emails collected offline)
Downloads content (specific lead magnets)
2. Customer journey tags
Not every subscriber is at the same stage in their relationship with you. By tagging based on their journey, you can send the right message at the right time—whether they are just browsing or are a loyal advocate.
When to add: Use these to distinguish between prospects and those who have already made a commitment
Group ideas to try:
Prospect vs. lead
Partner/vendor types
Happy customers vs. disappointed customers (Identified via NPS surveys)
3. Interaction and behavior tags
These tags are based on how people engage with your content. It’s the best way to see what truly resonates with your audience.
When to insert: Apply these when a subscriber takes a specific action inside your email
Group ideas to try:
Newsletter clicks (general engagement)
Clicks on social media icons
Shares newsletter
Registers for a webinar
4. Product or service-related tags
If you run an e-commerce business, these tags are your best friend for cross-selling and up-selling.
When to apply: Tag subscribers based on the specific items they buy or the categories they browse
Group ideas to try:
Purchases specific product types
Prefers a product category
Likes promo deals
5. Audience engagement level tags
Keep your list healthy by identifying who is active and who might be slipping away. This is crucial for maintaining your "targeting superpower."
When to use: Use status-based tags to see who is interacting with your specific notifications versus those who aren't
Group ideas to try:
Newsletter opens
Re-engagement campaign target
Clicks on product notifications
Clicks on special offers
Uses coupons
6. Interest and preference tags
As you get to know your subscribers better, you can create ultra-personalized groups that reflect their unique personalities.
When to add: Use these when subscribers tell you exactly what they like or who they are
Group ideas to try:
Job titles: Designer, developer, writer, etc.
Interests: Traveler, surfer, watches true crime documentaries, etc.
7. Internal and administrative tags
These help your team stay organized behind the scenes. They aren't usually for the subscriber's benefit, but for yours.
When to apply: Use these to keep track of list maintenance or specific internal segments
Group ideas to try:
Test list (for internal campaign reviews)
GDPR/consent verified
As you get to know your subscribers better, you can create ultra-personalized groups.
However, don’t stress about collecting a lot of data right away. It can be overwhelming and even counterproductive to have too many different email tags. Start small and as you create more groups, continually update or review old ones (and keep your marketing team sane)!
Common mistakes to avoid when using email tags
While tagging is a superpower, it’s easy to get a little carried away. To keep your automation running smoothly and your data clean, try to avoid these common pitfalls.
Falling into the "tag soup" trap
The most common mistake is creating too many tags that overlap or mean the same thing. If you have one tag for "Webinar_Attendee" and another for "attended-webinar-nov," your data becomes fragmented.
The fix: Establish a strict Prefix-Action naming convention (e.g., Source: Facebook) and maintain a shared Tag Registry to ensure new tags never overlap with existing ones. Consistency is key—choose one format for casing and dates, then perform monthly audits to merge any "look-alike" tags into your primary system.
Using tags for dynamic data
Remember that groups (tags) are static. A common mistake is manually tagging someone as "Active" based on a single click. The problem? That person might stop opening your emails next month, but the "Active" tag will stay on their profile forever.
The fix: Use segments for anything that changes over time, like engagement levels or "signed up in the last 30 days." Use tags for permanent or specific actions, like "Downloaded eBook."
Collecting too much data upfront
Getting new subscribers can be tough, and nothing kills a signup rate faster than a form with 15 checkboxes for different interests.
The fix: Don’t feel pressured to collect every detail immediately. Start with a simple signup and use link triggers or interactive survey blocks later in your welcome sequence to learn about your subscribers' interests over time.
The "set it and forget it" mistake
Your subscribers are dynamic and their interests change. A mistake many make is leaving old tags on a profile that no longer apply. For example, if a subscriber moves from your "Lead" group to your "Customer" group, they shouldn't still be receiving "Lead" discount offers.
The fix: When setting up your MailerLite automations, use the Action step to "Remove from group" when a subscriber moves into a new stage of their journey.
So you've created your groups, what next?
Once you have decided what kind of email groups are best going to help you meet your email marketing goals, you can add tags to your subscribers so they become members of those groups. There are a bunch of ways you can do this in MailerLite.
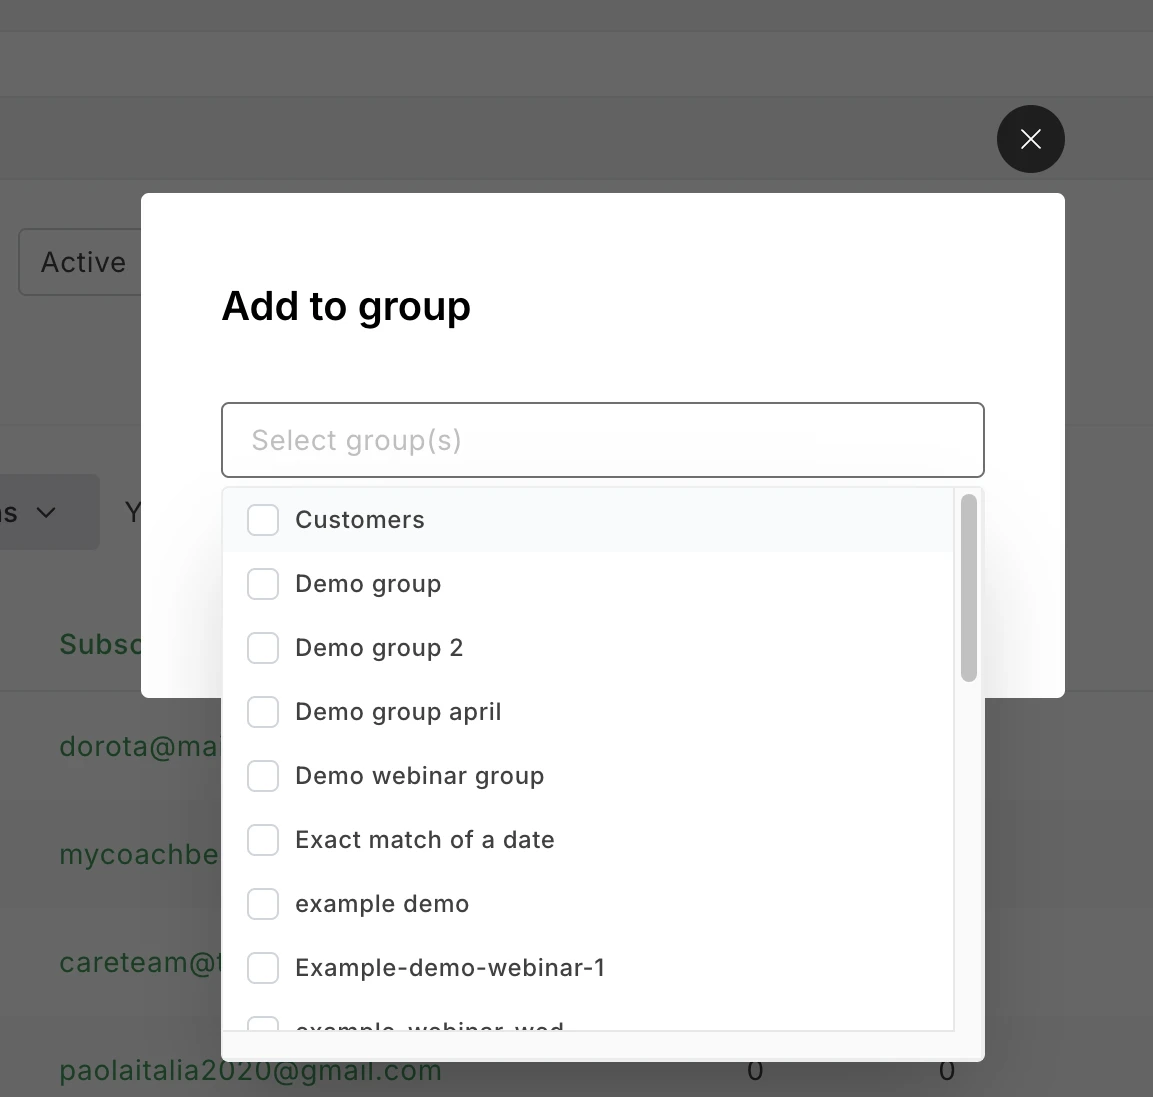
1. Select a subscriber group on import
When you import your pre-existing email contact list to MailerLite, you can select a group(s) to add those new subscribers to on the Import settings page. Simply enter the name of the group you wish to import these subscribers into and the different tags will appear in the Add to group field.
2. Use link triggers
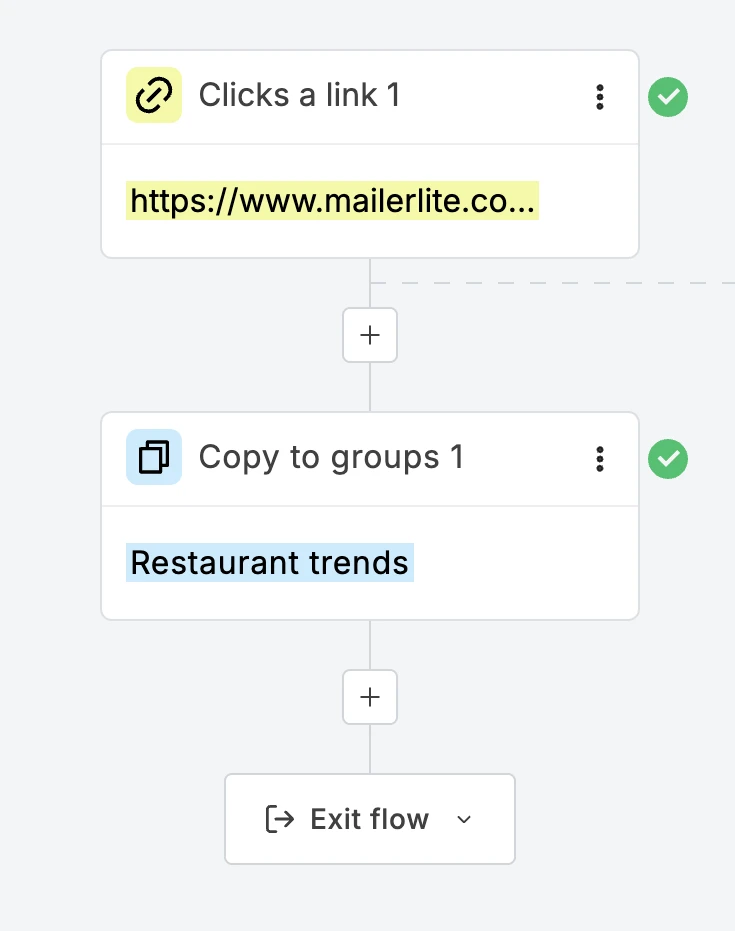
A link trigger is a link that kick-starts an automation workflow. You can set links that you have placed in your newsletters as the link trigger for your automations. That way, when a subscriber clicks on the link, MailerLite can automatically copy them to a new or existing interest group.
To achieve this, your automation will contain an Action step that allows adding, moving and copying subscribers to groups.
For example, say you have 3 groups based on different industry trends, and you want your subscribers to choose which group they’d like to be added to. First, you add 3 links to your newsletter: Real estate trends, Restaurant trends and Retail trends.
Subscribers can then click on the link they’re interested in receiving newsletters about. The link click will trigger the automation that assigns the new tags to your subscribers, adding them to the group that coincides with the link they clicked. From that moment on, that reader is a member of a targeted interest group.
You can also assign email tags to subscribers that don’t click on any of the links. If people aren’t engaging with your newsletters, you can tell MailerLite to automatically assign a new email tag to those subscribers so that you can send a follow up email campaign to them later.
3. Let subscribers self-select email tags using forms
Getting new subscribers can be tough. One strategy to encourage new people to sign up is to give them the power to opt-in exclusively for content they wish to receive.

You can design your signup forms with pre-selected topics by enabling Interest groups in your form settings. Then, MailerLite will add different tags to your subscribers based on their choices. You can also activate automated email marketing campaigns to start building your relationship with each group right away.
If you want to keep your forms short and sweet, you can attach one group to the form, so everyone who signs up with that form is assigned the email tag of your choice. This will be done automatically, without subscribers needing to select the group.
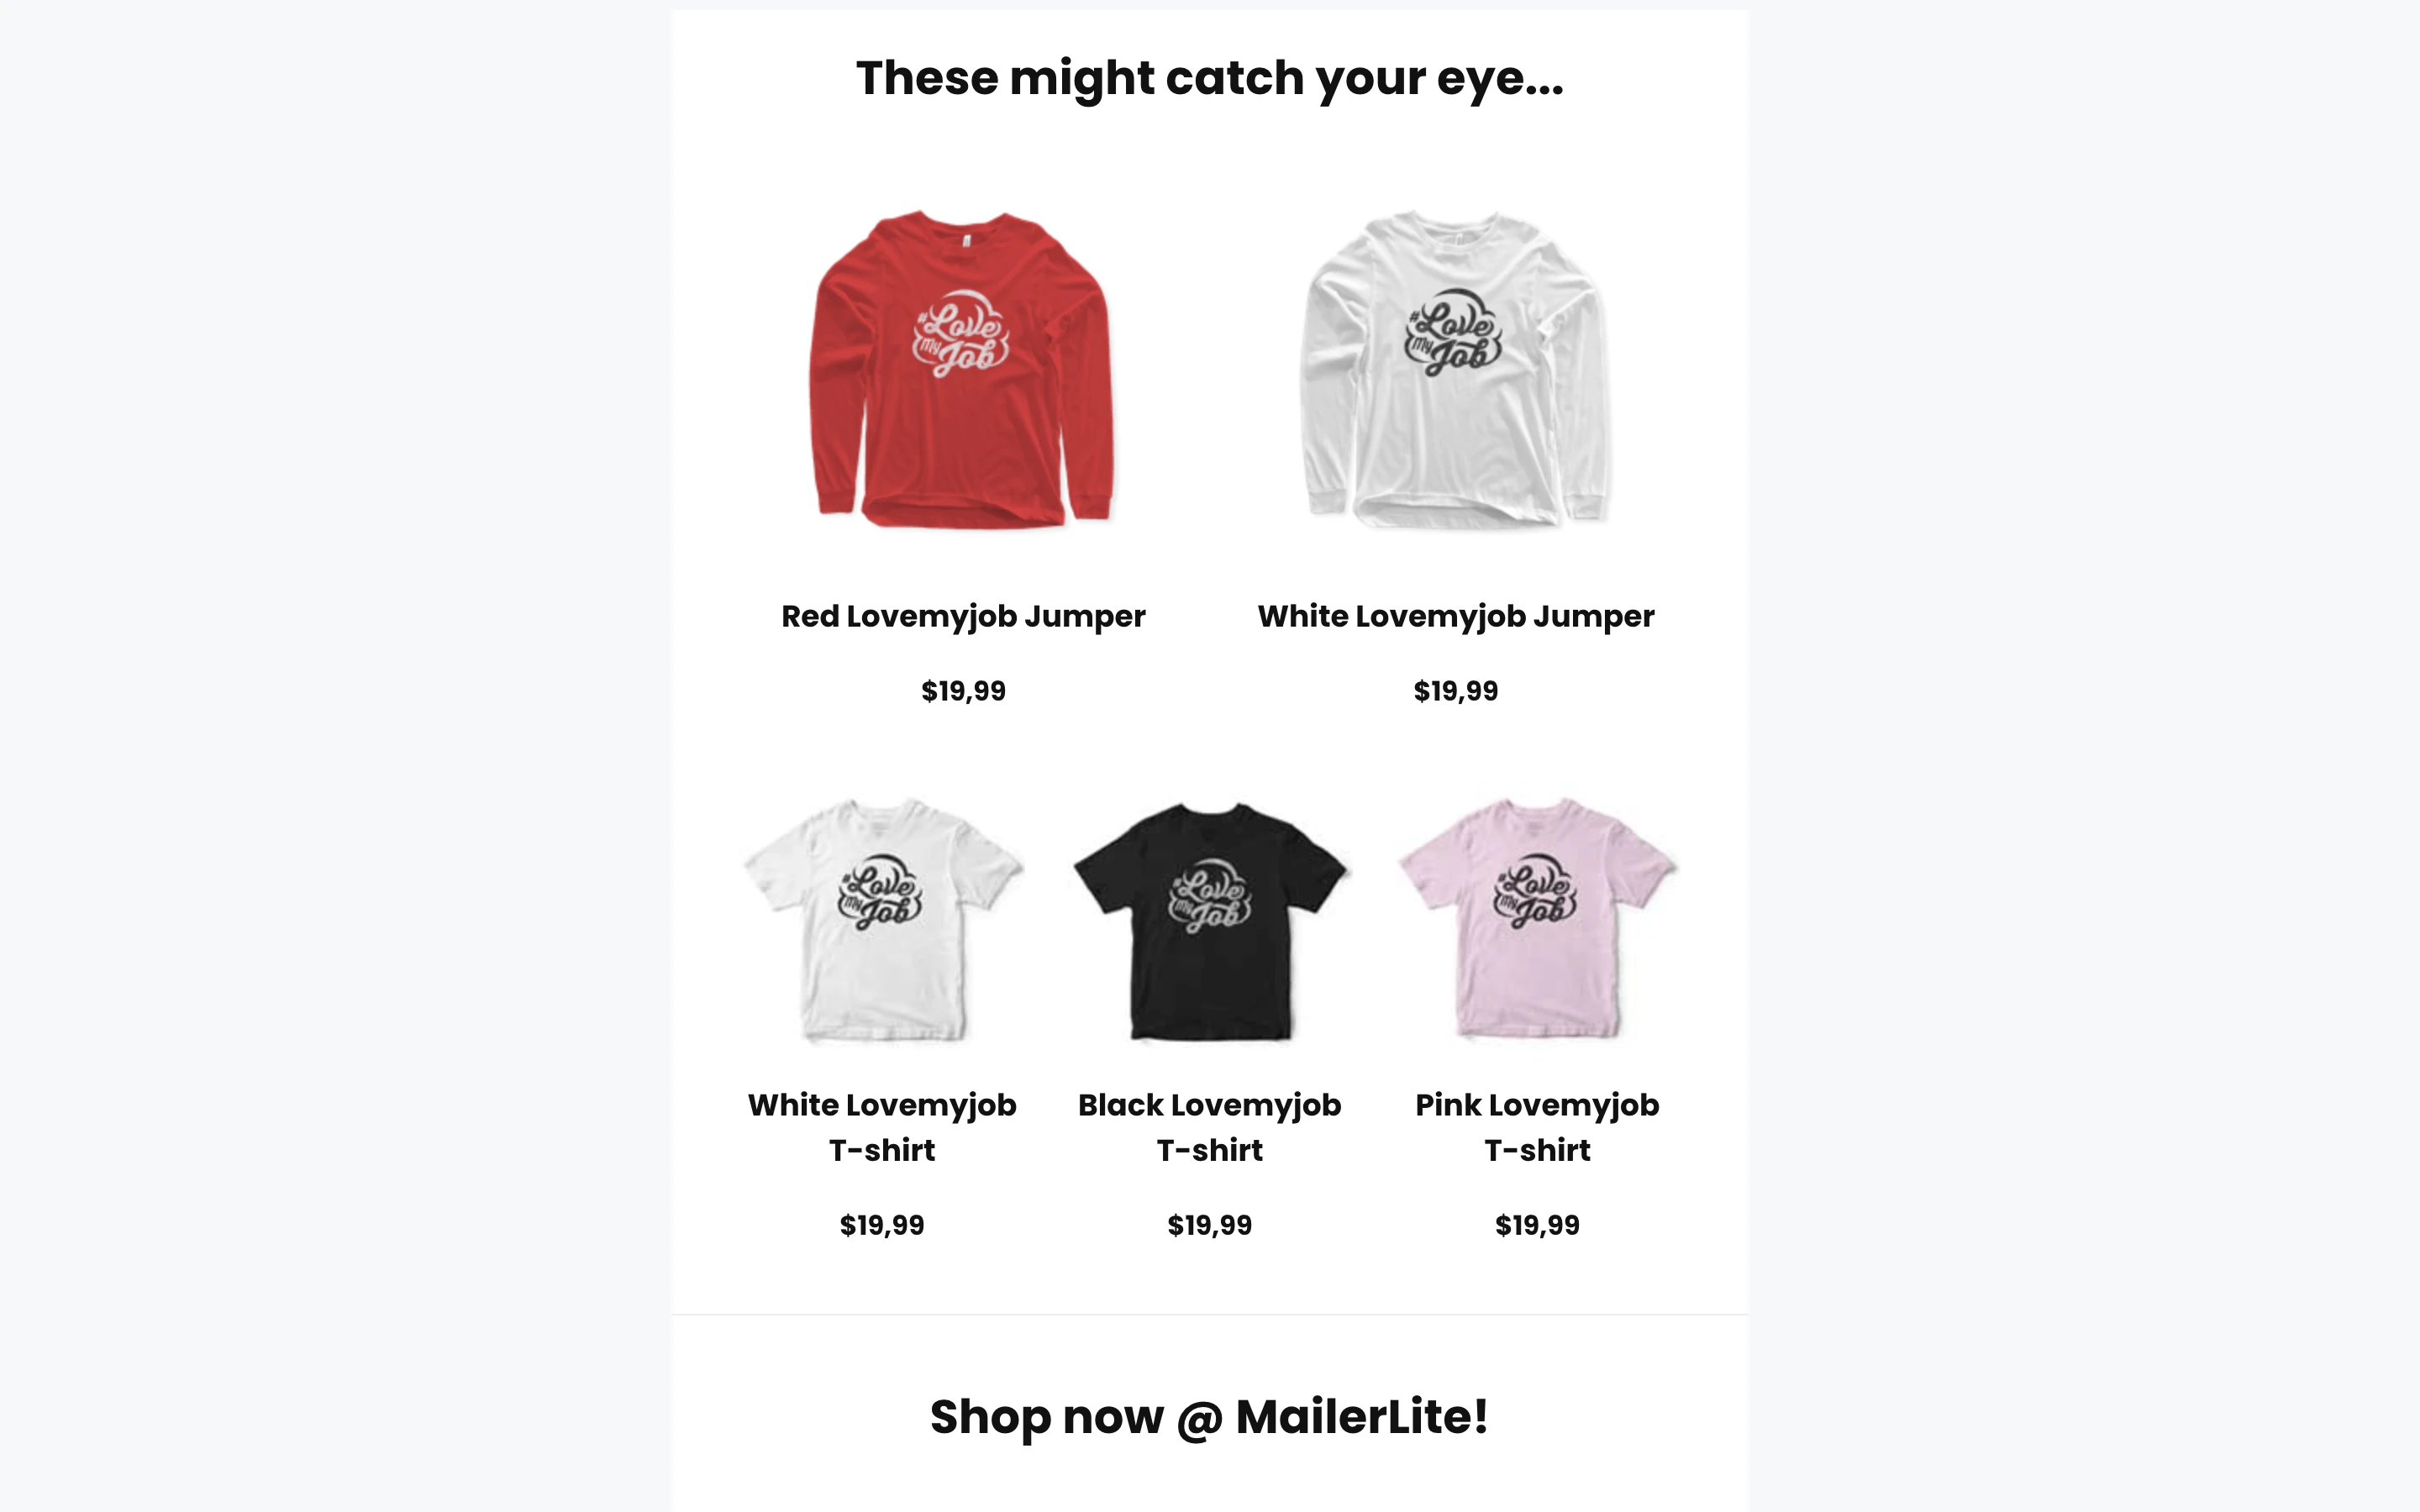
4. Email tagging based on purchases
MailerLite’s e-commerce integrations with Shopify or WooCommerce allow you to add people to groups based on the products they purchase.
For example, if a subscriber purchases a product from a specific category such as “Sportswear”, you can set up an automation to automatically add new tags to those subscribers. You can then send a targeted email message to those subscribers based on their purchase. This provides a great opportunity for cross-selling.
By sending emails to your subscribers entirely tailored to their interests or behaviors, not only are they more likely to engage with your content, they’ll actually look forward to opening and reading your messages.
5. Use interactive content blocks
MailerLite offers a wide range of interactive email blocks to help boost subscriber engagement. Using tags, you can move subscribers between groups based on how they interact with these blocks. Some interactive email blocks you might use include:
Survey block
Quiz block
For example you may have an existing email contact list, but want to gather some additional information about them in order to start sending more relevant content. A great way to do this is by embedding a survey in your newsletter using these simple steps:
Use the drop-down menu in the left-hand sidebar and select Surveys and quizzes.
Drag and drop the Survey block into your newsletter.
Once added, you can use the settings in the right-hand sidebar to apply rules to your survey based on how your subscribers interact with it.
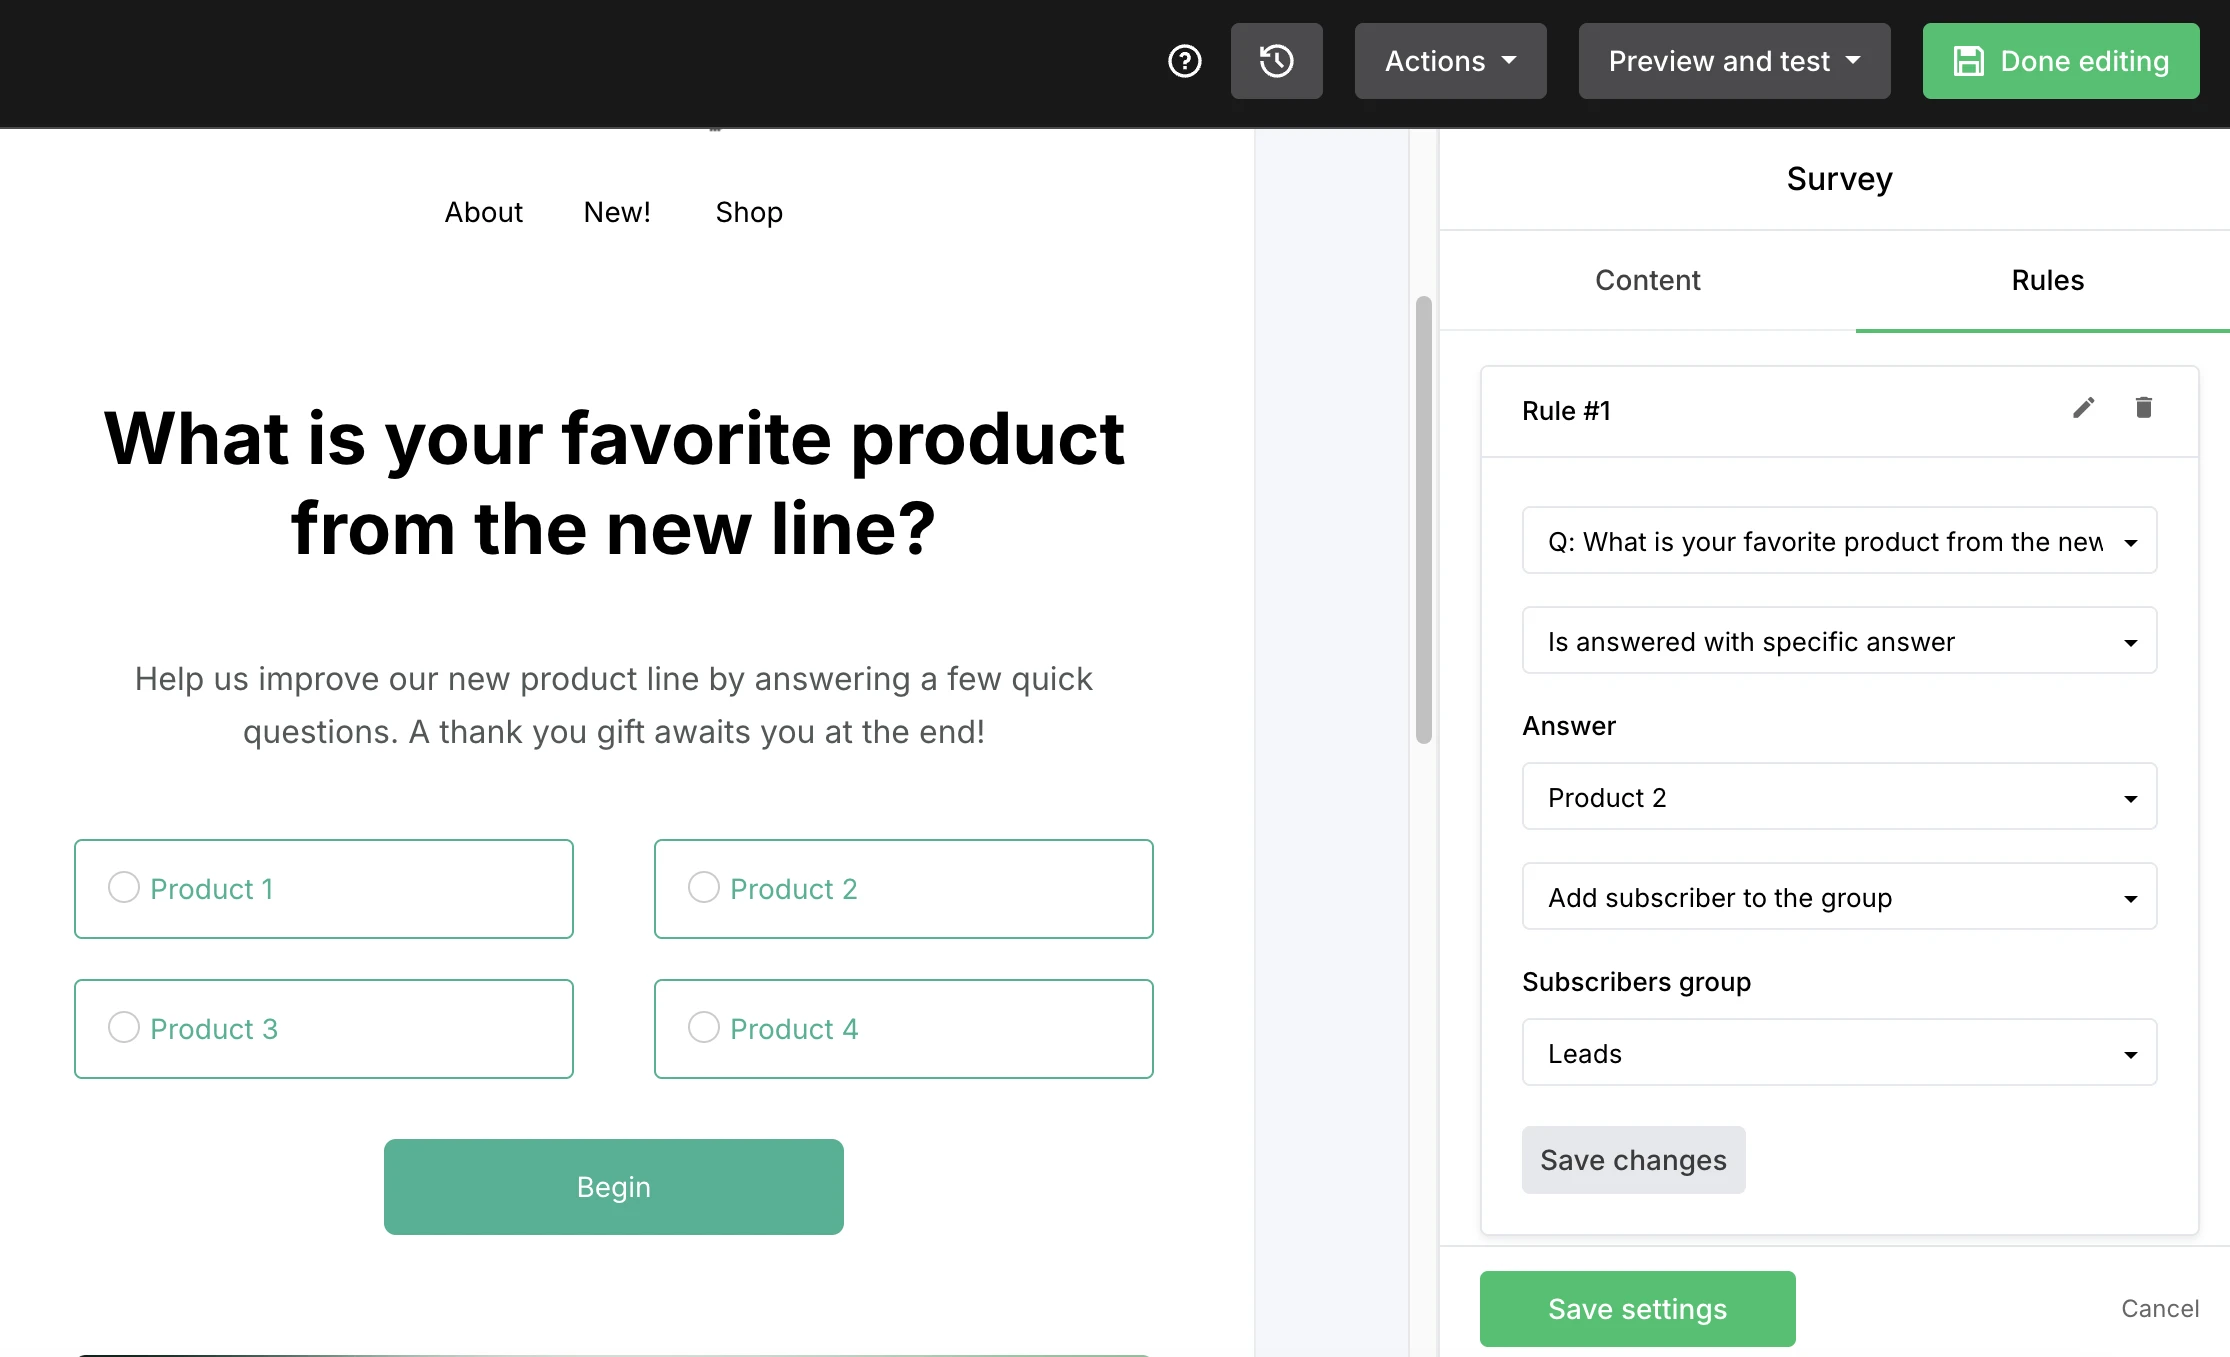
You can create a rule for each answer that adds or moves subscribers to a corresponding group. You can even create a rule that adds subscribers who don’t answer the question to a specific group.
Put your new email groups into action!
Now you’ve organized your email list into targeted groups, it’s time to put them into action! There are 2 ways to send personalized email messages to your subscriber groups: Campaigns (one-off emails) and Automation.
1. Send emails to groups
Before you schedule or send a campaign, you’ll be asked to select the campaign’s recipients. It’s here that you decide which group(s) will receive this specific email.
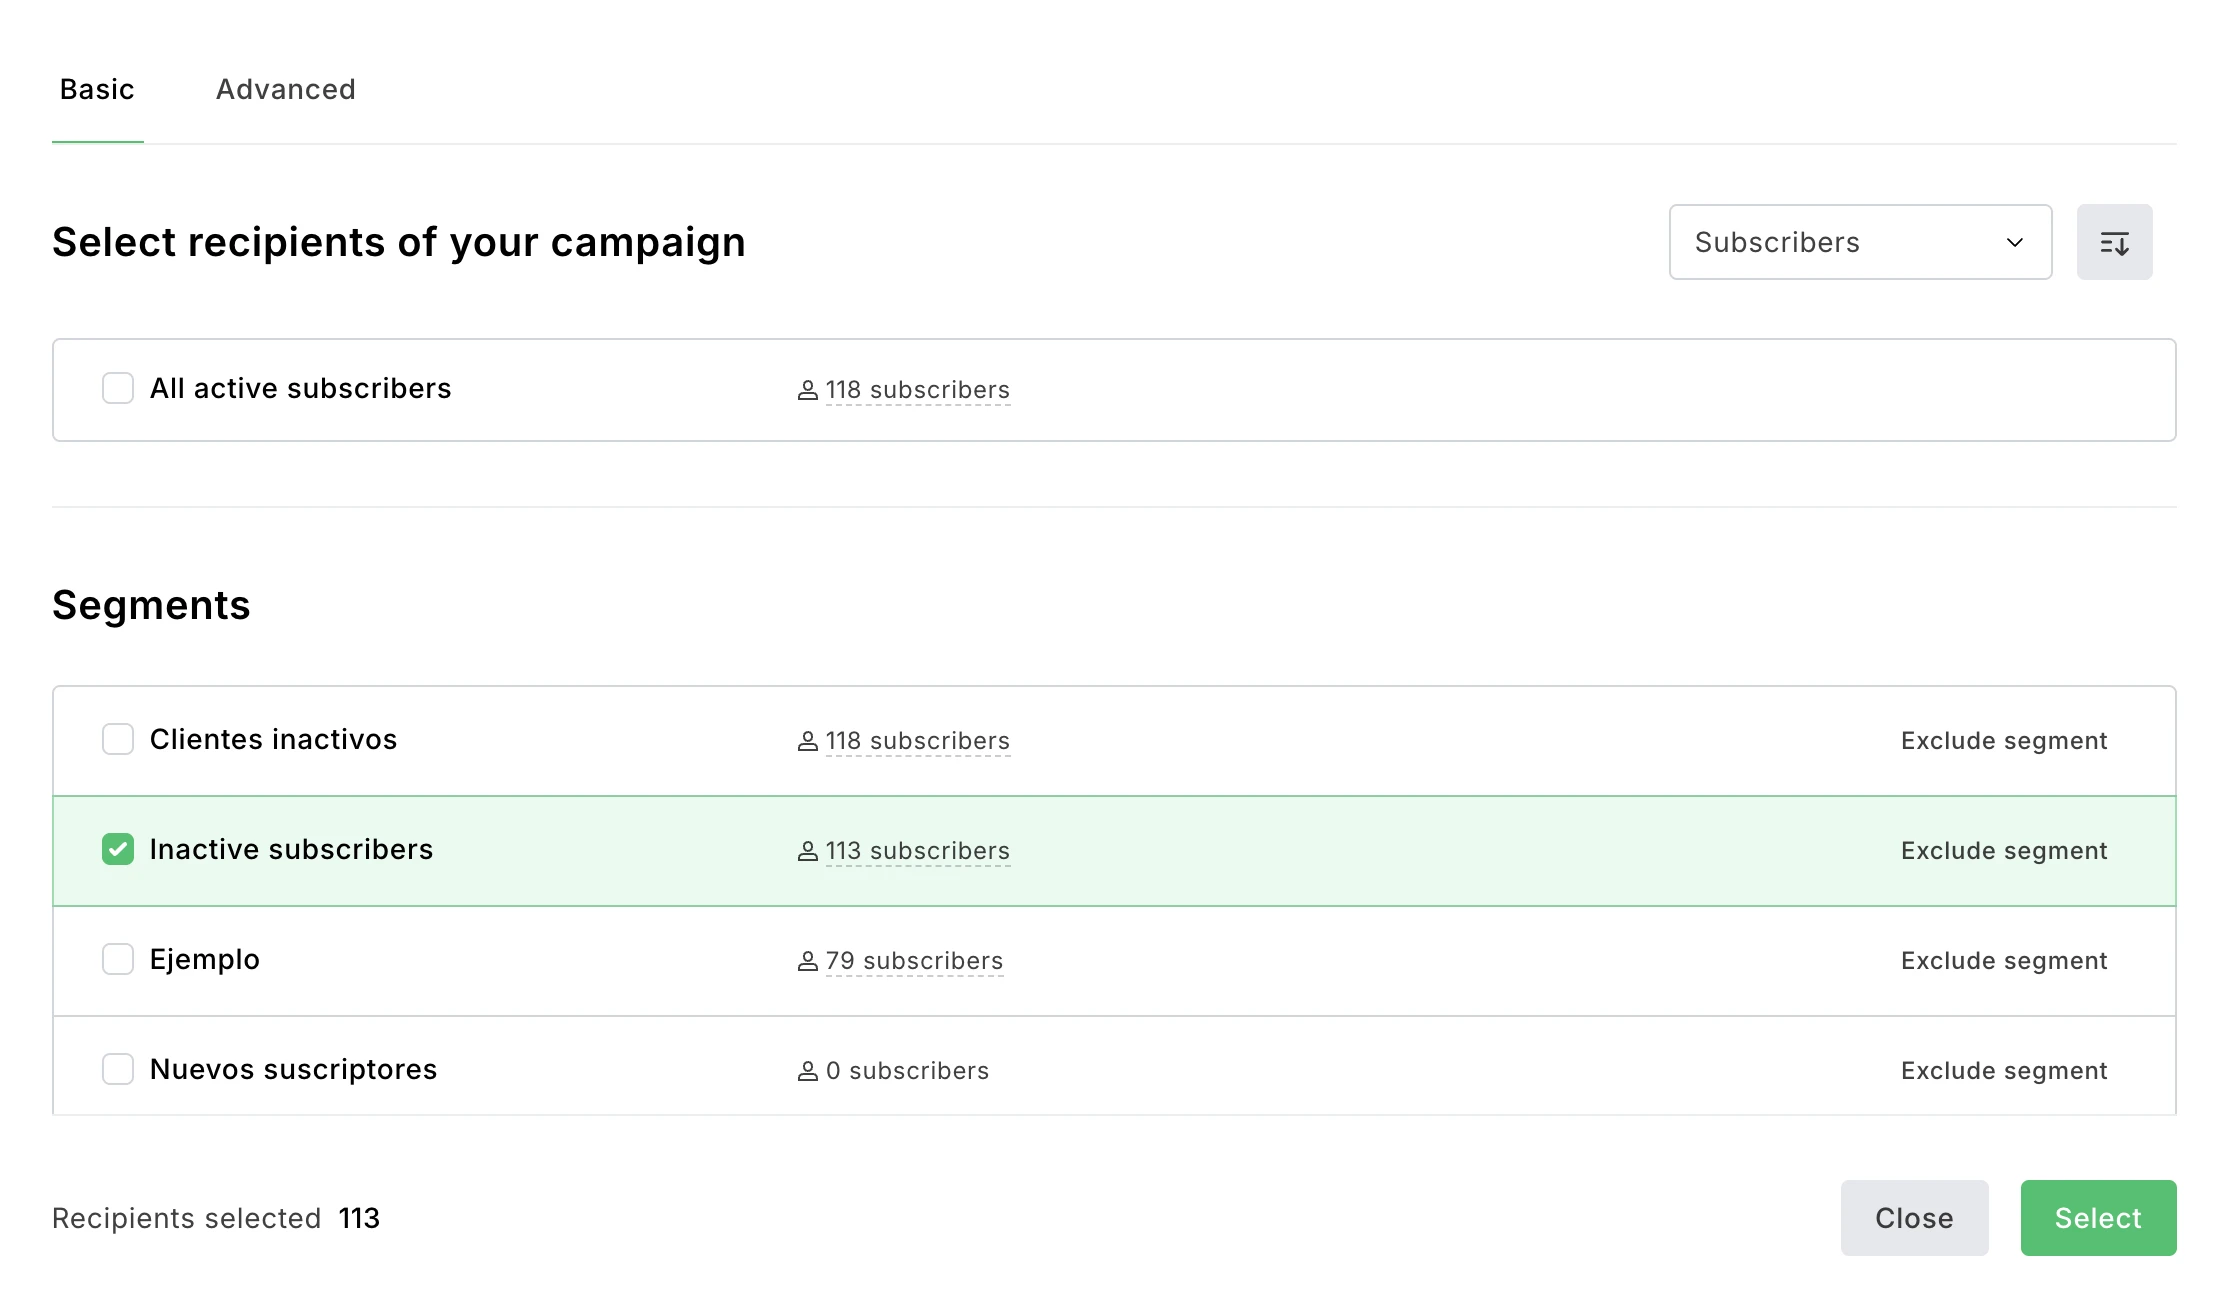
Not only can you select groups to include in this campaign, you can also select groups to exclude. If there is a specific group you don’t want to receive your campaign, you can simply select the Exclude group option. If a subscriber is both a member of an included group and an excluded group, they will be excluded from the campaign’s recipients.
2. Use groups to trigger an automation
One of the most popular triggers for an email marketing automation in MailerLite is “Joins group(s)”. If you select a group as the trigger for your automation, each member of the group will travel through your workflow as soon as they’re assigned a new tag, adding them to that group.
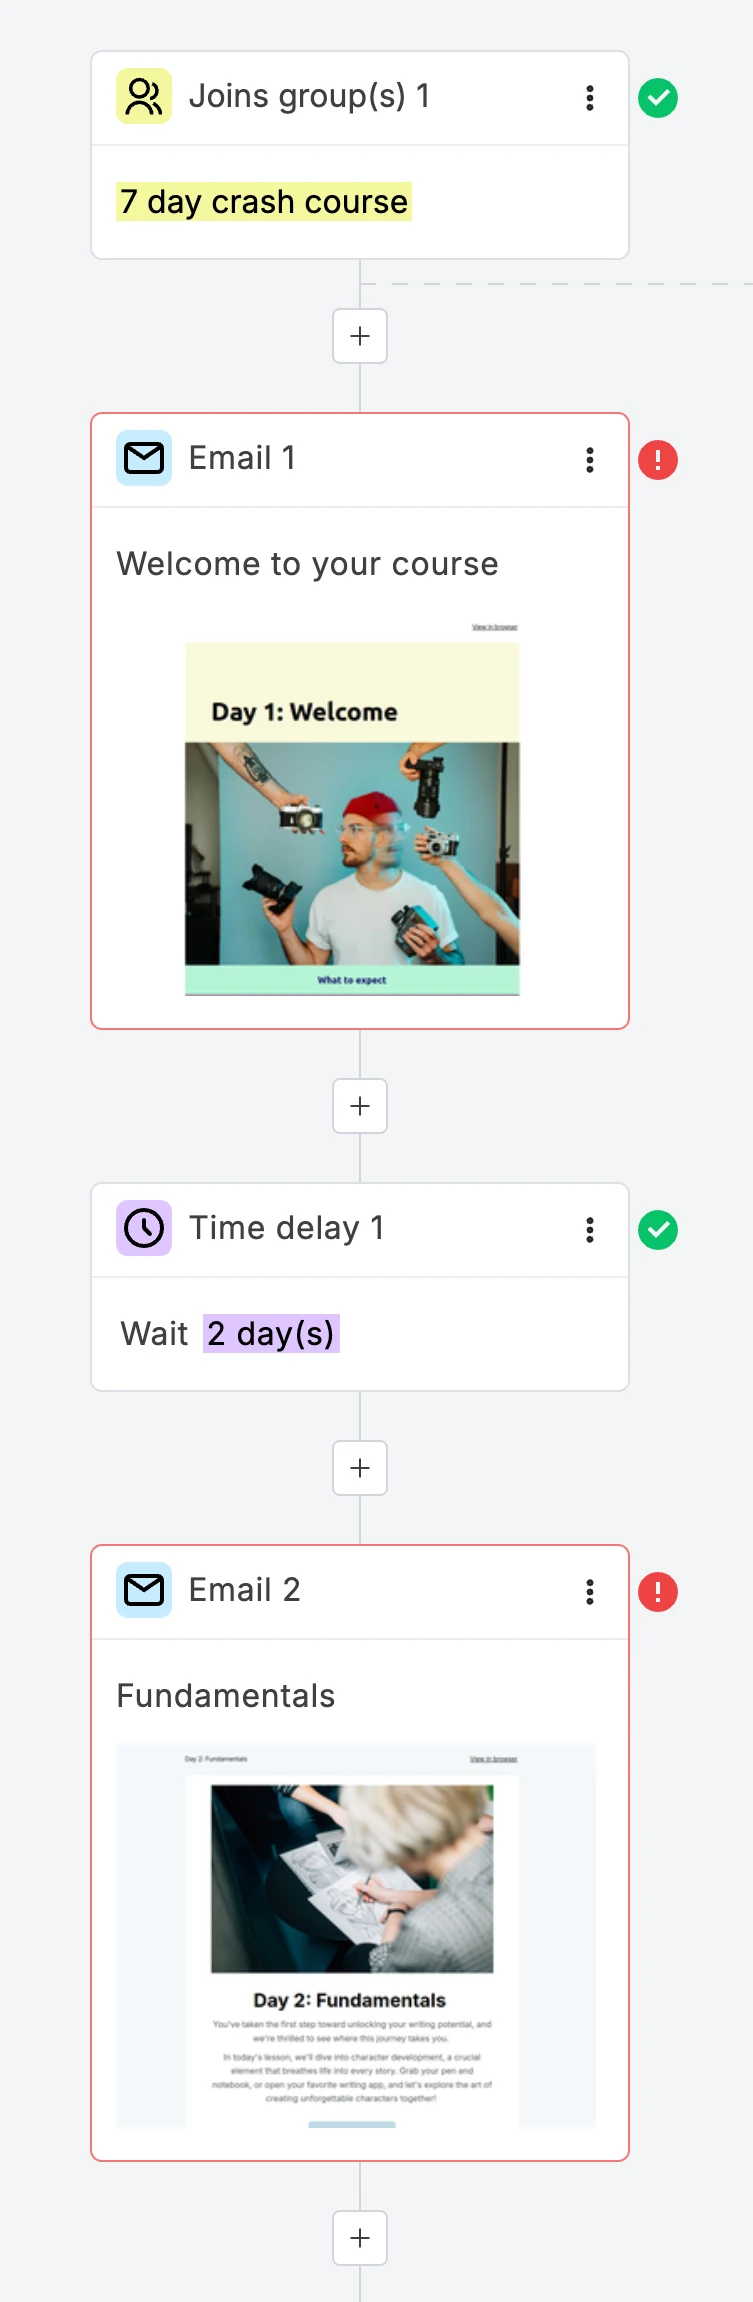
You can even opt to have your subscribers repeat the workflow every time a subscriber rejoins the same group.
For an in-depth look at automation triggers, check out this article on what automation triggers are and how to use them.
Manage your email groups using the group filter
Let's talk subscriber list management. Group filters can help you manage, sort and find your subscribers with ease.
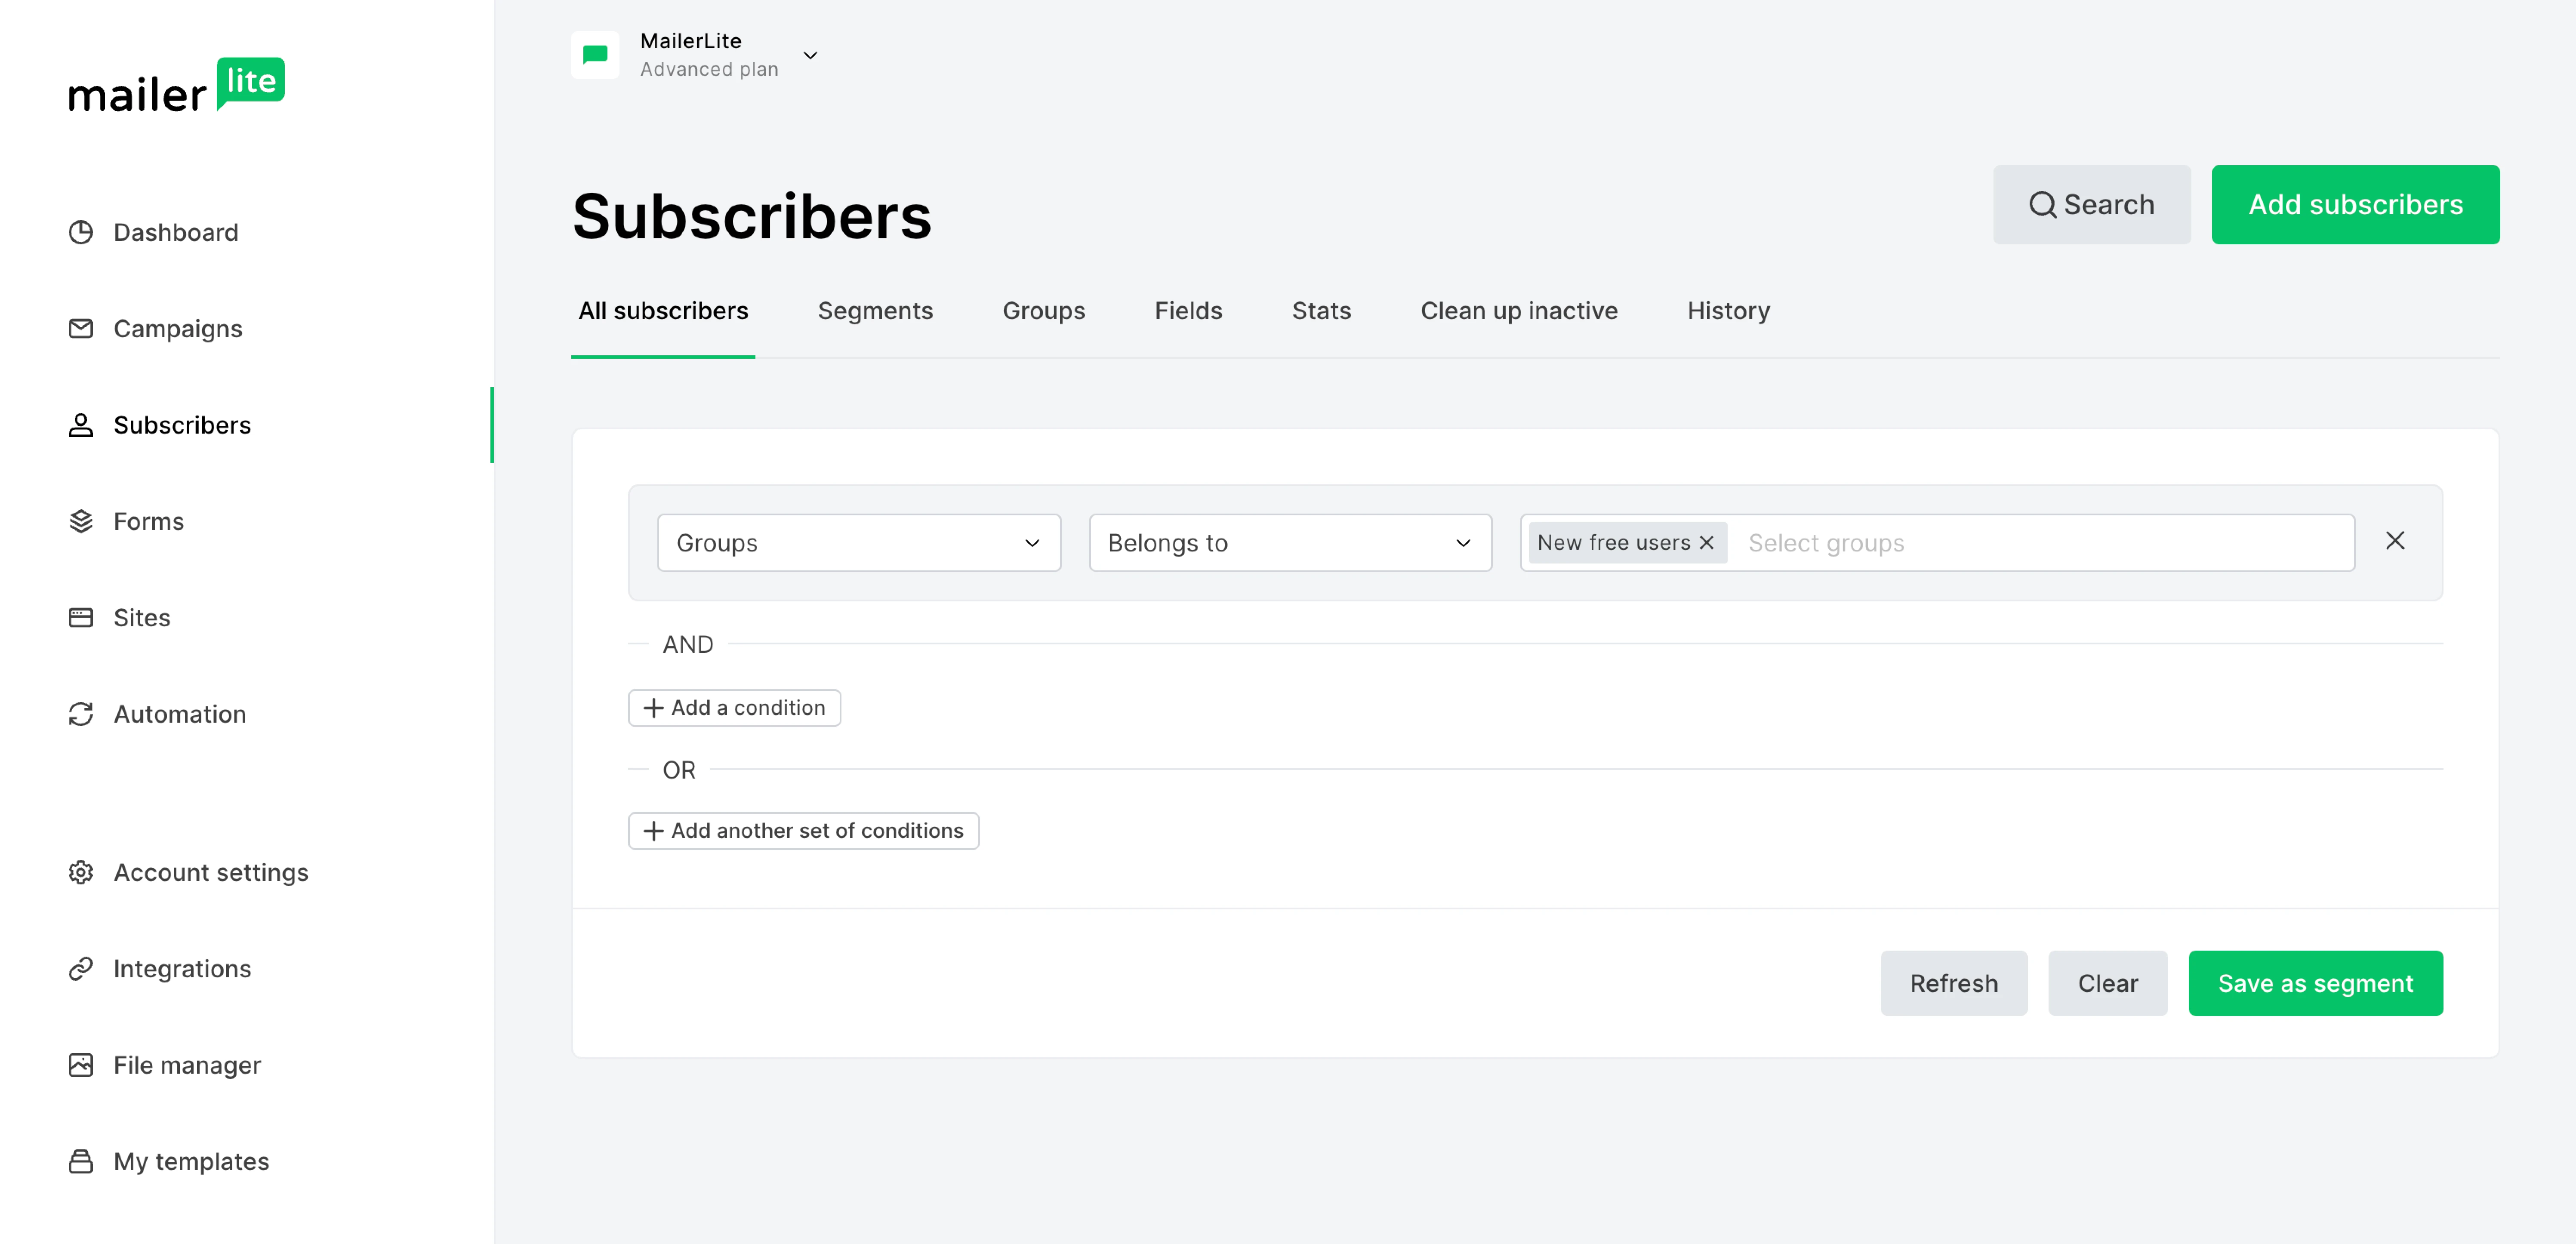
When searching through your subscribers, you can add filter conditions of groups based on:
Belongs to
Does not belong to
Belongs to any
Does not belong to any
No groups
By filtering by groups, you can see how they are performing and determine if you need to revise or add new groups.
Within MailerLite’s subscriber management interface, you can filter beyond groups, such as:
Fields: Email, name and all other custom fields (equals, does not equal, contains, does not contain, is set, is not set)
Signup source (is, is not)
Signup date (is before, is after)
Time zone (is, is not)
Campaigns (was sent, was not sent, was opened, was not opened, was clicked, was not clicked)
Automation workflows (active in, not active in, has completed, has not completed)
Email inactivity (have not opened or clicked any of their last X emails)
Email actions (have/have not opened and/or clicked an email in the last X days + have sent/not sent emails in the last x days)
Then, with one click, you can save your filter conditions as a segment and use it for future campaigns.
Best practices for email tagging and management
To make sure your tagging system stays organized and effective as your list grows, it’s important to have a management plan in place. Here are a few expert tips to help you maintain a high-performing subscriber list.
Test to check for tagging accuracy
Before going live, verify that your naming conventions and automated triggers work exactly as planned by running an end-to-end audit. Use a test record to sign up through your forms and confirm that the correct "Prefix: Category" tags appear on the subscriber profile without creating duplicates or "ghost" tags.
To streamline this, use the "+1 email trick": most providers like Gmail or Outlook support "plus addressing," meaning you can sign up as name+test1@example.com. MailerLite will recognize these as brand-new subscribers, allowing you to see exactly how tags are applied and how automations trigger, while all the test emails still land in your primary inbox.
Keep your tags clean
As you evolve your marketing strategy, some tags will naturally become obsolete. Leaving these "ghost tags" in your system makes it harder to find the data you actually need.
Make it a habit to perform a "tag audit" every few months. Review your list of groups and delete those that are no longer tied to active automations or current campaigns. Don't worry—deleting a group in MailerLite doesn't delete the subscribers; it just removes that specific label from their profiles.
Manage and review your tags using filters
Group filters are the best way to manage, sort, and find your subscribers with ease. Within MailerLite’s subscriber management interface, you can use filters to see exactly how your groups are performing.
When searching through your subscribers, you can add filter conditions for groups based on:
Belongs to: Finds subscribers who have every one of the tags you select
Belongs to any: Finds subscribers who have at least one of the tags you select
Does not belong to any: Use this to exclude specific segments from your search. For example, if you have groups A, B, and C, selecting "Does not belong to any: A, B" will filter your list to show only subscribers who are not members of either group
No groups: Finds people who haven’t been categorized yet and have no tags at all
By filtering by groups regularly, you can determine if you need to revise your strategy, merge similar groups, or add new tags to better serve your audience.
What are you waiting for?
Categorizing subscribers into groups is a great way to start managing and improving your subscriber relationships. Go beyond broad email targeting and personalize your email marketing campaigns.
Use tags to highlight anything you think will make that deeper connection. Start slow by creating some standard groups, and gradually build your group structure in a way that makes sense for your business.
Frequently asked questions (FAQs)
To wrap things up, here are some of the most common questions we hear about how to use email tagging effectively.
Q: Why should I bother with tagging or segmenting at all?
A: It’s easy to feel like sending one big email to everyone is the most efficient way to work. However, your subscribers are dynamic people with different habits. When you don't tag or segment, you risk sending irrelevant content, which leads to higher unsubscribe rates. Tagging allows you to provide value to the individual, which builds a much deeper connection (and a much more profitable email list) over time.
Q: What is the +1 email trick?
A: The +1 email trick (also known as "plus addressing") allows you to create unique aliases of your email address by adding a plus sign and a keyword before the @ symbol (e.g., yourname+testing@gmail.com). This is incredibly useful for testing your signup forms and automations, as MailerLite treats each alias as a new subscriber while the emails still arrive in your main inbox.
Q: Is there a way to automate the tagging process?
A: Absolutely—in fact, automation is the best way to use tags! In MailerLite, you can automate tagging through link triggers (tagging someone when they click a link), form settings (tagging someone when they sign up), and e-commerce integrations (tagging someone after a purchase). You can also use automation workflows to automatically add or remove subscribers from groups based on their behavior.
Q: What are the benefits of using email tagging for organization?
A: Tagging helps you move away from "one-size-fits-all" marketing. By organizing your list with tags, you can:
1. Increase relevance: Send content that matches specific interests or behaviors
2. Improve deliverability: Targeted emails get higher engagement, which signals to email providers that you are a quality sender
3. Simplify management: Easily find and sort specific types of subscribers without building complex, permanent rules
4. Personalize at scale: Reach thousands of people with a message that feels like it was written just for them
Q: What should happen if someone signs up for a webinar?
A: When someone signs up for a webinar, they should be automatically assigned a specific group tag for that event. This tag serves as a trigger to enter them into a specialized automation workflow. From there, you can send automated confirmation emails, event reminders, and post-webinar follow-ups with the recording or a special offer. Using a tag ensures that even months later, you can easily identify and reach out to everyone who showed interest in that specific topic.