How to make a booking website and go live today
 Franco, QA analyst
So you’ve got a new service, and you want to create a website to promote it? We’ve got good news! Creating a website doesn’t have to be a complex, expensive process.
With the method outlined in this article, you can create a website to promote your bookings in a single afternoon. And once your booking website is live, the real magic starts.
You’ll be able to accept bookings automatically so people can choose their time, pay for their appointment, and receive all the relevant information they need without any input from you.
Sounds good? Then read on to find out how!
Who is this booking website guide for?
This guide is for any new or existing business that wants to build a website to let people make free or paid 1:1 or group bookings.
This could be:
Coaches
Consultants
Online tutors
Freelancers
Agencies
It will show you how to set up your website, as well as put a system in place to automate the booking process. We’ll also include some tips at the end for actually promoting your website to get more bookings.
How to make a booking website for your business
To create a booking website, we recommend selecting a platform that combines a website builder with a built-in booking system.
Then, create a booking product by setting your services and availability, enabling online payments, and configuring automated confirmation emails. Finally, create a simple one-page website so you can go live quickly. You can then build out more pages later.
By following these steps, we think you could be up and running in just an afternoon.
1. Choose your platforms
You need 2 tools to offer bookings from a website:
A website builder: This is where you design, publish and host your website. Examples of website builders include MailerLite, Squarespace, and Webflow.
A bookings tool: This is where you create, schedule and manage your bookings. Examples include MailerLite, Calendly and TidyCal
We’re showing you how to build your booking website with MailerLite, since our platform offers websites and bookings together.
Having both these tools in a single platform allows you to manage your whole business without juggling multiple tools, saving you time and money.
With MailerLite, you can create and publish your website and create a single booking option for free. When it’s time to upgrade to your own domain or multiple products, you can do so for just $12 per month. Plus, you get top-tier email marketing features to promote your service.
If you choose other platforms for your website and bookings platform, all the steps below will still apply.
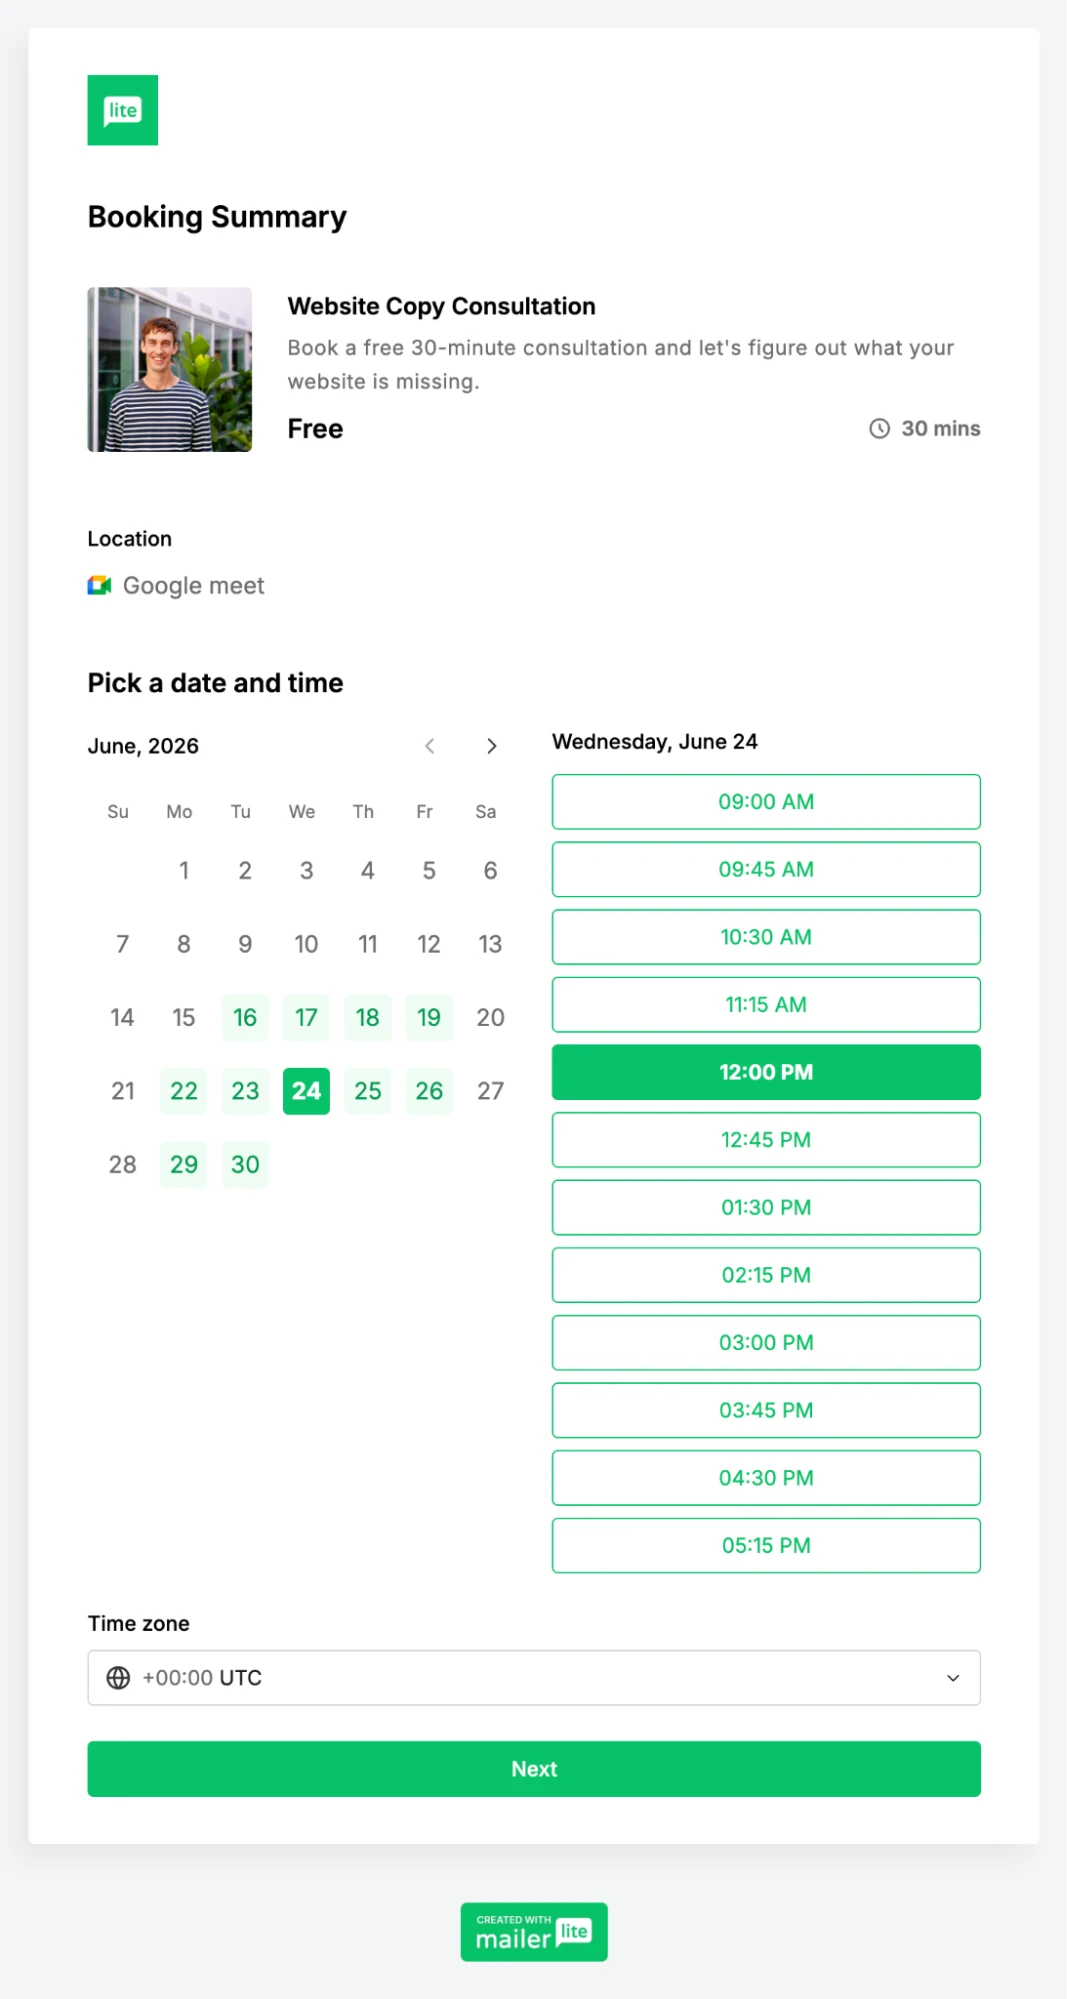
2. Creating your booking product
Once you have your platforms, you need to create a booking product to add to your website.
This will allow people to book time with you independently by following the steps on your booking page. Since you won’t need to do anything, people can schedule appointments even when you’re not around.
And don't worry, you won't miss any bookings. All the key details will be synced with your calendar, and both you and the person making the booking will receive emails with all the key details.
MailerLite offers all you need to create free and paid 1:1 or group bookings.
Connect your calendar to automatically book space
Define your schedule and set buffer times
Take payments with 0% MailerLite commission
Create 1 booking for free, or unlimited bookings with a paid plan
Find out more about our appointment bookings feature here.
Simply head to the Products section of your MailerLite dashboard and then choose to create a booking.
From here, you can fill out all the details, such as:
The name of the booking
How long the appointment will last
The price (or make it free)
What to do with a subscriber when they create a booking
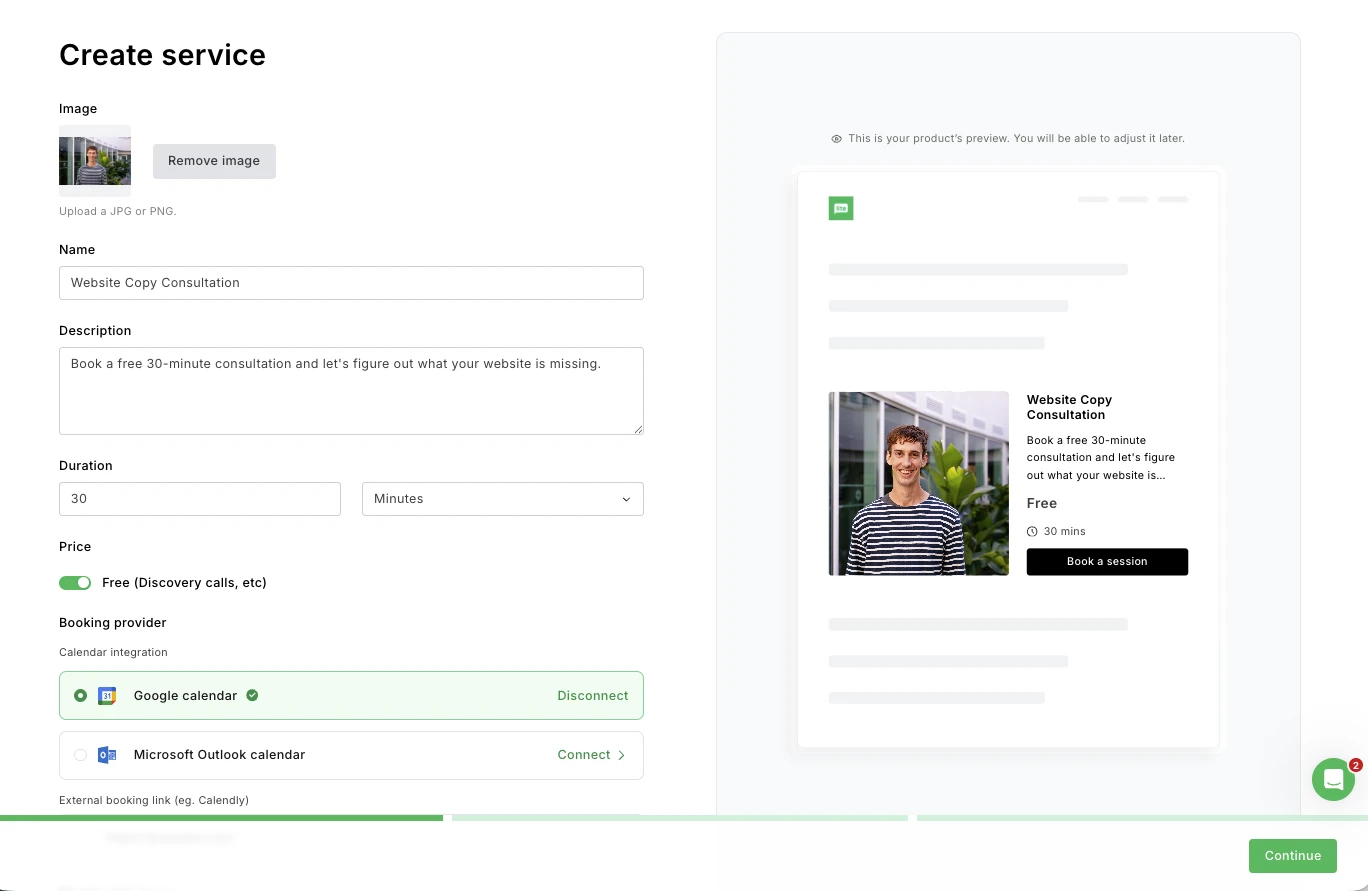
You can then connect either Google Calendar or Outlook Calendar to have your bookings automatically reflected in your calendar. At this point, you can also set your availability, add a buffer time between meetings, and define how far in advance someone can book.

Finally, edit the checkout page, including the colors and any additional information you want to collect alongside the email address, such as the person’s name or industry.
When someone creates a booking, both you and the recipient will automatically get a confirmation via email, and the booking will appear in the bookings section of your dashboard.
If you offer more than one service, it’s easy to create multiple bookings for every use case. Our Comfort plan lets you create up to 5 bookings, or you can join our Power plan for unlimited bookings. Click here to find out more about each plan.
3. Decide which website pages you need
Before you start the website design process, think about the pages you’ll need to include on your website.
We recommend keeping it simple. The easiest way to start is to create a single home page that introduces your business and directs people to sign up for your service.
Include all the relevant information on this page and don’t get slowed down by feeling like you need to create a more complex website. Plus, one-page websites are extremely easy for visitors to navigate since they don’t have to look far to find the information they need.
Once your one-page website is live and you’ve started collecting bookings, you can add other pages later, such as contact details, about info, pages for other products or services, and even a blog, if you feel like you need it.
You should add a privacy policy to your website, even if you create a one-page website. This is essential since when people book with you, you collect data about them, including their email address. Use a tool like Termly’s free privacy policy generator to create one for your website and publish it on a dedicated page, which you link to from your footer.
4. Decide on your brand styles
Deciding on your brand styles before creating your website ensures you end up with a coherent brand identity.
If you already have a brand kit, you can just use your existing styles. If your website is for a new business, or if you haven’t thought about your brand identity before, now’s the time to make some simple decisions that can make a big difference to the look and feel of your brand.
Here are some factors to consider:
Title font: Choose a font that reflects your brand's personality. Use bold and modern for a tech feel, elegant serifs for a premium look, or friendly rounded fonts for an approachable tone
Paragraph font: Opt for a highly readable font at smaller sizes. It should complement your title font without competing with it. A clean sans-serif like Inter or Lato works well in most cases
Background color: This sets the overall mood of your site. Light backgrounds feel open and professional; dark backgrounds can feel premium or dramatic. You can alternate between complementary background colors to break up a longer page
Text color: This should contrast strongly with your background for readability. Use black or dark grey for light backgrounds, and white or off-white colors for dark backgrounds
Highlight color: Your brand's accent color, used for buttons, links, and calls to action. Pick something that pops against your background and text colors without clashing
Getting these down in advance will make it much easier when it comes to actually creating your website.
Use a tool like Coolors to browse color palettes or a tool like FontJoy for typography pairs. If you just want to choose a style as quickly as possible, ask an AI tool like ChatGPT or Claude to come up with suggestions for you.
5. Write your website copy
Plan your website copy so you know what kinds of content to include in your page before building the site.
For a simple booking website, you don't need a lot of content. Focus on clearly communicating what you offer, who it's for, and why someone should book with you. Take a look at other businesses with a similar offering to see the kind of content they include.
Here are some ideas for what to prepare:
Headline: The first thing visitors see. Make it specific to your service and audience. "1:1 coaching for new freelancers" is more compelling than "Welcome to my website."
Subheading: Include a sentence or two that expands on the headline and reinforces why someone should keep reading or take action
About or intro section: A short paragraph about who you are and why you're the right person to help. Keep it focused on what's relevant to the person booking
Service description: Describe what the booking involves. For example, what happens during the session, how long it is, what someone will get out of it, and how much it costs
Social proof: Add a testimonial or two from past clients. Even a single strong quote can meaningfully increase the number of people who go ahead and book
Call to action: Use text that tells the visitor what happens when they click the button. "Book a free call" or "Schedule your session" is clearer and more motivating than a generic "Click here."
Once you’ve written all the copy, read through the page to ensure that you have mentioned all the key details that potential clients need to know.
If you’re not sure what to include in your landing page copy, consider asking an AI tool like ChatGPT or Claude for help. Just tell it information about your service and business, and it will suggest copy and a structure that you can use or edit on your page.
6. Design your website
Once you have your brand styles and website copy, designing your website becomes much easier. Simply head to the Sites section of the MailerLite dashboard and then choose the option to create a website.
When you start, you’ll get the option to start from a template or a blank slate. Choosing a template (see your website template options here) is useful since it comes with pre-built pages and styles. Even with a template, you can still add, edit, and remove any of the content on the website.
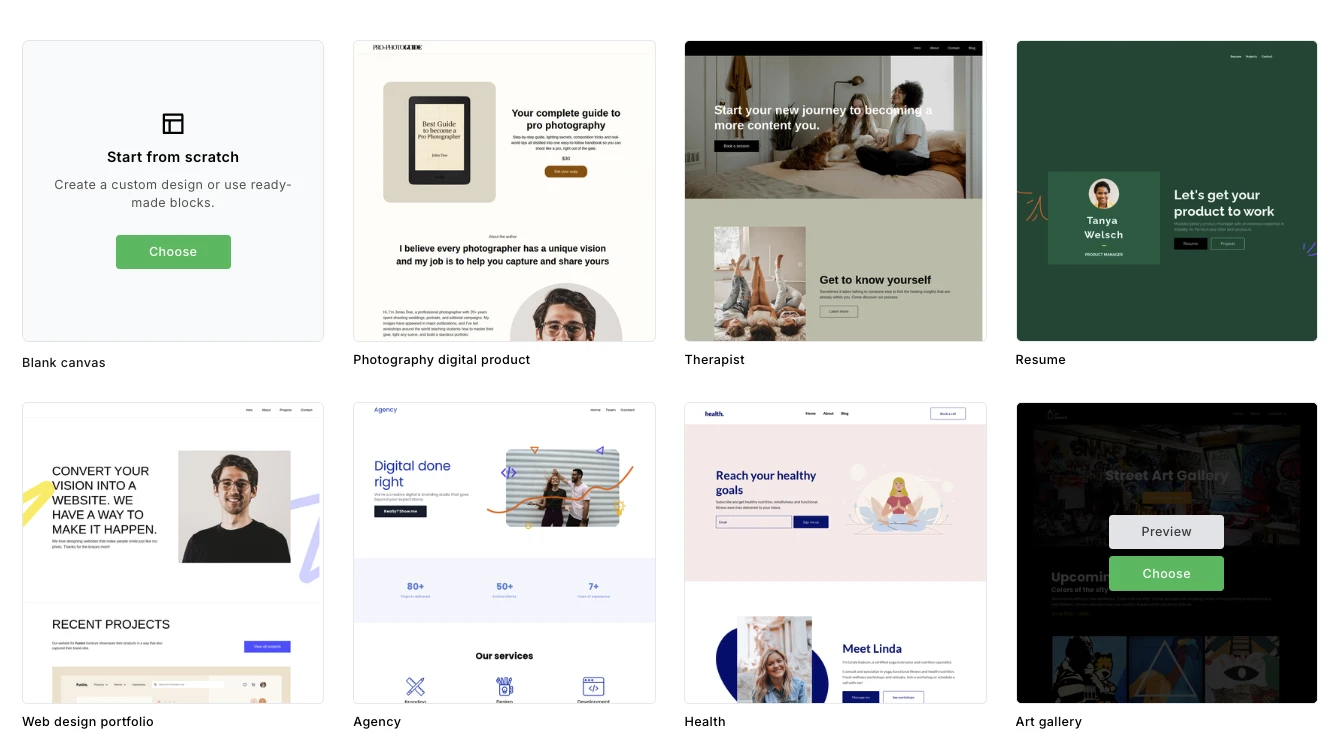
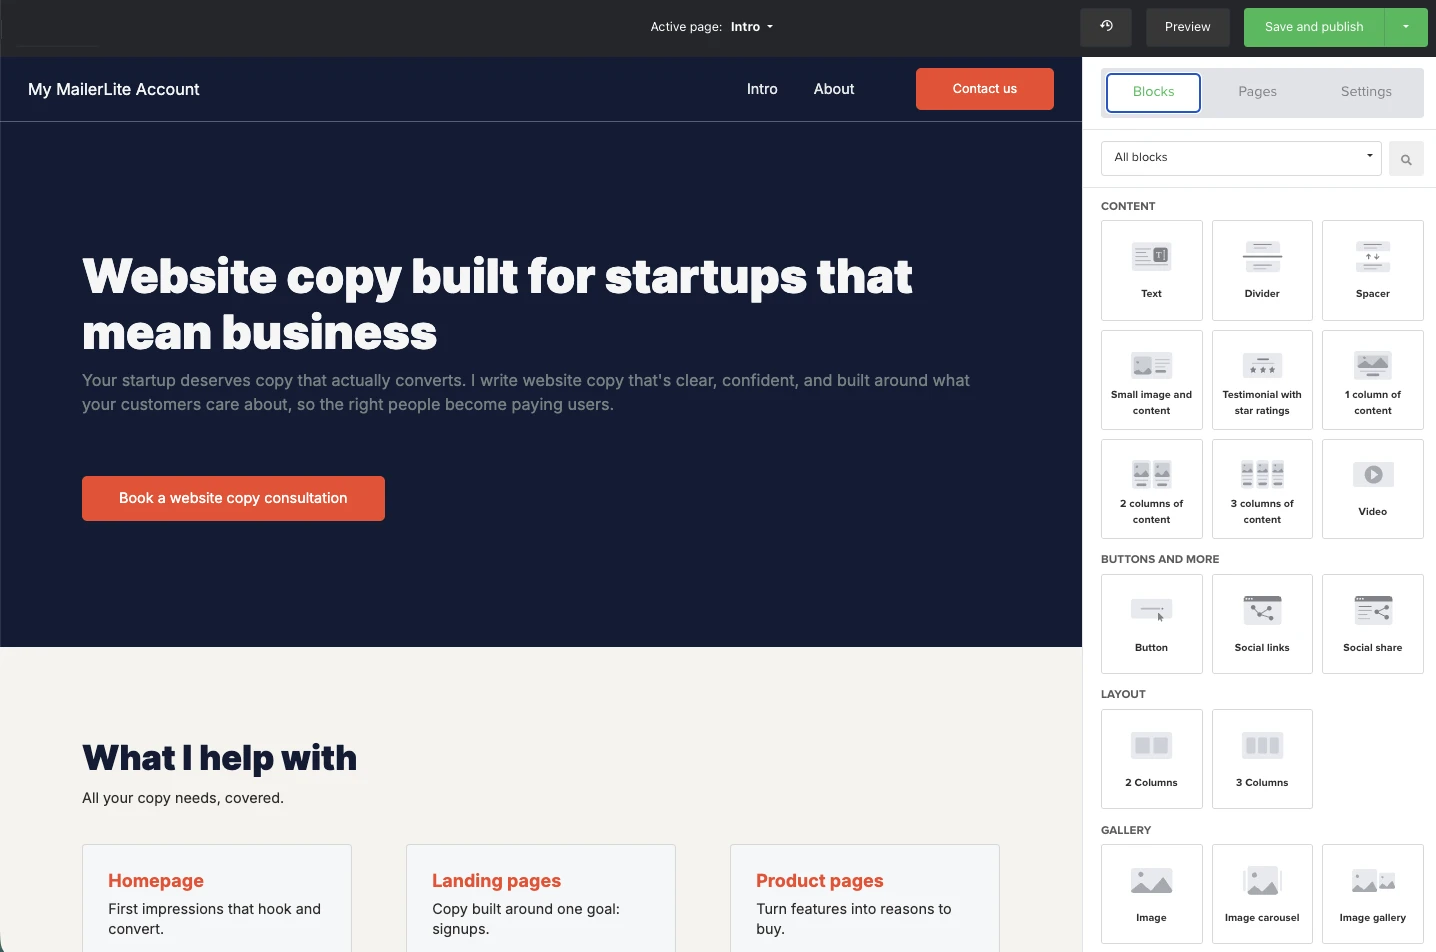
Starting from scratch is also easy enough, since the builder is packed with prebuilt blocks. You just need to choose one from the sidebar and then drag it onto the page.
You can then use the options in the sidebar to adjust what content is shown in each block, as well as change things like the colors, text, fonts, and more.
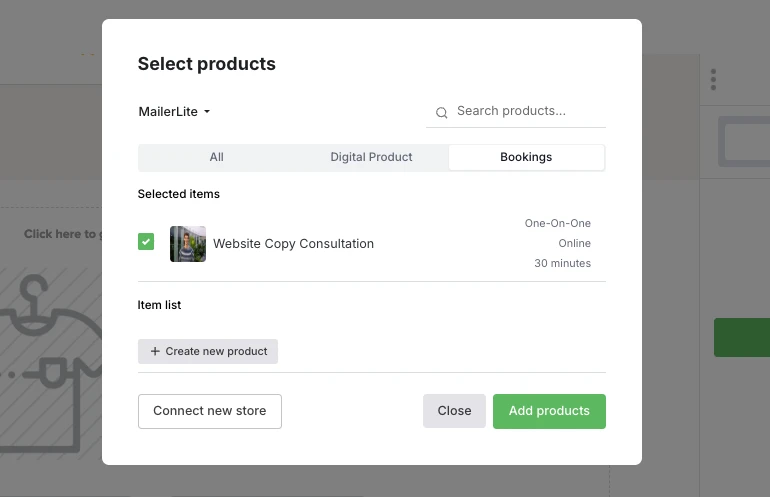
7. Add your booking to your website
The next step is to add the booking you created in step one to your website. MailerLite has a Product block that you can simply drag and drop into your page.
This will automatically bring in booking details to your website; when people click the button, the booking modal will open, and they can finish their booking.
If you’d like more control over the design, you can build the product promotion with MailerLite’s tools and then add a link to the booking product, using a button or any other linked item.
When people click on the button linked to your booking URL, they will be directed to the page where they can make the booking, including adding their email and choosing a time.
8. Add a website header with a button
Your main website navigation comes via your header and footer. Your footer typically contains a combination of your logo, website name, links to important pages and a CTA button.
For a simple bookings website, we recommend adding your name or logo and a CTA button linking to your booking page, and links to important pages if relevant.
Consider making the CTA button sticky, so that it stays on the page as people navigate down the website. This ensures visitors can always see the CTA.
Your header and footer will be automatically added to all website pages, so you don’t have to create them separately on each page.
Use your footer to include essential information about your business, such as your address, links to social accounts, and links to essential pages like your contact page or privacy policy.
9. Publish your website
Next, save your content and then go through the steps to publish your website. When you first publish your website, it will go live on a free MailerLite subdomain of the URL subscriberpage.io. For example [yourbusiness].subscribepage.io.
You can choose and edit the subdomain in the publishing menu in your website settings.
If you added any other pages to your site, they have the URL specified in the page’s settings in the landing page builder. For example, the page shown in the screenshot below has the URL [yourbusiness].subscribepage.io/about.

10. Buy and connect a domain
Your website can live on the MailerLite subdomain initially, but we highly recommend using your own domain to make your business feel more professional and give you more control over how it appears online.
Having your own domain will also allow you to send email newsletters and automated campaigns.
You can buy a domain cheaply and easily on services like GoDaddy or SiteGround. Just search for a domain that uses your business name.
The .com version of your domain may be unavailable. When this is the case, you can always choose an alternative domain ending such as .net, .co, or .ai. There are many, many different endings to choose from.
Next, you need to add MailerLite to the hosting records in the domain's settings. While this sounds complex, MailerLite’s automated tool adds the required records to your domain’s settings without you having to do it manually.
Once the domain is added, choose it from the website URL option in the website settings tab and then hit publish.
Our automated domain connection tool works with all the main domain registrars. See a list of popular domain services that work with MailerLite, and find out more about connecting domains with MailerLite here.
What to do once you have a booking website?
Once you follow the above steps, you’ll have a live bookings website to showcase your service. Now it’s just a case of generating traffic to your website and booking to start getting appointments.
Here are some steps you can take to start.
Add a link to your social profiles
Most social media sites, including Instagram, LinkedIn, and, in some cases, TikTok, allow you to add a link to your website. Add your booking website link to your social profile so people interested in your content can find out more about your brand.
You can also take steps to specifically create content that encourages people to visit your website. Check out our article on growing your email list on social media and beyond.
Add a link to your email signature
Consider adding a link to your booking website to your email signature. You can easily do this using the email footer settings of the email client you use. This is an especially useful strategy if you regularly use email to communicate with potential clients.
Automate a pre-appointment email
Create an email automation that is triggered when someone books an appointment. Use this to provide more information to the person about the booking so that they come prepared.
You could also add a survey that lets the person tell you more about what they want to get from the call. This would ensure that you show up fully prepared, which is useful for bookings like sales calls.
You can create an automated email in MailerLite by creating an automation, using the Buys specific product trigger, and then choosing the relevant booking. You can use this automation trigger even if the booking is free.

Once your trigger is set up, drag an email block into place and then add the content that you think will help you and your clients have a successful booking.
Start email marketing
Whenever someone books an appointment, they will provide their email address. Consider using these addresses as the base of an email list for your email marketing efforts.
Email marketing is one of the best ways to make repeat sales, so if you regularly send content to the people who have already shown an interest in your business, there’s a good chance that some of them will turn into repeat customers if you keep promoting to them.
This article has way more tips you can take to go from creating your website to actually promoting and selling your booking product.
Create your booking website today!
Sign up for MailerLite and then follow this guide to create your booking website today. You can test out the features, build your website, and even publish the site on a free MailerLite domain during your free trial. When it's time to upgrade, prices start at just $12 a month.